Showing posts with label Feminine Birthday. Show all posts

Monday, December 10, 2018

Altenew Educator Level III - One Layer Wonders

Hello!  Now that I have been certified for my Altenew Level I and II Classes, it is time to move on to Level III Classes, which means I am nearly finished.  Just a few more classes and then I will complete my final challenge and be fully certified as an Altenew Educator.

Today's project is all about One Layer Wonders which was taught by Kelly Latevola.  For my project, I chose a technique from Day 5 of class, which was to create a "quick" background using multiple stamps and minimal masking.  As you probably know by now, I'm not a lover of masks because fussing cutting is difficult for me due to having Rheumatoid Arthritis, but I liked the look and style of Kelly's project for today and I wanted to try to come as close as possible to the feel of her project.

© Kelly Latevola
It also required a lot of Copic coloring to get the feel I wanted for my card.  I love the large floral bouquets that she creates, so I took my own spin on her technique to create my card which is pretty but doesn't look the same as hers.  This is really okay.  For me, the classes I've been taking for my certification have all taught me new and different ways to look at my stamps.

Last week one day, as I was reading the Altenew Blog, I saw that there was a big sale on a few stamp sets and one of them has been on my wishlist for quite a while. Frosted Garden Bundle is a set I love, but at $72.00 regular retail price, it's not one that I would normally purchase.  When I saw it for 40% off, I knew it was now or never, so I snatched it right up.  Happily, it arrived on Saturday and when I finished watching the last two videos for this class on Sunday, I knew this would be my choice for my class project.  Even though I didn't use the dies for my card,  I will be quite happy to have them in the future.  My cards are typically pretty clean but lightly layered in style, so making a single layered panel is definitely a challenge for me.   Copic Coloring is also not one of the things that I am great at, so this was an additional challenge.  Again, because of the Rheumatoid Arthritis, I have to do my coloring in multiple sessions.  This was also my very first time using Copic Markers to completely fill in a background.  This is some scary stuff for me, due to inexperience with Copic Markers.  Kelly's card is bold and dramatic!  While mine is nice, I don't think you could call it dramatic.  I guess Dramatic is not really in my wheelhouse, but as Kelly pointed out, that's okay.  We each have our own style and that's one of the best things about this industry.

When I started working on the layout of my card, I stamped on some Neenah Solar White because I have precut panels lying on my desk.  I wish I would have used X-Press It Blending Cardstock because it takes a whole lot less ink than Neenah but once I started, I wasn't turning back.

Stamped with Fine Linen Distress Ink
Using my MISTI Creative Corners, I arranged my stamps onto my panel and then stamped them down.  At first, I thought I wanted to use Distress Inks for a no-line look, but when I stamped the first panel, I felt the ink was too dark.  So I stamped another panel using Simon Says Stamp's Barely Beige Ink.  I was planning to color in everything, so I just needed a light colored ink to act as my outline for the coloring.

Please keep in mind, that I am just a novice with Copics, but I am happy with my resulting card.  Since I give cards to my Sisters-In-Law each year during the Annual Finger Christmas Gathering, my stash is basically gone, so now it's time to replenish my supply of the cards I use most which are Thinking of You, Birthday and those that I send to let someone know I am thinking about them.  I sent a lot of heavily embellished cards for Christmas, so I wanted something that would be fairly flat for my card.  I used Ranger Liquid Pearls to add centers to my blooms.

The sentiment I used is from Altenew Build A Flower: Sakura Blossom Stamp and Die Set.  There are several very nice sentiments in that set. I double heat embossed this particular card as I didn't get a very good impression the first time around.  That's the beauty of the MISTI - saved again!  I could never match it by hand.


Thank you so much for coming by to see my project today.  I enjoy sharing my thought processes with you and hopefully, that helps you to learn that different is okay.  We each have our own sense of style and it's okay not to exactly duplicate someone else's style.  Our style is what makes the same stamp look so vastly different; that special touch that you want to use will be different from what I want to use, which is why there are so many versions of cards from the same set.  Each of us has our own thoughts and inspiration that we take away from seeing what others do.  I love how light and airy this card turned out and I hope you do too!

Thursday, June 1, 2017

The Challenge #85

Hello everyone!  Like you all, I am so happy that Lesley is back to running The Challenge Blog since having her sweet little girl! I joined The Challenge last fall as a designer but not too long after that Lesley had to take a break due to complications with her pregnancy.  Now, The Challenge is back with a new Challenge each week on Thursday Morning.  Our first challenge back is an inspiration challenge and we can't wait to see what you do with it!

I always struggle a bit with anything rainbow and this card was no exception until I found a way to make it my own.  I started with a panel of Gold and White Linen Cardstock from a Papertrey Ink assortment that I picked up in their January 2017 sale. I always try to buy a few gold and white designer papers because I can customize the white to be any color I want using a variety of methods, from ink blending to Copic Markers. Getting a perfect match is no problem at all so if I like the design, I buy it knowing I can change it to suit my needs. This is what I did here using Copic Markers in the Red Violet to Violet Shades starting with R55, R25, RV09, V05, V06 and V09. Simon Says Stamp has most, if not all, of the sketch markers available individually.  I've had most of my markers for many years but have purchased a few there to fill in my collection.  I die cut the three balloons from Papertrey Ink's Balloon Bash Dies using another small patterned white and gold paper, then colored them using RV25, RV09 and V09.  I went over all of the stripes with Wink of Stella Clear Shimmer Pen. There's a few Gold and White Papers that don't take alteration well, so I always do a little test area before I go all in on a whole sheet of paper. Most of them can be changed.

For the Balloon strings I used some gold wired cording I have leftover from Christmas.  You can also use Gold Thread and Gold Embroidery Floss. I've used both of those options previously with success.  I stamped the Altenew Label Love "Happy Birthday" sentiment 3 different ways, then heat set it to see which one I wanted to use. I used Versamark Ink with Ranger Black Sparkle Embossing Powder, Black Versafine Ink with Simon Says Stamp Clear Embossing Powder and Versamark with Fine Detail Black Embossing Powder.  In the end, I chose the one embossed with Sparkle Black.  I don't normally use any type of black embossing powder because it is hard to get cleanly embossed image, but with all the gold on this card, the Black Sparkle just looked the best. I know you can't really see the sparkle in the photo, but I promise it's there.


I die cut the rainbow panel with the WPLUS9 Gift Card Layers Die and attached it to a top folding card base made from Stamper's Select White Cardstock.  Next I adhered the balloons using some Thin 3D Foam Squares.  Pulling the strings as straight as I could get them, I put a bit of Ranger Multi Medium Matte behind the knot and stacked a few acrylic blocks on top to keep it from moving while the glue dried. The end result is a clean and simple design with a feminine feel. Please join us at The Challenge and see all of the great projects from Lesley and the Design Team.

Thursday, April 13, 2017

Papertrey Ink's April 2017 Create Along With Us


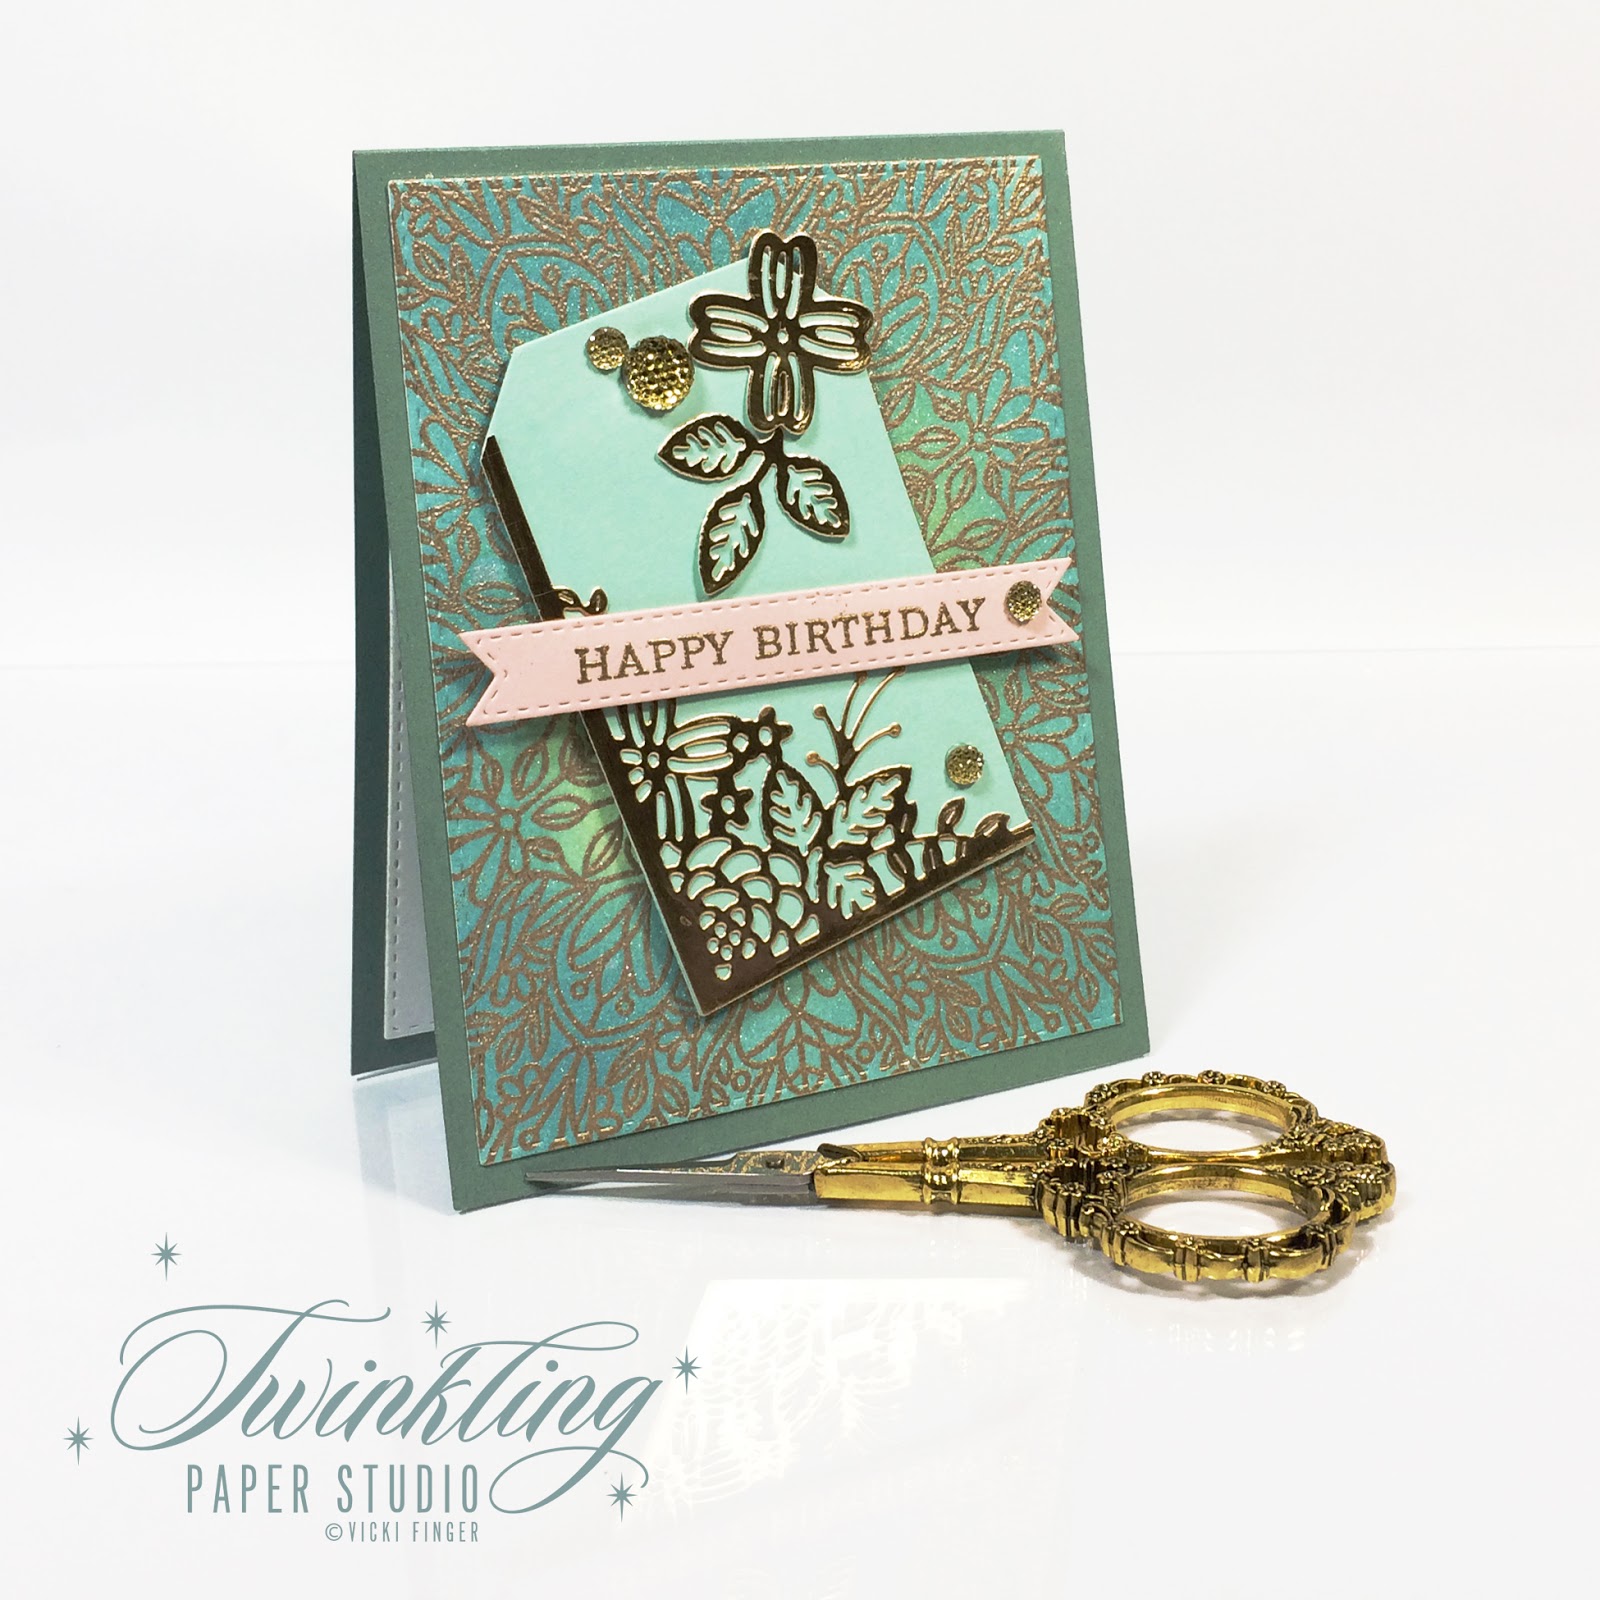
Hello everyone! Today I have a post for the Papertrey Ink Monthly Create Along With Us Challenge. There are so many projects during release time every month and my card for this Challenge is inspired by Nichole Heady!  Nichole made this gorgeous tag using this month's Mix & Mat Die Release which has an  optional lace panel this lace inset panel that you can cut. It can be cut into a card base or used in conjunction with the outer frames of the die set.  This is the 2nd in a series of "to be released" dies each month for an unspecified period of time.  I think as long as the designers have ideas it will continue. Nichole introduced this month's set on April's Release - Day 1.  You can read more about it here.  

Since the release doesn't go live until the 15th of the month at 10:00 p.m. Eastern Time, I obviously don't have that exact die yet, but it did make me look around to see what I have that I could use to mimic that feel. I don't need too many gift tags but I am wishing I would have put a messy "nest" of gold thread on my card.  By the time I thought of it, it was too late to do it without tearing up my card.  I tried lifting the banner up to tuck a bit under there, but I used foam tape so it was stuck!  I have a pretty good size zipper baggie that has all kinds of bling embellishments in it from pearls to "jewels" so I've been trying to remember to use them and I'm happy that I remembered them today.  


When I started out with a tag for today I used the same colors as Nichole did since that is part of what inspired me; Aqua Mist and White Cardstock with a touch of Sweet Blush.  But then I saw a corner of something from yesterday laying on my desk next to the tag and it all kind of just morphed from there.  I had stamped a background stamp yesterday and did some ink blending on it in Cracked Pistachio and Broken China Distress Oxide Inks but I didn't get it stamped very well so the whole center of my design didn't get the embossing powder which means I don't have a clean design on the background to use as a card front.  But after I had cut my lacey piece of Stamper's Select White from the Garden Guild Cover Plate Die (part of the Make It Market Garden Gild Kit) and used Multi Medium Matte to attach it to my tag, I set it aside to dry.  This background panel was laying there next to it.  Laying side by side, you can see that the Aqua Mist is a good match for the ink blending I had done.  Actually, there's not too many things that Aqua Mist doesn't work with.  It's not really a combination I've thought of before, but I always have extra or stray "Parts & Pieces" on my desk that I try and eventually use.  So, because it was laying there I was thinking how pretty the lacey piece would be cut from gold cardstock and from there, its easy to see what happened. I promise, I really can make a card without gold, but I simply don't want to; it's part of my signature style.  

The outline of the background stamp works well with the outline of flowers and leaves from the cover plate die.  I also cut a couple of the individual flowers and a leafy stem to go along with it on the tag. In the final project, I changed out the aqua colored brad for a larger gold bling dot.

The background panel was ink blended and spritzed with shimmer sprays in the same method as always. I used Ocean Tides for my card base which was also inspired by Nichole Heady.  The little touch of Kraft cardstock makes for a nice contrast.  I used the little strip of Sweet Blush Cardstock for my sentiment banner, just as Nichole did for her Gift Tag. Both of Nichole's projects inspired me so I tried to do a blend of both her projects into my single card.  I'm happy with my results. I think this card is beautifully understated with it's more classic color and the gold.  I find more and more that I don't care for the look of Gold Mirror Board.  It's way too much for me, but I do love using Gold Foiled Cardstock which fits perfectly with the warmer tone of the embossing powder I use most often.  I hope that my card is as classy and elegant looking as Nicole's.  The Mix & Mat: Scallops are definitely going on my wish list. It would be easy to use a different sentiment and change the card up for other occasions or any occasion as I like to call it.


Thank you so much for stopping by my blog today.  I appreciate the time you took to be here and to read through my blog post.  I also appreciate it when you take the time to comment.


ETA:  I liked this card so much that I made a second one to send to a friend.  This one has genuine Sworovski Crystals in the flower centers!  How much fun is that!?!

Friday, April 7, 2017

Simon Says Happy Birthday

This week at the Simon Says Stamp Wednesday Challenge, they are celebrating their 8th birthday as a Challenge Blog. Simon Says Stamp gets hundreds of entries to their challenges each week and they are one of the two main places that I go to for my one stop shopping. They have their own brand of exclusive stamps and dies plus inks, papers, sequins and much more. They carry a wide variety and full line of general crafting supplies including some of the most popular brands out there like Tim Holtz's Distress Line of Products which you know are some of my favorites. In fact, I can hardly wait for the next release of Distress Oxide Inks which I hope is not a whole year away.

I've mentioned in the past that when I get supplies out for Fresh Bouquet, that I stamp extras so they are ready to go when I need a quick card at the last minute. I just stamp them using color combinations that I like which is what this already stamped image is. This bouquet was stamped in Sweet Blush, Pale Peony and Berry Sorbet for the flowers with Vintage Jadeite for the leaves. The embossing is done in Simon Says Stamp Antique Gold Embossing Powder.  The Fancy Butterfly is from Impression Obsession and is my favorite of all the ones that I have. It was cut from Gold Foiled cardstock.  The banner is also cut from Stamper's Select White using the banner from Tag Sale: Quilted Dies.  The Happy Birthday Sentiment is from Botanical Blocks.  I really like the size of the sentiments in this set and they are among my most used.  This design would work for any number of occasions.

My card base was cut from Stamper's Select White Cardstock using the Noted: Scalloped A2 Die Set.  The Berry Sorbet colored panel is half of a WPLUS9 Sunshine Layers Die that has been cut to fit on the horizontal card.  I actually messed up a corner when I was die cutting the panel originally, but I saved the piece to see if I could use at least some of it later. I'm always happy when that works out, but I swear I need less paper scraps in my work area!  I used Thin 3D Foam Squares to assemble the card.


At some point every couple of months I go through the pile of scraps and eliminate pieces that I shouldn't have tried to salvage in the first place. But even after that, I still have a large amount of scraps. I use a 12 x 12 paper pocket and keep that folder right next to my desk so I can look there first when I start trying to pull colors together for a cards. I'm getting ready to play with some new dies and I'm going to start with the scraps since it is a multi layer design.  Wish me luck in using some of them up!

Thank you for stopping by today and I hope you'll come back soon.  I always appreciate it when you take time to leave me a comment or word of encouragement.

Tuesday, April 4, 2017

Papertrey Ink Make It Monday#280

This week for the Papertrey Ink Make It Monday Challenge#280, we are using a technique called Stamping Outside of the Box hosted by Lexi Daly.  You can find her video here. This is a very simple way to highlight your focal image.


My card uses Fresh Bouquet Stamps with the coordinating die and was stamped in Sweet Blush, Berry Sorbet and Vintage Jadeite for the leaves.  My card base is made from Sweet Blush Cardstock, the background panel is Pale Peony and the "box" is cut from Stamper's Select White with a bit of ink blending in Pale Peony.  I used a Simon Says Stamp Stitched Rectangle Die in the largest size and a mid sized Stitched Square Stax Die from My Favorite Things.  The greeting from Botanical Blocks was stamped onto the Banner Die from Tag Sale: Quilted using Versamark and heat embossed with Antique Gold Embossing Powder.

Whenever I get out the Fresh Bouquet stamp and die set, I always cut several and stamp them while I have the supplies out.  Since I like to heat emboss the outline part of the image before I stamp it, this takes a bit more time to do.  I just do a variety of colors that I like and that way when I need to pull a card together quickly, I have some of these ready to go.

Be sure to stop over to the Papertrey Ink Blog to see everyone's projects!  There are sure to be some fantastic cards!

Tuesday, January 3, 2017

Birthday Greetings for Anything Goes

Hello and HAPPY 2017!  My first post for the new year is a birthday card for the Anything Goes Challenge at the Simon Says Stamp Wednesday Challenge Blog.  I actually have quite a few birthdays in January and I've been wanting to use this Concord & 9th Stamp Set called "Hello Lovely".  You know how I love to watercolor and this bouquet is perfect for the technique.  Someone else has already done the work of putting the bouquet together so no masking is required and I can heat emboss the outline using Simon Says Stamp Antique Gold Metallic Embossing Powder which you also know I love.  *Ü*

I stamped 4 of this same card panel onto Canson Bristol Watercolor Paper and heat embossed them. I didn't need it this time but I often do this so I don't have to stop what I am doing to stamp another if I make a mistake. I like to watercolor on a clipboard because you have something to hold down the paper but you aren't having to tape off your project. I've also got a small cutting board with a handle that I can use, but I'm more comfortable with the clip board and they only cost 99¢ at your local dollar store. I have two of these and I use the other one for Copic Coloring.  It has a sheet protector with my Hex Chart in it to refer to if needed when I am coloring. Sandy Allnock created the Hex Chart and you can get one at her website here.  You get a colored one and an uncolored one to color in as you get Copic markers so you can see what you have and what you need.  


I've been dying to make this card using some of my purple Distress Markers.  For this card I used Wilted Violet, Seedless Preserves, and a touch of Milled Lavender along with some Picked Raspberry and Spun Sugar.  The leaves were water colored with Peeled Paint and Mowed Lawn Distress Markers.

I cut a card base from Winter Wisteria Cardstock using the Papertrey Ink Noted: Vertical A2 Scalloped Note Card Die.  I cut the painted panel with Simon Says Stamp Stitched Rectangles Die in the largest size, then realigned it to make it narrower and a better fit for the card base and attached it to the card base using my ATG Adhesive.

I didn't want to cover up the watercolor painting with a sentiment, so I die cut the Paper Clippings Birthday Details Banner from Stamper's Select Vellum and attached the Happy Birthday die cut to that.  The Happy Birthday Die is one from Penny Black and is no longer available but there are lots of others out there to choose from.  Once that was dry, I put some adhesive behind the letters on the vellum to attach it to the card front.

I hope you enjoyed my card for today.  I have a few more to make and I think I will be creating some more using this same stamp set. Please come back again.  I have another blog post going live tomorrow morning and I will be joining the Simon Says Stamp Wednesday Challenge team as the Designer in the Spotlight for January.  I am so excited and I hope you'll be sure to stop over there and see all the projects!

Saturday, September 24, 2016

The Color Throwdown #411

The Color Throwdown Challenge Blog has some gorgeous colors chosen for this weeks Challenge; Purple, Magenta, Orange & Yellow. They use generic names so everyone can work with colors they already have and not have to go out and buy anything special.  If you've been around my blog at all, then you know I love using Gold.  Two of my favorite tools in my studio are Finetec Mica Gold Watercolors and Iridescent Gold Shimmer Spritz and that is what I used for my Yellow.  The one I have is no longer being made but this Tsukineko Sheer Gold Shimmer Spritz is what I will use when mine is completely gone.  Thankfully, I have several more bottles.

To create my card, I started with a Stitched Rectangle cut from Papertrey's Fresh Snow Linen Cardstock.  This immediately gives my background some texture but I really wanted a lot of texture.  Using some color sprays made using reinkers, I misted that panel with Purple and Orange Sprays.  Once those colors were spritzed on there, I gave the whole panel a good spritzing with Iridescent Gold Shimmer Spritz then set it aside to work on my balloons.

I started with a piece of Watercolor Paper and did some very random ink blending using Distress Inks in Seedless Preserves, Picked Raspberry and Abandoned Coral. Again, I spritzed the panel with Iridescent Gold Shimmer Spritz.  Once that was dry, I used Balloon Bash Dies to cut the balloons. Using some Metallic Gold DMC Floss, I made the strings for the balloons by attaching the string on the backside using Ranger Multi Medium Matte and then reinforcing that with a foam square since I was planning to mount everything but the background with Foam Squares.


I die cut the banner from the Tag Sale: Quilted Die and mounted the Penny Black "Happy Birthday" die cut on that with Ranger Multi Medium Matte.  All my pieces were cut and ready to assemble, but I wanted a bit more interest and texture on my background panel so using the end of the sprayer nozzle from the purple color spray I made spatter by tapping a brush handle on the top part of the sprayer.  I also used my Finetec Mica Gold Watercolors in Gold Pearl to create some gold spatter as well then assembled my card onto a Blackberry Bliss A2 Top Folding Card Base.  

I wish I had been able to capture all the shimmer and shine. I did my best, but my image falls far short of the reality.  Trust me - you can definitely see it in real life. All of the supplies I used are linked unless they are no longer available. Wishing you all a happy Saturday and I hope you come back soon!  

This card will also be entered at the Sugar Pea Designs Mix It Up Challenge #16. The graphic on the left is the inspiration image for that challenge.  They have some great stamps and dies although I don't have any of them yet. Simon Says Stamp is carrying Sugar Pea Designs now so you can click the link in my sidebar if you like!  Just type Sugar Pea into the search window and you'll get a whole bunch of them.

Simon Says... Gift It!

The Simon Says Stamp Wednesday Challenge Blog has a "Gift It" theme this week.  This was great because I wanted to try out a stamp set called Gifts of the Season that was released in September at Papertrey Ink.  There is a set of Coordinating Dies as well.  While it was released with the Christmas goodies, it can also be used for birthdays depending on how you do it.

One of the really fun things about this set is that you only need two stamps to do this whole stack of presents.  I took my idea from Betsy Veldman and stamped one of my layers in Versamark and then heat set it using Simon Says Stamp Antique Gold Embossing Powder. The ink I used here is Hibiscus Burst.  I adore Pink and Gold together in just about any form I can find it in.  I have several colors and styles of this gold foiled paper by Paper Studio (Hobby Lobby's brand).  The gold foiled polka dots of this one made such a fun background for my presents.  The banner is from Paper Clippings: Happy Birthday Details Dies.  I love it and use it as often as I can. The sentiment is an older die from Penny Black.  There's no special techniqes here, I stamped and die cut the stack of presents, and die cut the other elements. I used Simon Says Stamp Stitched Rectangles Dies to cut the mat for the card and everything is assembled to a top folding A2 card base made from Stamper's Select White Cardstock.


I'm currently trying to decide whether or not to use props in my photographs. Several of my favorite bloggers do and I often like the look they've captured but I don't want the props to be more important than the card, so I am still undecided. I also don't want to spend stamp & die money buying a lot of props, so I am trying to keep it simple and affordable.  That said, I did get a few fun ones for the upcoming holiday season. Lighting gets a bit trickier with the added elements as well, so y'all will have to share your thoughts on this.  

Sunday, August 7, 2016

Simon Says: Celebrate!

The Simon Says Stamp Monday Challenge is celebrating their 6th Birthday this week so "Celebrate" is the theme for the challenge. They are also featuring their very own Simon Says Stamp branded products.  I had never heard of them until I started making cards last year about this time.  Yes, I was sort of living under a rock for a while there.... but that's a whole other story.

I could hardly wait to sit down and play with Altenew's Remember This Stamp Set when it arrived in my mail yesterday.  It was released last Friday and was designed to use with the Altenew Beautiful Day Stamp Set.  It's a great addition to Altenew's lineup.

I started with a 4.25 x 5.5 inch panel of Canson Bristol Watercolor Paper.   I started by stamping in the large outline bloom from Remember This in Versamark twice and heat embossing them with Simon Says Stamp Antique Gold Embossing Powder.  Using a post-it note for a very lazy mask (ha ha), I stamped the leaves from Beautiful Day on the same panel and heat embossed them with the same embossing powder.   On a separate piece of watercolor paper I stamped the large outline bloom from Beautiful Day Stamp Set and heat embossed it. Next, I colored the blooms and the leaves by misting my paper with water then stamping the solid surface stamp of the images in Vintage Jadeite for the leaves and Spun Sugar Distress Ink for the blooms.  All of these images are multi layering and have different levels of detail in each layer.  For the second color, I stamped one of the detail layers for each of the blooms in Lovely Lady Ink from Papertrey. By misting my paper with water before stamping it, the color softens immediately and blends into the bloom with just a touch of color on the outside for that very loose and organic feel. Once the inks were dry, I misted the panels with Tsukineko Sparkle Sheer Shimmer Spritz and let it dry.

Since I was trying to get some depth to my blooms, I die cut the largest bloom from Beautiful Day Dies and used Thin 3D Foam Squares to mount that bloom on top of the rest of the blooms and leaves in just the lower left hand corner. This was a great way to give the depth without having to fussy cut the blooms from "Remember This" since there aren't dies to coordinate with this set yet. I hope they will be coming in the very near future.


Next, I cut that entire panel with the largest of the Simon Says Stamp Stitched Rectangles Dies then cut it again just a little smaller by realigning the die cut back into the die and cutting a bit more off the top and one side.  This is my favorite trick for having just a narrow border around my focal panel. Then I cut a Stitched Rectangle of Lovely Lady Cardstock to put behind the first panel for a mat.

You can see how narrow the mat is here.  If I would have used the next size of rectangle down, I would have lost a lot more of my image.  I've been doing the re-alignment thing for several months now and it's a fantastic way to get more out of your dies.  The Simon Says Stamp Stitched Rectangles are my single most used die set in my tool box.  I use them on nearly every card I make.

To finish off my card, I stamped the Happy Birthday sentiment from the Simon Says Stamp Sketch Ranunculus Stamp Set and cut the Gold "Celebrate" using a Waffle Flower Die that can also be found at Simon Says Stamp.  I added a few sequins in pink and gold for a whimsical touch and mounted it to a top folding card base made from Stamper's Select White Cardstock.

I'll be entering this card over at the Simon Says Stamp Wednesday Challenge also for the "Fabulous Florals" theme.  Thank you so much for stopping by.  I really appreciate it.