Tuesday, July 31, 2018

Altenew Educator Clean & Simple Boutique Cards


I’m back today with a couple of cards for the Clean & Simple Boutique Cards Class at Altenew Academy. I have to tell you, this one was a bit of a struggle for me because I just don’t think much of my style is geared to Clean and Simple but I tried really hard to stay with that feel.

For my first card, I used one of the techniques that Jen showed by using specialty paper for my card. I’m pretty bad at masking so while I wanted to do another technique, I didn’t think it would turn out very well. Later on in a different course for the Altenew Educator Program there is a class on Masking so I’m saving it to try then.

Using the New Leaf Frame Cover Die, I die cut two of them from Gold Foiled Cardstock. Since the design is asymmetrical, I rotated the top one 180 degrees which gives a much fuller look that kind of makes that gold really pop.


I used an older Happy Birthday die for the sentiment and put it all on Dark Blue Cardstock. This is as simple as it gets for me but still made a very striking card.

For the second card, I had a used piece of decofoil and I wanted to be able to use the negative of that for my background. Thermoweb makes black toner sheets and so I was able to place the foil over that and it transferred it to the black paper wherever there was still gold foil on that piece. It looks so rich and elegant!


I used a favorite quote from Kind Words Stamp Set and heat embossed it with Antique Gold Embossing Powder onto black cardstock and kept the rest of the card simple. When I considered adding a few gold sequins or gems to the card, I felt it detracted from the gold foil, so I didn’t add any.

I used Dark Blue and Black for the card bases respectively. Whenever I use a dark bard base, I always cut a white interior panel to write on.

So there you have it - not one but two clean and simple boutique cards! I hope I've given you some ideas for making some of you own.

Have a great day everyone! I have a few more classes to write posts for over the next few days, so be sure to come back and see them. Thank you so much for stopping by today!

Monday, July 30, 2018

Altenew Educator - All About Layering II

Hello again!  Today's project is for the Altenew Educator Certification Program - All About Layering II.  There's quite a few of the sets that were used in this class that I don't have, but I did have a few of them. For my class project I wanted to use a set that was not featured in either of the layering classes, Build-A-Flower Rose.  This particular set has six layers for the bloom and four layers for the leaves if you use them all.  I don't always use all the layers but I did today. These are the sets that were focused on for this class. 


I have to tell you that I have a new favorite color combination in shades of blue today.  I used Ocean Waves, Aqualicious, Teal Cave, Galactic Stream, Dusk and Desert Night in that order for the blue blooms.  Half the fun of stamping is creating something in a color that might not exist in real life and I admit, that is something I really struggle with.  But I love how those blooms turned out!  I also stamped several of the leaves and a few other blooms and will put them aside for other cards.  

I'm getting ready to make a big batch of cards for someone who extended quite a kindness to me and I want to be sure to have lots of beautiful images to play with to make a set of cards for her.  It's a really big deal to me, but I can't go into any more detail for a few more weeks. Trust me, there will be pictures coming later.  I also have quite the collection of leaves as well but I haven't decided on a certain one yet for the blue blooms so I am planning to die cut a few more and play with a few more combinations of greens.  I haven't settled on one that I like yet for the blue blooms.

Anyway, my goal for today was to get a card made for this person specifically to send right away.  I used a combination of soft pinks and corals for this particular card.  The base layer is stamped in Frosty Pink, then Pink Pearl, followed by Coral Bliss, Coral Berry and Ruby Red for the last two layers.  The leaves on this card are done with Frayed Leaf, Forest Glades, Just Green and Hunter Green.


I seem to be on somewhat of a horizontal card kick lately, but I honestly just pick based on the layout of my design.  I keep pre-cut card stock for vertical and horizontal cards so I have either ready.   I just try to pick based on the designs rather than picking the card style and then doing the design.  I used a soft pink card stock to cut a background layer called a hemstitched rectangle from Spellbinders.  I like to use the various types of rectangles in my designs.  The card used a ton of foam tape as well.  I'm going to have to get more fun foam very soon because I have been using a lot of foam tape on the backs of card panels lately.


I knew that I wanted to use the Abraham Lincoln quote from Altenew's Sentiments and Quotes Stamp Set.  It is, after all, the perfect thing for this card.  I'm sending this card to an artist so I wanted it to be just right and in the end since I know that she loves sparkle and shine as much as I do, I wanted to add that touch of bling to the card.


I haven't been able to post as much because we don't have Broadband Internet but they are hopefully installing it on Wednesday and I won't be limited to a little each day. I'm not even able to do the affiliate supply links right now because it uses so much data.  So there's not picture supply list at the bottom but I have linked the Altenew products so if you click on the name it will take you to the store.  In addition to that you can always shop through my affiliate link in the right hand side bar.


I hope you enjoyed my project today and that it encourages you to try some of  the absolutely stunning layering stamps that Altenew creates.  I have several other projects to share with you from some of the other classes, but I have to have time and bandwidth to get them finished.  I have Easy Ink Blending Techniques and For the Guys coming up in the next few days.

Thank you so much for stopping by today!  I really appreciate it when you do.  Have a great day everyone!

Thursday, July 19, 2018

Altenew July 2018 Stamp/Die Release Blog Hop + Giveaway

Hello there!  I am so excited to be here as a stop along the hop with Altenew! There is a huge Blog Hop today at Altenew and I am hopping along with many ladies that I very much admire!

I'm also pleased to tell you that my second stamp set, "Kind Words" is being released today.  This was another collaboration with my friend, Tasnim Ahmed, who illustrated the set for me.  She is a really gifted artist and I am actually getting to the point where I recognize some designs as her illustrations.  I have several projects to show you today, so lets get on with the details of this release!

This set actually came about for a couple of different reasons.  The first was many of you!  When I released my first set, Wings of Hope, with Altenew in February, I was blown away by the kind and encouraging comments you left here on my blog!  It made me think of things I would want to say to all of you so the phrase "Kind words can mean so much...... ....yours will not be forgotten" is because of all of you.

The second reason is because I like to send a lot of encouragement cards.  Some of the sentiments in "Kind Words" are more that I have been wishing I had stamp sets for.  The Lorraine Mitchell quote is one that I have used and loved for many years in cards I send to my girlfriends.  I hope you'll enjoy using it as well.

My daughter is the single biggest recipient of my encouragement cards and this post is dedicated to her.  About 4 years ago, she was diagnosed with a couple of the same autoimmune diseases that I have, RA and MS.  Earlier this year, they realized they had misdiagnosed one of the illnesses and that she has a much more serious illness than what they originally thought. When doing MRI's on her joints for what they thought was RA, they realized something was not right.  Her joints should be damaged from the RA, but in her case, it was the tissue that had the damage.  So, they realized the original diagnosis was wrong and did an antibody specific blood test for Mixed Connective Tissue Disease (MCTD) which was positive. Here's a little bit from the Mayo Clinic:
  • Mixed connective tissue disease is an autoimmune disorder. In autoimmune disorders, your immune system — responsible for fighting off disease — mistakenly attacks healthy cells.
  • In connective tissue diseases, your immune system attacks the fibers (Muscles, Tendons, etc.) that provide the framework and support for your body. 
Eventually, your vital organs become involved.  Most deaths from MCTD are due to heart failure caused by Pulmonary Arterial Hypertension.  My daughter already has heart and kidney involvement.

I know what a struggle it can be just to get out of bed and be present some days.  I have several autoimmune diseases myself, so I totally get it.  As the mom to three high energy boys (which takes a lot of energy for a normal healthy mom) it's even harder when you have illnesses that completely zap your energy.  You'd be amazed at the little things that just totally wipe you out.  It's also really hard not to get discouraged, especially when the medicines you take aren't helping and sometimes have horrible side effects.  When I was having to do shots for my MS, one of the shots they had me on was WICKED!  It burned and stung and left huge 3 or 4 inch diameter knots under the skin and I'd have to stay on ice for the first 24 hours.  About the time the injection site was feeling better, it would be time to do another one.  It's a question of which is worse, the medicine or the illness and honestly, it's a toss up most of the time.  So for that reason alone, I try to keep her encouraged.  I've been there and walked in those shoes myself.  There is no medicine for MCTD.

In case you haven't noticed, there is a movement happening right now across the country for lots of folks to be kind to each other.  It's not just in the Paper-Crafting community but in lots of industries across the country.  Who can't use a little kindness or encouragement?  This stamp set was born out of that desire.

I have a Word document that I like to keep with sayings or quotes that are meaningful. I add to it when I think of something or when I come across a quote that I like.  I also have times when I want to let someone know that their kindness touched my heart.  When I think of just the right thing to say, I always keep that in my document for future reference.  Jennifer McGuire is one of those people whose kind words made a big impact in my life.  The quote by Leo F. Buscaglia in the Kind Words Stamp Set was chosen as my way to honor Jennifer and I made a card using this sentiment for today's hop along with a release from last month, Climbing Clematis. I love the large leaves in Beautiful Heart and so I chose to use those instead of the ones that came with Climbing Clematis.


My first few cards all use sentiments from the Kind Words Stamp Set.  Because there are a couple of references to stars in this set, I wanted a little starry background to be able to stamp or emboss.  Knowing my love for gold, you probably already know I did heat embossing for my stars.  For my first card I did some ink blending in the upper left hand corner using Lagoon Ink on some turquoise cardstock.  To intensify the farthest part of the galaxy, I blended some Sapphire Ink on top of that.  Then I heat embossed the stars using some gold sparkle embossing powder.  I moved my stamp and heat embossed more of the stars to cover a larger area.  This creates the illusion of a night sky, (at least to me).


Once the heat embossing was done, I hit it with some shimmer spritz for even more sparkle.  I cut the panel down to 4 x 5.25 inches and mounted it on a horizontal top folding white card base.  To make some of the stars really pop, I adhered some iridescent star confetti on top of some of the stars using Ranger Multi Medium Matte.


For the next card, I started with a panel of white cardstock and blended Lagoon on the upper left hand corner. This time I used Iridescent sparkle embossing powder to stamp the stars with some of the iridescent stars adhered on top of that as well.  I die cut both, the gold and the cardstock panels with some stitched rectangle dies because I can't seem to cut anything completely straight so that takes the guesswork out of it for me.  I have several different rectangle die sets that I use to get the look I want for the mat and the main card panel.  I used white card bases for most of my cards today.


This card uses a sentiment from Kind Words with an old favorite, Beautiful Day.  I heat embossed the bloom and leaves with Antique Gold Embossing Powder and then stamped them using my Altenew Crisp Inks.  For the bloom, I used the Pink Pearl, Coral Bliss and Heart Beat.  For the leaves I used Frayed Leaf with Forest Glades.  I added a little pearl in the center for that special touch.

Next up are a couple of cards made with a new set called Beautiful Heart.  I was so excited to get this set and use it!  For my first card, I die cut a couple of the blooms from some coral cardstock.  I stamped the layers in Coral Berry and Ruby Red, using the stamp set and then I added some additional details using markers.  The leaves are stamped in Frayed Leaf and Forest Glades.  For this set, there is an outline, a more solid image and a detailed image for each.  The small leaf image has just and outline layers and a solid layer. Since I still stamped the layers, I used that as my guidelines to add more details with markers.  I haven't ever tried this before but I was pretty tickled with my results.  Using colored cardstock for the blooms is a technique that I saw once from Emily Midget so I tucked it away and this was the perfect technique for these cards.  Emily did it because she doesn't care for the white outline you'd get from traditional stamping on white card stock so this was her solution.


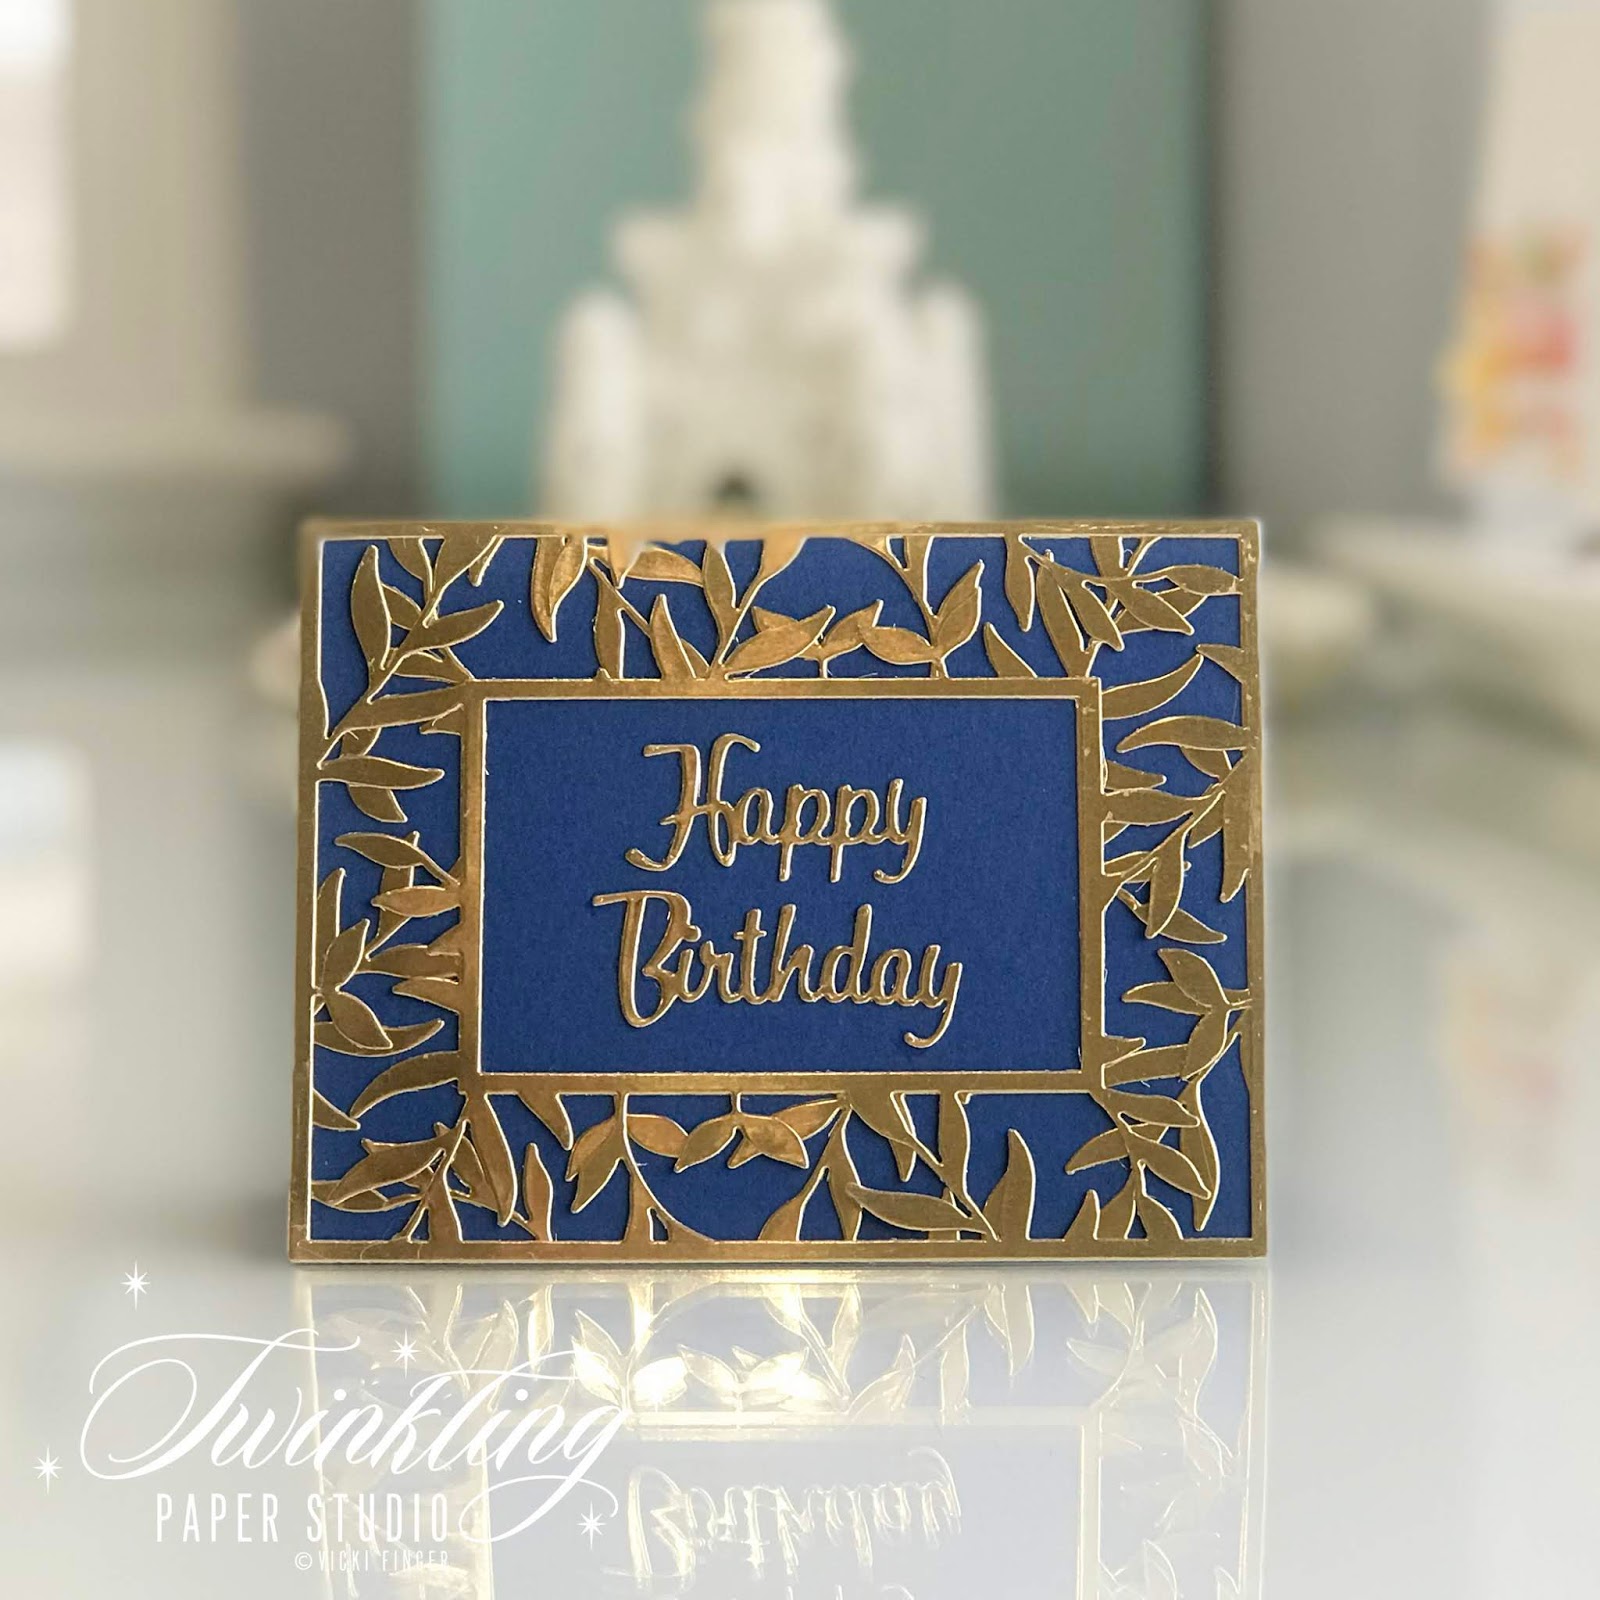
For the background of this card, I also used a frame from a new cover die from this July 2018 Release from Altenew called Leaf Frame Cover Die.  Because I wanted to pair it up with a navy card base, I thought by adding it in a lighter color, it would give a lot of texture to the background.  I also used the same cream color for the sentiment strip.  The sentiment is from Beautiful Heart and I love it.  I can think of at least a dozen people I could send it to right now.  It will be one I use often.

Normally I would cut off the overhanging bits of the leaves but when I tried to stand this card up, it actually did stand.  So I decided to leave it and I'll send it in a 5 x 7 envelope.  These leaves are especially beautiful and I'm sure I will use them for other arrangements as well.  I added little pearls to the center of the blooms.


This card also uses the Beautiful Heart Stamp and Die Bundle.  Again I used die cuts with the stamps and then added more details with markers.  For this bloom, I used Rose Quartz with Puffy Heart.  On this set I like to stamp the outline and the most solid image using the same color of ink, then the third layer with a slightly deeper shade.  As before, I used the other two layers of stamping as a guideline for my detail work with markers.  These leaves are stamped with Forest Glades and Evergreen onto white cardstock. I really like the added dimension that the darker detail layer adds.  I did not add any marker details to any of the leaves.  For the darker maroon color in the center of this bloom, I used a Burgundy gel pen.  My pens are really old and leftovers from my scrap-booking days so it took a while to get the ink flowing enough to make the small dots.

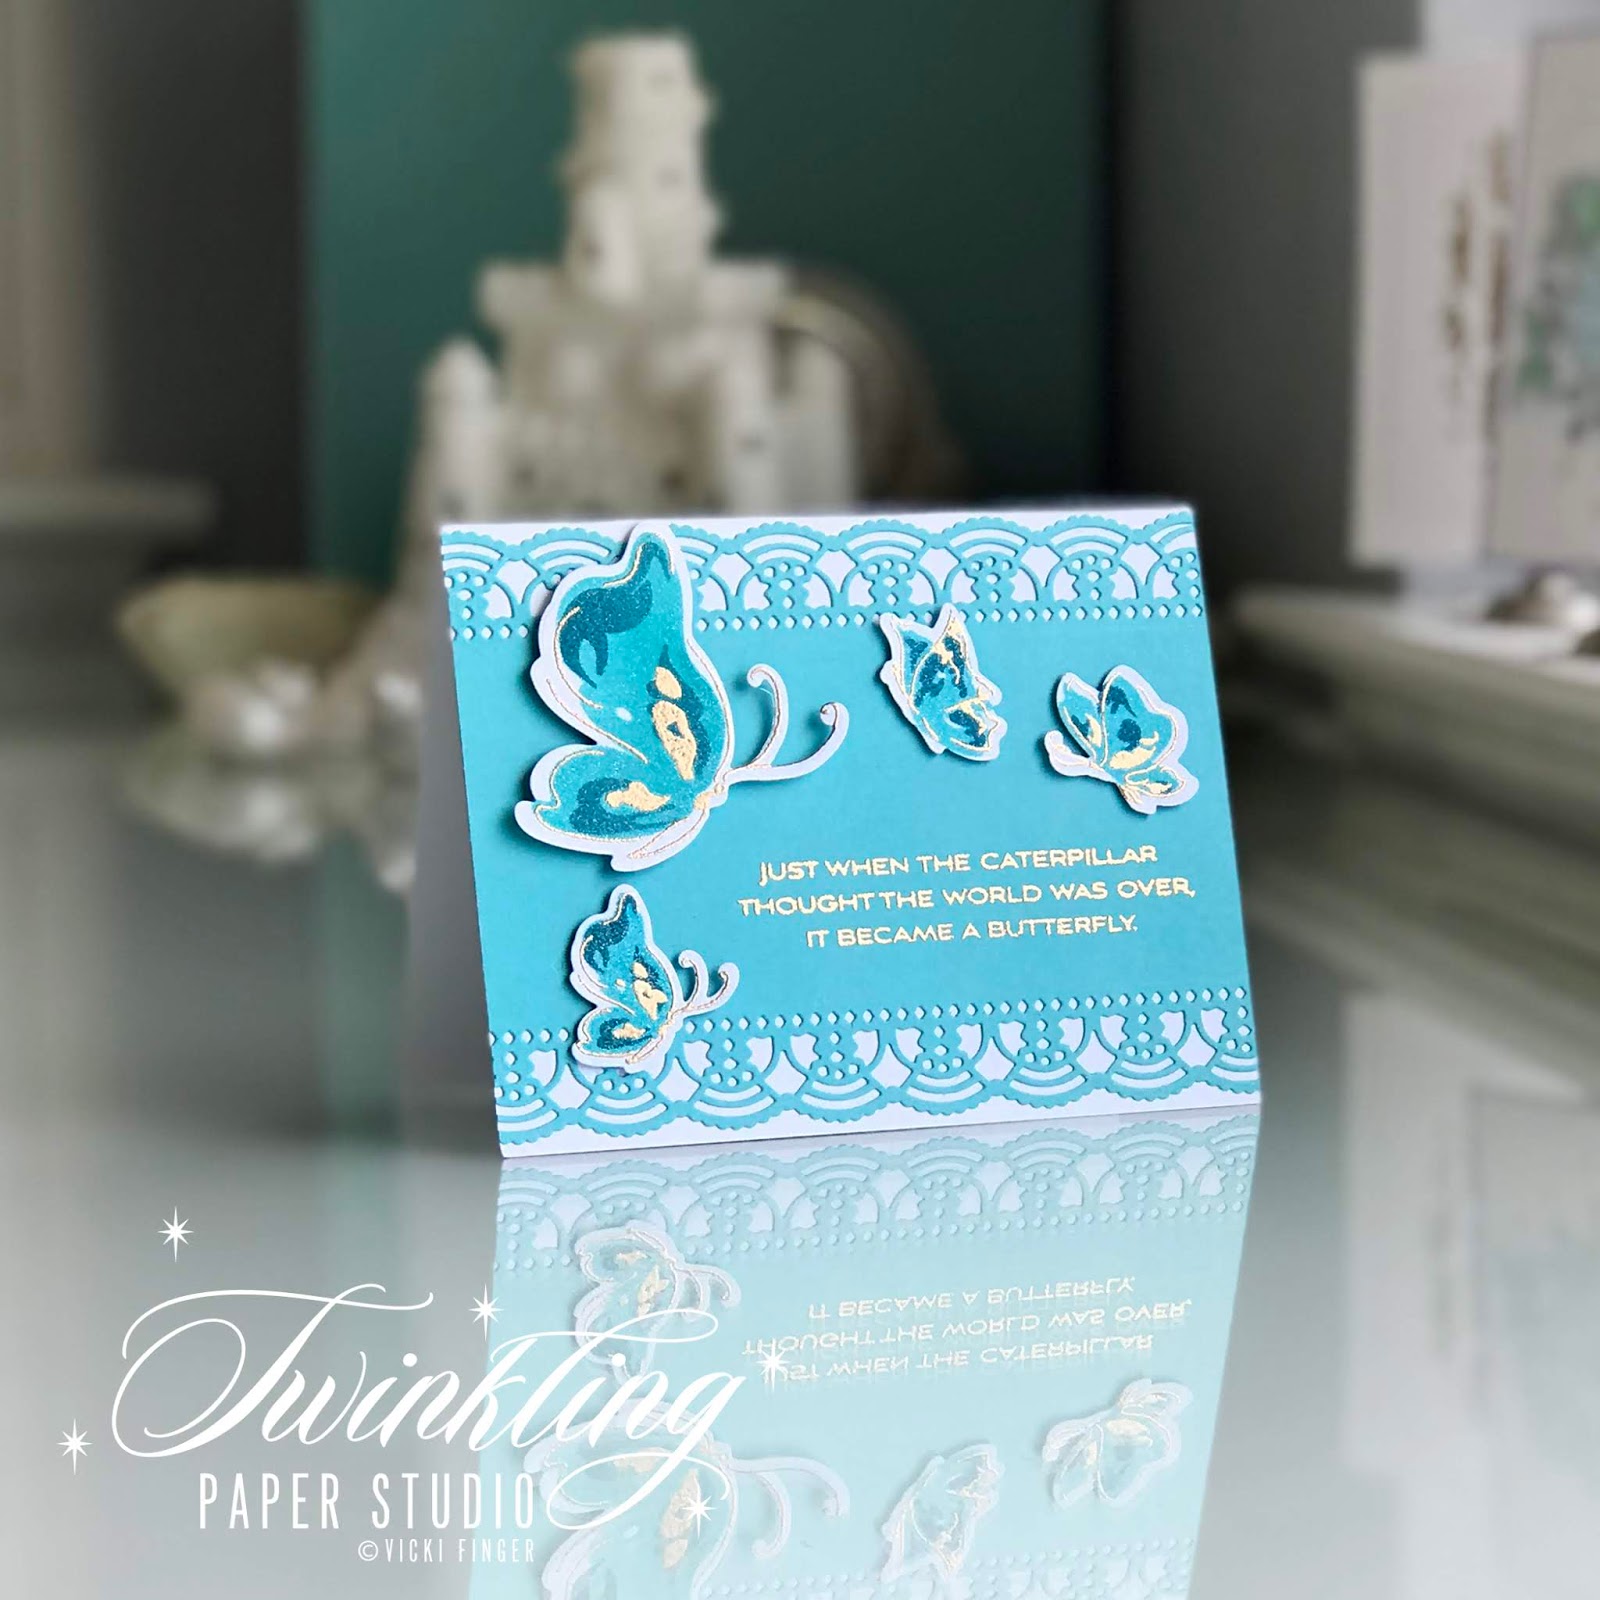
My last two cards use a new set called Needlework Motif.  I can see Tasnim's talent in this illustration and I'd bet money that it is her design.

If any of you have Persian Motifs Stamps and Dies, this is done in the same style but in larger images with coordinating dies.  For my first card I heat embossed the image on some watercolor paper and then used my Zigs to watercolor it.  Honestly, you could just heat emboss this image on a colored cardstock for a simple but elegant look.  There are also coordinating dies for the floral images.  For my card, I adhered the watercolor panel directly to a pale pink cardbase.  I added some sequins with little jewels in the center for some bling.  I adhered both with Multi Medium Matte.


There are a lot of sentiments with this set but I wanted to use this one from Kind Words.  In order to keep the whole design, I couldn't mat this panel as I normally would have.  


For my last card, I heat embossed the image onto watercolor paper and colored it in the same way.  This time I die cut the image and two additional layers so that I could create a thicker element for my card.  I chose some purple cardstock for my card base and again used some glitter jewels to embellish my card. I have had these for many years and I have no idea where I got them.  I also used the same sentiment on this card.  I have a girlfriend that loves this shade of purple (as do I) and I'm planning to send this card to her.  She's been an encouragement to me many times over the 34 years we've know each other.  

Please be sure to hop along with everyone!  


There's no coordinating dies for Kind Words but I hope you'll enjoy using these sentiments over and over again.  My heart is in every single one. 

In celebration of this release, Altenew is sponsoring a $30 Gift Card to the Altenew Store to a lucky winner from my blog.  Additionally, there will be six $50.00 Gift Card winners from the Altenew Blog so don't forget to comment there as well.  To be eligible to win on my blog, you must leave a comment here by 11:59 p.m CST on July 31st.  I will choose a random winner on August 1st and it will be announced here on my blog soon after that so don't forget to check back to see if you are a winner!  

I've linked the supplies I've used throughout my post because I have no WIFI at our new house and the links list uses too much data. I still use a desktop at home rather than a laptop, so I can't even run to McDonald's to do it.  We can't wait until they get fiber optic cable to our neighborhood, not to mention actual cable TV Channels.  You can always shop through my affiliate link at Altenew here or in the side bar.  As always, I appreciate your support!  Thanks to all of you for your kinds words!    

Tuesday, July 10, 2018

Altenew's All About Layering Class

Hello there!  I am back today with another project to share with you for the Altenew Educator Certification Program.  This time the class was "All About Layering" and I did happen to take this class once before.  As I mentioned in my last post, I always enjoy a look back because it seems I pick up something new each time I watch it.  I remember when I got some of my very first Altenew Layering Stamps, I had sent a note to customer service that I couldn't seem to get things lined up correctly.  They referred me to the All About Layering and All About Layering II Classes (which are FREE) and that was actually when I started being able to use the layering stamps and getting them lined up correctly. It was definitely a game changer in my card making. 

In this class we learned about these sets:


For my project to share with all of you, I chose one of my favorite sets, Painted Butterflies.  This particular stamp set doesn't line up exactly with the previous layer making it a bit tricky if you haven't seen the video.  They definitely have a more organic feel to the finished product.  There's nothing like it and I love the very artsy feel of this set. 

I wanted to use a family and shade of ink that matched my cardstock piece so I usually lightly swipe the corner of an ink cube on plain printer paper to see what color I think matches.  I usually have it narrowed down to one or two color families and then one shade within that family.  I found a perfect match to my colored cardstock in the color Aqualicious.  I heard that Tasnim picks all the names for the ink colors and she does such a great job!  Also, she is right - Aqualicious is a truly delicious color!  

Recently, I got the Altenew Creative Edges Die in Lace.  I had a A2 sized scrap of aqua cardstock in my scrap bin and I wanted to try out the die in a color with a white card base.  I just lined up the lacy edge of the die first on the on the top and then on the bottom of the aqua cardstock panel to give the lacy looking center panel. 

I chose a sentiment from my first stamp set collaboration that I did with Tasnim for Altenew which released in February of this year.  It is "Wings of Hope" and was geared toward being an encouragement sentiment set.  Tasnim did all of the illustrations for this set while I did the sentiments.  

Using two of the inks from the Sweet Dreams Mini Cube Set, I stamped the butterflies using Aqualicious Crisp Dye Ink for the base layer.  I added the detail layer using Galactic Stream and finally I stamped the loose outline image using Versamark with Antique Gold Embossing Powder to match the sentiment I had stamped using the same products.


I really love how this card turned out and that it used a favorite color with one of my favorite stamp sets, "Painted Butterflies".  The quote is also a favorite from "Wings of Hope".  If you don't feel very comfortable using layered stamping, I would encourage you to sign up for the "All About Layers" classes at Altenew Academy.  Remember, those two classes are free so you need only create an account, put them in your cart and check out.  You total will come to $0.00.


Didn't this card just turn out so pretty?  I love it.  I've included the links to the Altenew Store and Altenew Academy All About Layering Classes here and here (respectively) for your convenience.  Thank you so much for stopping by today to check out my project.  I hope you'll come back soon or consider subscribing to my blog.  Have a wonderful day! 

Sunday, July 8, 2018

Altenew Educator Certification Program - Dynamic Die Cutting

Recently, I was accepted into the Altenew Educator Certification Program and while I have completed a number of these classes already, it's always great to get a refresher course  or maybe try something that you didn't try the first time around.  There's also quite a few classes that I have not taken and this was one of them.

Today's card is a technique that is really very simple and I loved the whole concept because it is a totally different way to use Nesting Dies that you might already have in your supplies called Inverted Die Cutting. 

Card by Lydia Evans
I really love the simplicity of White on White cards and this was a new spin on that look.  This was a really fun and interesting class and we learned a lot of "out of the box" things we could do using standard dies.  Any kind of nesting dies will work for this but it was Lydia's Nesting Stars Card that got my attention.  We are supposed to choose our favorite technique and card from the class to share and this is the one I chose.  I have quite a few birthdays coming up this month so I wanted to make a birthday card to share with you.

I also think it's important to know that you can use whatever kind of nesting dies you have in your supplies.  Mine happen to be very old Quickutz Dies that nest and I didn't have as many sizes as Lydia had, but you can see they worked great.  Lydia used Halftone Stars Nesting Dies.

I also wanted to add a small sparkly pop of color to my card so I carefully added some glitter card stock behind the smallest layer of stars.  This was really easy to do.  I just cut a glitter star one size larger than the opening to use behind it. 


It's a super clean and elegant look for a birthday card and with the glitter cardstock added, it gives a slightly more festive element to the card.  I used Label Love to stamp my sentiment and backed that with another strip of the same glitter cardstock to help it pop.

If you haven't taken any classes at Altenew Academy before now, they are quite reasonably priced.  Most are around $10.00 or less.  They are online classes so you can work at your own speed.  This works well for me anytime because you just never know what life is going to throw your way!  Although we have finally moved into our new home it seems that every day, we have something come up that needs to be fished or completed or whatever on the house and that is a full time job in and of itself. 

Thanks so much for stopping today to see my project.  I'll be back often to share  with you in the coming weeks while I work towards completing projects for my certification.  Have a great day!