Monday, October 30, 2017

Butterfly, Purple & Die Cut

I'm popping in with another quick card for the Simon Says Stamp Wednesday Challenge and the Tic Tac Toe Challenge because my Simon Says Stamp November Card Kit arrived yesterday (a Sunday of all days) and I wanted to have a chance to use this purple background I made using Glossy Cardstock and Alcohol Inks.  Simon's theme for this week is anything goes and I knew it would make for a quick card to use some of the kit contents like these Cardstock Stickers by Jen Hadfield for Pebbles Inc called Heart of Home which are available separately. 

I talked about how I created these backgrounds in this post and again in my previous post found here.  I still want to do a bit more experimenting with Alcohol Inks so be sure to check back in a few days for a bit more information.  I am planning to try out regular reinkers and see if they work!

As you can see, I used the left column for my card which is butterfly, purple, and die cut.  To begin my card, I die cut the Amethyst & Gold Mixative marbled panel using Hemstitch Rectangles from Spellbinders. I love these dies and even have a ladies handkerchief that belonged to my great grandmother with this type of hem on it. I selected the sticker elements I wanted to use for my card and placed foam adhesive on the back of the 2 elements I wanted to pop up on foam tape.  Without removing the release paper yet, I dusted over the exposed areas of the stickers with some baby powder to deactivate them.  Then I could pull the release paper off and place them where I wanted on the focal panel.  For the tiny butterfly, I just stuck that directly to my focal panel.


Cards don't get much easier than this and I was glad of the chance to play with my November Card Kit.  I used Royal Velvet Cardstock from Papertrey Ink for my card base and my focal panel.  Be sure to stop over to the Simon Says Stamp Wednesday Challenge and check out all the gorgeous entries in the "Anything Goes" category for this week. There are more than 550 entries at this time to inspire you.

Bountiful Thanks

My card today is for The Paper Players #368 - a Tic Tac Toe Challenge and The Fusion Card Challenge, Autumn Leaves. This card came out nothing like what I had intended when I started it.  I've been experimenting with Alcohol Inks and Alcohol Blending Solution on Yupo Paper (I got mine from Amazon) a bit this weekend and the particular one I used here didn't come out how I wanted it to.  It turned kind of reddish orange with my combination of inks (Gold Mixative with Red Pepper) which definitely felt more Fall than Christmas or holiday.  So I rolled with it and die cut the paper with Romantic Leaves from Spellbinders.

Before I move on, I want to talk about what I've learned with the Yupo Paper and the Alcohol Inks.  Initially, when I tried Alcohol inks, I didn't have any Yupo Paper so I used some of my SU! Glossy White Cardstock. I was pretty satisfied with those results but everyone talks about how you're supposed to use it with Yupo Paper.  Honestly, I didn't care too much for the Yupo Paper.  It's somewhat expensive, it's thin like vellum, and I didn't think it moved or worked very well with the alcohol inks. I purchased a single 11 x 14 pad with 12 sheets that I can cut down into 6 panels, but I would not use it again for this technique. I thought maybe I was using the wrong side, but there doesn't seem to be a right or wrong side and I tried both sides.  Also, I think it takes a lot of Alcohol Blending Solution to achieve good results and that is pretty pricey as well. So while I like having this tool in my tool belt, it isn't one I will use very often and when I do use it, I plan to stick with Glossy Cardstock. The best results I got by far were by smooshing the paper into the ink which I did on aluminum foil rather than dropping the ink directly onto the paper and adding blending solution to it.  I have several other backgrounds (including the ones I made with Glossy Cardstock last week) to use in a variety of colors that you'll see on upcoming projects and I used one here.

For this card, I wanted something that would work with the color of my leaves and I happened to have some paper out that would work perfectly.  I found this great 8.5 x 11 paper pad by Momenta at Hobby Lobby.  All of the prints in this pad are watercolor look and many of them have gold or silver paint splatters on them.  Since I have the touches of gold in the leaves, I chose this soft yellow/coral print for my background.  I die cut it with MFT Blueprints 15 Stitched Rectangle Die and gave it some healthy mists Iridescent Gold Shimmer Mist.  I arranged the leaves on that panel then adhered them with Ranger Multi Medium Matte.  To keep everything simple, flat and easily mailable, I cut a strip of vellum with the largest MFT Horizontal Stitched Strips and then stamped the sentiment from the Color Pop Autumn Stamp Set using Versamark and heat setting it with Simon Says Stamp Antique Gold Embossing Powder.  I used my powder tool first so that my embossing would stay clean.


To adhere the vellum strip, I put a skinny little line of sticky dot adhesive (Kokuyo) on the stitch line of the background panel and then gently pressed the vellum onto that.  The adhesive is light blue and if you put it directly onto the vellum, it shows through.

I die cut one of the Impression Obsession Butterflies that I use all the time from Gold Foiled Cardstock and put skinny strips of Scotch 3M Foam Tape under the body and a glue dot under the back end to make it seem as if the butterfly was about to be in flight.  I added a few Nuvo Drops in Copper Penny for a bit of contrast and let them dry overnight. 

I hope you enjoyed my card and will take time to stop by The Paper Players Challenge Blog and the Fusion Card Challenge Blog

Friday, October 27, 2017

Tic Tac Toe Challenge #21

I have a card for the Tic Tac Toe Challenge #21 today using the diagonal line of die cut, FREE and Oval.  Last year for my birthday, my husband got me a Minc Machine and with it came some Project Life types of cards that had been printed with toner so they can accept foil. If I had a printer at home that used toner, I could print my own.  Alas, I have an inkjet printer. I really struggle with trying to find a way to use these items because they are bigger than an A2 Card and if you trim, you start losing the foiled design and they just look funky.  So when I get to use one, it's kind of a big deal to me. Add to that a stand alone die I found at Hobby Lobby the other day and I have a great card for an upcoming event in our lives.

I found a Momenta Die (I have a few others and I really like them) that is a floral bouquet and with the coupon, was $7.80! I think I'll be able to use this die quite a bit, especially when I need something quick for a card.  I can see a wide variety of occasions that I can use this die for.  I also had one of the Project Life Cards that it would look great with so I went ahead and decided that for once, I would make the card fit the foiled element. My foiled panel was 4.5 x 6.5 with rounded corners so I made a card base to match that and then using a corner rounder chomped off each of the corners. I have a regular corner rounded which isn't the best to do this with, but I did get it this time.  Papertrey Ink Stampers Select White Cardstock is so thick, it was hard to cut the corners off, but I did manage to finally get it done.  I think I might have to invest in a Corner Chomper at some future time but the only other time I round corners is when I am making a custom envelope (which I did here today).  And the corner chomper is an expensive tool for no more often than I use it so I'm sticking with the one I have for now.

Since I had already run the Project Life piece through my Minc Machine with Gold Foil from Thermoweb, I die cut the floral bouquet to go with it from Gold Metallic Cardstock. Simon Says Stamp carries a complete line of decofoil from  Heidi Swapp and Thermoweb. As you can see, it fit right onto the oval frame of that panel.  The only other thing I had to do was to stamp a sentiment onto Stamper's Select Vellum that I had cut from a vertical stitched rectangle which is part of a die set from My Favorite Things.  The greeting is from the Give Thanks Stamp Set and was stamped in Versamark and Heat Embossed with Simon Says Stamp Antique Gold Embossing Powder.  Then I stretched that across the floral die cut and attached it with Kokuyo Dot Runner behind the words and a skinny little line of that hidden under the stitching on each end.


This card came out looking so luxurious and because it was a special size, I use a piece of Gold Shimmer Vellum to make the envelope.  I also ran the flap through my die cut machine to make a fancy little embossed design on there. That just gave this card another special touch.  My finished card is 6.5 wide by 4.5 tall.  I did have a little bit of trouble getting the gold foiling to show up on the card.  In the photos it looks black, but I can assure you, there is no black on this card.  You can see the gold on the right hand side corners and that little stitch line that goes around the oval is all gold as well.

While I enjoy learning and using techniques, sometimes I just want something that is simple and easy to complete. In fact, that is what won me over to card making  in the beginning two years ago; it was something I could complete in hours rather than the months it took for scrapbooking.  Card making is much more instant gratification.

Thanks you so much for stopping by today.  I hope you enjoyed my quick and easy card and that you'll come back another day. 

Wednesday, October 25, 2017

Make It Monday #301 with Papertrey Ink

My card for today features a few techniques, one from Lizzie Jones where she shows "Matting With Glitter" in her video here. You'll have to scroll down to the next picture to see the glitter detail. For my card, I took a slightly different approach for my mat because I have a tiny little bit of experience with this and I've learned what works for me.  I've also learned that some glitters are just messier than others.

I started out this morning with some aluminum foil, latex gloves, a few alcohol inks, and some Alcohol Ink Blending Solution. A week or so ago, Jennifer McGuire had done a video showing some techniques to use alcohol inks but I had seen one more than a year ago from Loll Thompson. Yupo Paper is the thing that is recommended for using with alcohol inks for best results but I don't have any. I did, however, have some Stampin' Up! Glossy White Cardstock in my supplies from long ago so I decided to try that out before I went all in and got Yupo paper since it's kind of expensive. A warning though, as Jennifer said the other day, it is hard to quit playing with the supplies because each time is different and so beautiful.  

I cut two 8.5 x 11 inch sheets of glossy card stock in the 4.25 x 5.5 inch panels. That would give me 8 panels if I didn't mess any up, and I had other things I needed to do, I had to give myself a limit. I tried Jennifer's technique first but it didn't work very well on my glossy cardstock so I switched to Loll's method for the second and subsequent card panels.  It was a lot of fun and not too messy the way I did it thanks to Loll's advice. You can see her video tutorial here. I did use a Metallic Mixative in gold which I'm sure comes as no surprise to anyone.  I used a large piece of aluminum foil for each color combination (2) and a pair of latex gloves (I buy a box at the beauty supply store), I had regular rubbing alcohol but I found that didn't work very well on my paper so after the first try, I didn't use it any more. I do plan to try it on some Yupo when I get it. Alcohol inks stain badly so that's the reason for the foil.  I'm very curious to know if regular ink refills will work with this technique, but I'll have to try it another day. 


While my background panels dried completely, I got to work on the Glitter mat part of my card.  For my glitter mat, I covered a scrap piece of white card stock completely with Stick-It Adhesive and then die cut the smaller of the Mat Stack Layerz I from that. Next I die cut the Wonderful Words: Joy from gold foil cardstock along with a Star of Wonder from Memory Box. I placed my die cut word onto the sticky label and pressed it down firmly with my bone folder.  Then I covered the rest of the label with some Nuvo Pure Sheen Diamond Glitter and burnished it in with my bone folder. That way, only the negative parts were still sticky and this gave me an inlaid look for the mat. I also cut the Largest Layerz I from Gold Foil so that my mat could have a mat (ha!).  Because the background has so much movement, I wanted to keep my card design very simple.  I cut the panel with a stitched rectangle die and adhered it to my top folding card base made from Stamper's Select White Cardstock. Then I placed the glittered, matted element on the front along with the Star of Wonder.  


I hope you like my card for this week's Make It Monday.  You can see lots more inspiration and many projects over at the Papertrey Blog.  Thanks you so much for spending a few minutes with me today.  

Papertrey Ink October 2017 Blog Hop

Hello everyone! It's the 25th of the month so that means it's time for the Papertrey Ink Monthly Blog Hop.  As soon as I saw the inspiration image from Nichole, it reminded me of many botanical and gift wrap prints that I admire from Rifle Paper Company and their ability to put color combinations together that are just not what I would routinely think of.  I found a Recollections Paper Pad called "Midnight Garden" that has some similar style prints in it. I really enjoy finding new images to add to my Pinterest page where I have lots of their stuff pinned already.

One of the colors I used to create this card was a little gift from a friend, Cindy. Cindy sent me several 1/4 sheets in many colors I did not yet have in Papertrey Cardstock and this particular card uses one of those although it will not be very obvious because I placed a vellum layer over it.  The very front cardstock panel on this card is Stamper's Select Vellum over Honey Nut Cardstock.

I mistakenly had this cardstock labeled as Saffron Spice.  I didn't realize my mistake until I did a bit of bartering with Cindy to get a couple of sheets of "Saffron Spice".  Until the additional sheets came in the mail, I hadn't realized I had the labels switched.  It's not a big deal, I'll just add a small package of Honey Nut to my next order so that I have that perfect color.  One of the nice things about the Rifle Paper Company Prints (and this pack of  patterned papers that are similar in style) is that I have other colors of cardstock that also match.  Don't get me wrong, I realize that the two styles are very different but there's no telling what particular thing will make you think of another so I've learned to go with the flow to see where that exploration will take me. You can see many more of these prints, calendars, and gift wrapping papers by doing a search on Pinterest like the one I did here.

For my card, I stamped the saying from Quoted: Start Again in Versamark and heat embossed the sentiment in Antique Gold Embossing Powder on to Stamper's Select Vellum Cardstock then die cut it with a Double Stitched Rectangles Die from MFT.  I cut another rectangle the same size from Honey Nut Cardstock and applied the embossed vellum to the rectangle cut from Honey Nut Cardstock. I love how it is the right color but softened up from the vellum overlay.  Next I die cut a larger panel from the same Double Stitched Rectangles Die Set out of Sweet Blush Cardstock which is a perfect match to the colors of the patterned paper.  I die cut the patterned paper with WPLUS9's Gift Card Layers Die and affixed all the layers to a top folding card base made from Stamper's Select White Cardstock


For a little touch of color on the vellum I used a Zig Clean Color Real Brush Marker in Light Pink with a Wink of Stella Clear Glitter Brush Pen to color in the ribbon and help tie all the pink elements together. I really love how this card turned out and I have in mind a particular friend I want to send it to.  

Thank you so much for stopping by today to see my project.  I have so many projects in my head that I want to create but the trouble is finding enough hours in the day to do that. Hopefully, I won't have any distractions for the rest of the week and can get to a few more of those ideas.  Be sure to head over to Nichole Heady's Blog and see what everyone has created for this challenge. I promise, you'll leave inspired.  

Tuesday, October 24, 2017

The Flower Challenge #13

Hello everyone! Today I worked on a card for The Flower Challenge #13.  It's their first birthday and we are celebrating by using our favorite flower stamp or digital image. I'm sure I don't have to tell you that it changes all the time.  It tends to be the one I want to use or one that I've been using recently that is still sitting on my desk. Honestly, I love all flowers.  Since Pink is one of my favorite colors, I wanted to make a Pink Christmas Card. I saw a beautiful card made by Laurie Schmidlin that I just loved so she was the inspiration for today's card.

Not too long ago, I started following Gina K of Gina K Designs on YouTube and Stamp TV.  I got a newly released Merry & Bright Kit from the Gina K Designs Store found here. This kit has an incredible value of more than $130.00 for just 59.99 and I thought it would be a good way to sample some of the Gina K products. I only had a few other things previously - some of the foil mates collection of products along with a couple of packs of patterned paper.

In the kit, there are two large stamp sets, a pile of dies and a very nice selection of cardstock.  Oh my goodness - I am in love with the layering weight white cardstock.  It is so silky to the touch and takes stamped images incredibly well. With all the color choices available from the kit, it was the white that I started with. Jennifer McGuire said one time that she loved the "magic" of turning white cardstock into anything she wants it to be and I agree with that a lot. So I started with a half sheet of the layering weight white and stamped several of the poinsettia flowers and leaves on it.

I wasn't sure about what colors to use so I had to experiment a bit to get colors I wanted.  I ended up using Altenew Rose Quartz and Puffy Heart for my blooms.  I had ordered just two of the Gina K Mini Ink Cubes to try out in Cherry Red and Fresh Asparagus.  I love both of them but I knew I would really love that green.  It's kind of an in between color that I don't have in any other inks at this time.  It's darker than the New Leaf I often use, but not as yellow as the Ripe Avocado that I also use for foliage.  In fact, I am so taken with the Gina K Cardstock in the kit that I ordered a few more packs in colors that I don't have with any other company. I haven't received that package yet, so I can't report on the colors, but I ordered more of the Layering Weight White, Cherry Red, Fresh Asparagus, Edible Eggplant and some Gold Metallic Cardstock. I'll be sure to post a follow up when I receive my order and have time to try them out.

I stamped 2 large and 4 small blooms along with the large and small leaves that are a part of the set. Coordinating dies were included in the kit so I die cut everything and then started putting my card together. I used each of the two different sizes of the Avery Elle Postage Stamp Dies, cutting one from Hibiscus Burst Cardstock and the other from Gold Foil Cardstock. I stamped the sentiment (part of the stamp set in the Merry and Bright Kit) onto the layering weight white and heat set it with Simon Says Stamp Antique Gold Embossing Powder.  I die cut that with the smaller postage frame die so that I could insert that white piece into the gold frame.

Using a new to me technique, I held those pieces in place with Scor-Tape that went along that seam on both sides. Since Scor-Tape is such a strong adhesive, I knew there was no room for error in placement of the frame onto the Hibiscus Burst Frame which I had held together in the same way as the gold. I wanted to line up the bottom and right sides in the corner to leave room for my floral arrangement in the top left. I started pulling the release paper from each corner about 1 inch long and fold it with a right angle so that I could grab a hold of it to remove it all the way once the frame was in place. Then I placed the Hibiscus Burst Frame onto my top folding white card base with each strip of the Scor-Tape started in the same way.  Once the frame was in place, I pulled out the release paper the rest of the way and pressed it in place with my bone folder.  Then I started arranging my flowers loosely so that none of the sentiment would be covered up. I used the shorter leaves in the outside corner and saved the longer leaves for the rest of the arrangement.  For some added texture and dimension, I used a combination of Thin 3-D Foam Squares, regular foam squares and sticky dot runner adhesive. I went over the blooms and leaves with Wink of Stella Clear Shimmer Pen. I normally use shimmer mist after the ink has dried on my stamping, but I forgot this time until everything was already adhered so I did a quick coat of Wink of Stella.


Once I got the card put together, I wanted to add a special touch so I used some of my Swarovski Crystals in Aurora Borealis for the center of the flowers.  For the largest bloom, I used three crystals in the center and a single large crystal in the center of the two smaller blooms.  I also added a few to the sentiment panel to form a visual triangle and tie it all together.

I decided to just use a larger envelope for this particular card or I will make one.  They are really easy to do and I often make them for special cards.  There are only a few hours left for me to get this card uploaded to the challenge, so I better get moving.  I had so much fun creating this card and I plan to do a red version of it very soon! Thanks so much for stopping by today and I hope you'll come back soon.

Wednesday, October 18, 2017

The Card Concept - Autumn Love

Hello everyone!  I created today's card for The Card Concept Challenge this week.  You have two weeks to join us and play along using whatever inspires you from the image on the left.  Isn't that a wonderful cake with cute little owls sitting on top. And those wonderful leaves... Fall colors do make me feel happy -- almost as happy as spring colors do. And just look at what I think are wheat stems. Being a Kansas girl, that really appeals to me and oak leaves are somehow always fitting.  I'll tell you the truth here - I had a very hard time deciding which way to go with this week's inspiration but I finally decided that I wanted something pretty clean and simple with lots of white space like the cake.  I've been in "Merry Making" class this week at Online Card Classes where there have been some simple and some more technical techniques.  I've already done a post of one of those more technical cards and you can find it here. So while I like to learn new techniques to elevate a special card, I also appreciate really simple techniques.

This particular card was inspired by Gina Krupsky (a.k.a. Gina K Designs) and her technique on Day 3 of class.  This technique asked us to look at stamps that might already be on our desk or in our stash and use non-holiday stamps to create a Holiday card.  "All you need is a little sprig and a little berry" she said and it was true.  I loved this technique and have so many ideas for other stamps I have to try this out with.  I have already done four other cards using this technique and I love how clean and simple it truly is.

To start, you want to trace a shape such as a circle or oval onto your card front or card panel. I always stamp on a panel so that if I mess up (which if often do) I haven't destroyed the whole card. For this card I used the largest Simon Says Stamp Stitched Circle Die to trace my shape lightly in pencil.  That just serves as your guide to create your wreath shape.  I used the smaller branch from the Layered Laurel Stamp Set from Altenew.  I haven't gotten to use it yet as the layered set but I love it for this purpose of making a wreath.

It's a good idea to stamp on a piece of scratch paper to see how the size of your little sprig works and how many you'll need to create your wreath.  In my case on this card, I scrunched mine up a bit (closer) so that I could use two different colors of ink (Altenew Sand Dunes and Rocky Shores) to give it a bit more texture and depth.  I stamped about 6 times in Sand Dunes and 4 times in Rocky Shores. This made for a nicely full wreath yet still a lot of "white space". These inks are from the Altenew Ink Family "Coffee Break" and I like that they are a less yellow based tan.  I like taupe but not necessarily tan or Kraft unless it is just the right thing. 


I grabbed the small floral shape from the WPLUS9 Be Merry Florals and stamped it three times in Melon Berry Ink.  Next, I used 2 different berry stamps from the WPLUS9 Holiday Boughs Stamp Set. There are two small berries on one and a single berry on the other allowing me to stamp pretty much any pattern (or lack thereof) that I wanted.  To some groups of two I added a third and others I skipped but there was no rhyme or reason to what I was doing, I was just winging it. I spritzed it with some shimmer mist and die cut the panel with a Simon Says Stamp Stitched Rectangle Die.  I almost forgot my greeting so I lined up the die cut panel in my MISTI so I could be sure it was well stamped or that I could stamp a second time if needed.  I was almost done, so I didn't want to wreck it then. I stamped with Versamark and heat embossed with Simon Says Stamp Antique Gold Embossing Powder. I cut a larger rectangle die from Gold Foiled Cardstock and adhered them to a top folding card base made from Stamper's Select White Cardstock. Once that was finished I thought my card front needed a bit of dimension so I added Nuvo Crystal Drops in Golden Sunset and Stickles in Orange Peel to those berries.  I've had these for a number of years and that particular color is no longer available but there are two other oranges to choose from now if you follow the link.  There are also Orange Nuvo Drops in a few different styles found in the Simon Says Stamp Store.  This gives a bit of dimension but still allows for pretty flat mailing. Since I mail almost 100% of my cards, I like using this versus gemstones.

I can't wait to see what everyone else creates for this challenge.  I have been making a ton of wreath cards and today will be making another for a different challenge so I am getting in lots of practice. Thank you so much for coming by to see my card and I hope you have time to join us.  The other Design Team Members always have inspiring cards so be sure to stop over and check them all out.

Tuesday, October 17, 2017

Papertrey Ink Make It Monday #300

It cracked me up yesterday morning when I was laying out my work for this week and the newly posted Make It Monday #300 at Papertrey Ink turned out to be something that I have done several times in the past 5 days.  It is a Wreath Building Challenge.  The challenge part for me was finding a way to create yet another type of wreath that was different from what I've already done.  When I was looking through my supplies, I realized that I don't have a wreath die so I will need to remedy that at some point in the not too distant future. Since that was the case, I chose several stamps sets to create a whimsical stamped "wreath" card.

First I die cut a Scene It Doily Tag from Stamper's Select White Cardstock to served as the circle or wreath area.  Then I used bits and pieces from several sets to build the wreath itself.  It's not very traditional, but it turned out pretty okay.  I used the wheat stalks from Paper Clippings: Thankful for You Stamps, the small heart is from Paper Clippings: Done In Love, I used the second layer of the wheat stalks to add the detail to the wheat and then used them in another color as some of the elements in the other parts of the wreath. The leafy branches are from Turning a New Leaf and finally the little three petaled flower and the large and small dots are from this year's anniversary set, Grand Finale.  I noticed later that there were a couple of dots in the Paper Clippings: Done In Love set but I missed them when I was gathering all of the elements.  While I wanted things to be balanced, I didn't want them to be mirror images from side to side of the wreath. I wanted to keep it natural looking and I am happy with what I achieved.  I used Papertrey Inks in Kraft, Pale Peony, Ocean Tides and Berry Sorbet.  The detail layer on the wheat was stamped with Altenew Mocha Ink.  I love that particular collection of inks because they don't have so much yellow in them as most Kraft and Tan inks do.

The little acorns are from Give Thanks and were also stamped in the same Mocha Ink.  The sentiment is from the Papertrey Ink Counting My Blessings Die Collection.


Since I had everything out on my desk, I decided to create another wreath go in a cleaner, simpler direction.  I traced a circle die cut and stamped the smaller of the leaves from Gran's Garden onto my panel in Ripe Avocado Ink. I curved the leaves a bit on my acrylic block to follow the shape of the circle. I stamped the berries in my lightest yellow, Lemon Tart. Since I was planning to do White Berries with a little gold stem, I use a really light ink to stamp the berries from the Enclosed: Bell Mini Stamp Set.  This lets me see where they are supposed to go on the card front and serves as my guide.  I stamped the sentiment from Enclosed: Leaf Mini Stamp Set in Versamark and heat set it with Gold Embossing Powder. 

Once the stamping was finished, I hit it with some Tattered Angels Iridescent Gold Shimmer Mist and let that dry before die cutting the panel with a stitched rectangle die. I really wanted to put this particular card together on Vintage Cream Cardstock, but I've had a terrible time lately finding Cream Envelopes at a reasonable price.  I only have a few left on hand, so I went ahead and put the card together on a top folding card base made from Stamper's Select White Cardstock with a Gold Foil Stitched Rectangle mat. I put the rest of the card together and always do my drops as the very last thing. This was a lesson learned the hard way, (of course).  I tied a little bow with some Gina K. Sheer Satin Fancy Ribbon in White and Gold for the top of the wreath and added all my little white berries in Ivory Seashell Nuvo Drops.  After I let those dry for about an hour, I added a tiny little stem with Golden Sunset Nuvo Glitter Drops for the finishing touch.  I've made several cards using the leaves from Gran's Garden to create a wreath.  These are my favorite leaves from all the florals I have and use. 


Believe it or not, I have one more wreath I want to create based on another of Gina K.'s lessons from the same class.  I hope to have time to get to it this week. Be sure to hop all around to see the wonderful cards everyone has made for this week's Make It Monday Challenge

Sunday, October 15, 2017

Merry Making Class - Take Two

During last week's Online Card Class "Merry Making", Gina K of Gina K Designs taught a class on using non-holiday stamps to create Holiday Cards.  I've done something similar to this before but this was a unique spin and is my other favorite technique from this class (see this post for another). All the techniques have been wonderful and I still have many I want to make, but this particular one really appealed to me for the variety of styles and colors you can achieve.  I have made quite a few of this style already but I wanted to do a blog post for this.  I'll have another post for this technique that will go live on Wednesday Morning for The Card Concept where I am a Design Team member.

Today's post is for a challenge I want to participate in; the CASology Challenge. If you are new to card making, CAS means Clean and Simple which translates to limited layers, lots of white space, etc.  This is about as clean as I ever get because I stamped directly on my panel of Stamper's Select White rather than stamping and die cutting multiple pieces to create a bouquet or arrangement.  Sometimes I want to do something more complex but I also like my share of clean designs and this one fills the bill.

Gina showed us how to take an ordinary stamp and create something with a holiday feel using just the one simple image.  I made a few of these the other day using the leaves from Gran's Garden and I loved them but because of the size of the leaves, it was hard to curve the stamp around to fit around my circle or oval.  I had ordered an Altenew set that I was waiting on and it arrived yesterday so as soon as I saw it, I knew it would be perfect for this technique. The stamp I am using is the smaller of the leafy branches found in Layered Laurels from Altenew.  I'm not using any of the additional layers at all.  The stamp is already curved so I just chose a circle die that was a correct size to fit the shape of the stamp.

I traced my circle die onto a card front panel placing it more toward the top of the panel.  Then using the leafy sprig with Ripe Avocado Ink, I stamped with an acrylic block following the pencil line. This was about 3.5 times to get the full circle so I did a second set which gave me a fuller looking wreath and helped tie in that extra half stem. It was so simple and a great way to use other stamp sets that I already have depending on the look I want.  In this case I just wanted a simple wreath with lots of berries. I looked to the Papertrey Ink Mistletoe & Holly Stamp Set (NLA) to stamp the berries in Pure Poppy Ink. That set has a little group of three berries together and a single berry as well.  In the end, I covered up the berries with some Liquid Pearls and Nuvo Drops, but I still used the stamped berries as my guideline for the placement of those. I almost always embellish in "ODD" numbers (i.e. the challenge theme) you know -- 1 or 3 or 5, etc.  Even the sprig is stamped 7 times to get the full wreath.

The gold heat embossed greeting is from WPLUS9's Christmas Greetings Stamp Set which came out a couple of years ago. It's nice because it's a smaller set with a lower price point and the font is beautiful. Once I had all the stamping done, I spritzed it with some Sheer Gold Shimmer Spritz and let it dry.  Once dry, I die cut the panel as I almost always do using a Stitched Rectangle Die from Simon Says Stamp and cut another one from Gold Foiled Cardstock using the MFT Blueprints 15 Stitched Rectangle Die. I love the narrow accent mat that I get by pairing these two dies. I assembled it all on to a white card base made from Stamper's Select White Cardstock.  I considered adding something below the wreath and even considered a bow from another wreath set but I like the simplicity of this design and plan to use the bow on another wreath card.

Wreaths can pretty much be any occasion you want them to be and can be as rustic or elegant as you like.  You can dress them up with some special embellishments or simply stamp them for a more simple design.


For this card I used the Tonic Nuvo Drops in Gloss Red Berry.  I let those dry overnight and then went back in this morning to add the little highlight with Ranger Liquid Pearls in White Opal. There is a rainbow of colors available in Liquid Pearls or Nuvo Drops. You could use Tonic Ivory Seashell if you have those or even the Nuvo White Gloss Drops for the little accent. I did two other cards using a color of drops called Autumn Red but they dried more of a wine or deep rose color than red.  I like that as well, but these are the colors for the one I'm blogging about here today.  At this point I don't have a preference one way or the other and often still use my supply of Stickles Glitter Glue as well because I have several colors on hand.  Right now, my Christmas Red Stickles are a favorite for berries but I also appreciate having a choice. You could also use enamel dots, sequins, little jewels or whatever you have around.  I like the Liquid Pearls, Stickles and Nuvo Drops because they are a bit flatter and easier for mailing than enamel dots.  I love to put little pearls on my cards as well, but the drops are flatter and mail much better.  Just experiment with what you have until you find something that works.  There is not one right or correct way, thank heavens. You could also practice stamping your wreath on scratch paper to get a feel for how many times your sprig needs to be stamped to go around your circle and make adjustments from there. This is a pretty forgiving technique which is why I loved it so much.

Thanks so much for stopping by today!  I have a few more cards planned with variations on this technique so be sure to check back.  I normally post at least 3 times each week with new projects, so be sure to come back.

Saturday, October 14, 2017

Merry Making Class

Hello there! I have been in the Online Card Class this week called "Merry Making" and it has been a ton of fun with lots of new techniques. I wanted to share a couple with you that have been my favorites of the classes.  Don't get me wrong, I love all the new things I learned and I even learned some new twists on old techniques. The thing about taking classes is that they make you look at things you already have in new ways.

Today's card showcases the technique taught by Jennifer McGuire on Day 4 and I love it.  While I might not want to do this too often, it is a fantastic way to use background or cover dies.  Since those dies are some of the most expensive, it's nice to have another way to use them. In her video, Jennifer used some Silver Shimmer Cardstock and I did that for the first one of these that I made.  For the second one that I am featuring here, I used Shimmer Vellum which is much lighter weight and easier to fold since my center line is very narrow.  I have several cover dies but this one in particular seems to be well suited for this style of card.  It is from Papertrey Ink and is called Cover Plate: Twist.  It's a favorite for sure and was one of my early purchases from Papertrey Ink.

This class was pretty inexpensive ($25.00) and you can take it any time. It's all done through videos you watch at home. There are three lessons each day featuring different techniques.  I have not seen this technique before and the material is copyrighted so I am not going to be listing the steps here but you can sign up to take your own class here: Merry Making.

I thought this would also make a wonderful wedding card and I will definitely keep it in mind.  We don't attend too many weddings but it's always good to have a card design in mind for those occasions.

For this card, when you untie the ribbon, you get to see the medallion that sits in the middle. When you open that, then you can lift the top folding card to reveal the interior of your card.  It's fun to have an interactive card to present.

I always really enjoy doing feminine cards for my girlfriends and there are usually a few challenges that do a Twelve Tags or Cards of Christmas with a feminine twist and I plan to pull this one out of my arsenal when the time comes.

I pulled out a piece of 12 x 12 Pink Shimmer Cardstock (Creative Memories) for this card but in the end I trimmed it down to regular A2 size. The shimmer vellum I have came from Create for Less and the color is Gold Leaf.  I have another color that is a bit more yellow that I am planning to try.  The panel insert is stamped using Sunny Studios Petite Poinsettias which has 2 different sized blooms and three leaves.  I normally would get my MISTI out and use it for any type of layered stamping, but I was doing a trial run to figure out colors so I just used my acrylic block with Lovely LadyHibiscus Burst, and Autumn Rose Inks for the blooms and Ripe Avocado with Olive Twist for the leaves. The "Happy Holidays" sentiment is from a WPLUS9 Set called Holiday Boughs. Mine is stamped in Versamark and Heat Embossed with Simon Says Stamp Antique Gold Embossing Powder.  This is still my favorite gold because it isn't too yellow or brassy.  I have a large container of it and whenever Simon runs a sale on it, I buy about 4 more jars.

When I first stamped these blooms, I was thinking I was glad this was just a test because I didn't get it lined up very well.  But once the ink was dried back a bit, I liked how it looked so I decided to use it.  I die cut that panel with a stitched rectangle die for adhering it to my card base.  The base panel of this card is 4.5 x 5.75 so it will need to be mailed in a 5 x 7 envelope. I always have some of those on hand for just such a package so that was no big deal to me. Like I said, I wouldn't do this special size or type of card often and you can find packs of 10 envelopes at Joann's, Hobby Lobby, Amazon and lots of other places. I also used a couple of other Simon Says Stamp Products including Stitched Circle Dies and the Simon Says Stamp Kate Snowflake Die that I cut from Gold Glitter Cardstock.  It is very delicate so be careful removing it from the die.


The thing I have enjoyed most about this class is that I didn't need to buy anything special to participate. I was able to use stamps and dies I already had on hand and encouraged us to look at those things in a new way.  I hope you enjoyed today's project and thanks for stopping by!

Here's a few views of the first card I made in this style.  I'll be back tomorrow with another technique!

Tuesday, October 10, 2017

Sentiment Windows

This week's Make it Monday from Papertrey Ink features Dawn McVey and shows us a technique that uses a sentiment window (video found here).  I had never really thought about doing this before, but I like it as the sentiment does double duty because it's visible from the outside and inside of the card.  It was super easy to do although I did mess up my first attempt by putting to many thick layers on my card front.  I liked the combination I had first, but I just couldn't get that third layer cut so I had to start over.  I'll save the other card for a different project. 

I started with a top folding card base made from Stamper's Select White Cardstock.  I cut a Pinefeather Bitty Big Plaid background panel using a stitched rectangle die. I am loving the prints in the Bitty Big Papers and I'm excited to see what colors we get this month. Then I used the oval die from Noted: Scalloped A2 Dies to cut the oval window in my card.  I decided to use some of the previously stamped Berry Branches from Betsy's Beautiful Berries: Winter that had been stamped in Pinefeather with Pure Poppy Berries. The shadows on the berries had been stamped in Scarlet Jewel but I covered that up with some red glitter and a quickie glue pen.  It was okay though because it gave me a guide for where to put the glue.


Next, I chose a sentiment from the "A Thrill of Hope" Stamp Set and using my card in my Mini MISTI, lined it up in the window so that it will show through on the front as well.  After using my powder tool on the inside of the card, I stamped the sentiment with Versamark and heat set it with Antique Gold Embossing Powder.  I arranged the berry branches around the open window, being careful not to get any adhesive on the area that would go through to the card base.  I didn't, but if you accidentally get some on there, you can deactivate the sticky by putting some powder on it or using an adhesive eraser to remove it.  I will probably mail this card so I used sticky dot adhesive on there rather than foam tape.

This was super fast and easy to pull together and I still have several sets of the berry branches ready to go in other colors so I am planning to make a few of them.  Thanks for stopping by.  Be sure to check out all the entries on Nichole Heady's Blog.

Monday, October 9, 2017

Altenew's Majestic Mistletoe

Welcome everyone! Today's post will have lots of pictures because I did several variations of the same card. Today's card is for the CAS(e) This Sketch Challenge and the Addicted to CAS Challenge for this week. I have made so many Christmas cards in the past week that I think I have nearly enough for all of mine and plenty to share with my Sisters-In-Law as well. We'll be gathering at the Finger Family Farm Thanksgiving Weekend so I'll let them go through my stash of cards then to see what they want.  They always seem to enjoy this very much so it's a tradition I'm planning to continue as long as I make cards!

I've been enjoying the sketch challenges a lot lately so I am trying to participate in those more often than I used to.  This week's Sketch at CAS(e) This Sketch. This sketch is a clean and simple style as usual, but I used it to make quite a few cards - Christmas and a couple of thank you cards as well.  The overall design sweeps from left to right and is what my brain automatically sees when I start a card.  That's because we read the same way -- left to right. I also used the same stamp set for all of these cards; 
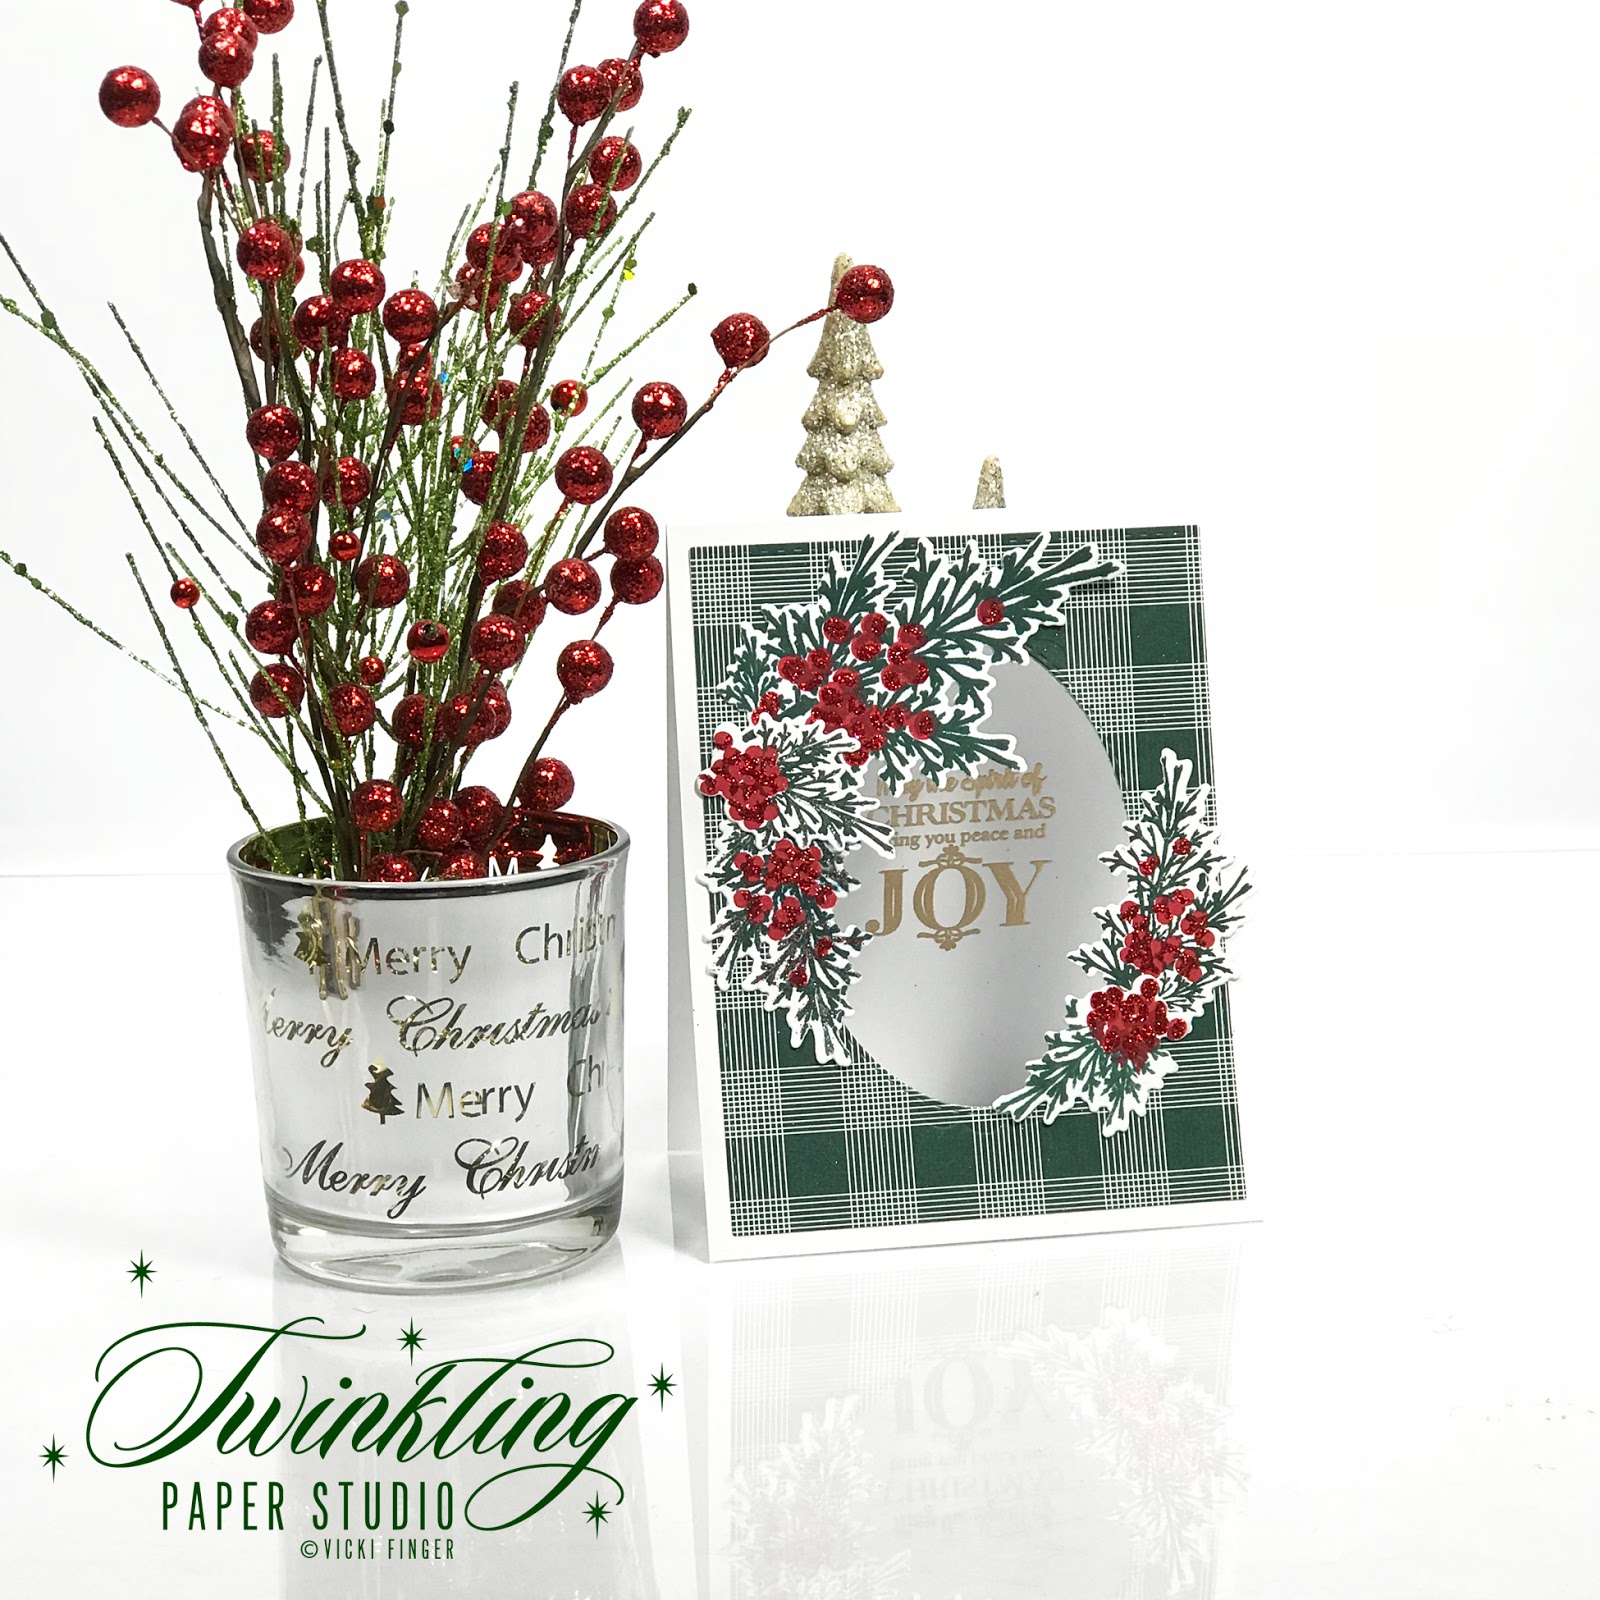
Altenew's Majestic Mistletoe which was just released in September and is my current "favourite" as our Canadian friends say.  Since we are moving in about 6 months, I am trying to only buy products that I will absolutely use. It was love at first sight for this set and even though there are no dies yet, I still got it.  There is something so perfect about greenery, no matter what season it is so I took a lot of creative license and made cards with both, red and white berries.  I actually love the looks of both styles so I made about 15 cards this weekend using this set.

For all except the first card, I started with several panels of 4.25 x 5.5 inch Stampers Select White Cardstock from Papertrey.  The first card was stamped on Vintage Jadeite Cardstock. Stamper's Select White is my go to card stock and I take several packages to Kinkos to have it cut into 4.25 x 11 inch sheets and 8.5 x 5.5 inch sheets for cards a couple of times a year.  It is super smooth, heavy weight #110 cardstock and very reasonably priced at $6.00 for 40 sheets. I usually do three packages of the tall and skinny for top folding vertical cards and one for the top folding horizontal cards. I still always have a pack or two of full sheets in case I need them. Since I use watercolor paper for all of my watercolor or blended backgrounds, I just cut down a few of the Stamper's Select White card bases when I need the smaller panels to work on. I also buy the watercolor paper in the larger pads and have Kinko's cut them down as well.  I never stamp on an actual card base.  I always want that die cut front panel for the finished edge it gives my cards, even if that adds a layer.  I find that I don't have any trouble standing those cards up. To me that is part of being a clean and simple card.

While I'm on the subject of clean edges, I broke my second personal trimmer last week.  I broke the first one last year sometime so I went to my second one; both are from my time as a Creative Memories Consultant.  They were both the Personal Trimmer from Creative Memories. This was my small one that I keep on top of the cabinet I use for my inks.  I have a large and small Fiskars trimmers that use the cut line wire guide with titanium blades plus the large Fiskars Guillotine Trimmer, but I need something a little sturdier for the cardstock I cut.  I decided on the Tonic 8.5 inch Trimmer in large part because of Laura Bassen's raves about it.  Well, I am shocked at the difference in the quality of cuts it makes. Creative Memories trimmers were definitely not cheap. I had the newer versions of those with the cutting mat on the top.  I need a sturdy, lightweight, not too big size to be on my desk.  This thing is a dream!  So while I wasn't happy to break my other one, I do love this new one way more.  I didn't even know I needed it when I chose it.  You can find them at Simon Says Stamp or Amazon and probably in most arts and crafts stores as well. 

Anyway, on with the cards. I stamped the mistletoe in a variety of greens. On the Vintage Jadeite panel I had to stamp the bottom layer about three times to get the amount of color saturation I wanted but I am very pleased with the effect. There is a layer for the bottom portion of the greenery, the top portion, the berries, the berry highlights and the last one for the tiny little dots/stems on the berries.  So the 5 layers make up a single image. There is also one with no berries, but I like the berries. I just got my last set (that I have room for anyhow) of Altenew Ink Cubes which gives me twelve sets total for a 48 color selection. My most recent purchase was the Tropical Forest Collection when I got the stamp set. I stamped a couple of cards using that set, but I ultimately wanted to use the bluer based greens from Papertrey Ink to stamp my greens in. My favorite combination for greenery is Papertrey's Vintage Jadeite with New Leaf Ink. I would choose differently if I wanted more toned down colors such as Frayed Leaf with Forest Glades.

I also stamped the berries in a variety of colors. I did red berries, pink berries, coral berries, and white berries.  In the end, I covered all of those options either with Ranger Xmas Red Stickles or Tonic Ivory Seashell Crystal Drops.  I got so excited to add my jewel drops, that I forgot that I needed to die cut my panels before I added the drops so it smooshed the Jewel Drops I had added when I ran them through the die cut machine. Because I needed something to cover all of that up, I tried the Xmas Red Stickles first and love them but I also wanted a few in white.

Jennifer McGuire did some cards last week using this set and once her white pearls were completely dry, she added a tiny little comma shaped highlight with another color. I really liked that extra little touch so decided to do the same. In my case, I used Tonic Golden Sunset Nuvo Glitter Drops. I don't have any Gold Metallic Liquid Pearls or Tonic Drops, so you know I'm going to have to remedy that given my love for gold. I use both products equally (Tonic Nuvo Jewel or Glitter Drops and Ranger Liquid Pearls) although I think the Tonic products are a slightly thinner consistency.

You can also use a combination of the three different branches in the set for your card front. I combined mine with some other stamps from previous years.  The Simon Says Stamp Believe Stamp Set and coordinating Believe Die were my favorites from last year. The Believe die cut was cut from Glitter Paper while the rest of the sentiment was stamped with Versamark and heat set with Simon Says Stamp Antique Gold Embossing Powder. The die is already sold out this year so if you want it, be sure to sign up to get e-mail notification when it is back in stock or you will miss out.

The Peace and Joy Stamp is from Hero Arts and is available at Simon Says Stamp. The Large Thanks Die is one I got recently from Honey Bee Stamps. It is one of the nicest dies I own and includes a shadow mat for the word also.

As you can see, I went to town with the Majestic Mistletoe set and made cards for the holiday season and regular use.  I also think this would make a beautiful sympathy card with some of the toned down colors or even grays or browns with the pearl colored berries. My last card here uses my Brilliance Pearlescent Inks in Pearlescent Ivy and Pearlescent Thyme. Altenew came out with another leafy set at the same time called "Lovely Laurels" and it is on my wish list now for cards in a similar style to the "thanks" card and also for sympathy cards.  I know they will be just beautiful.

Thank you so much for stopping by and spending a few minutes here with me today.  If you want more inspiration using this set, you can find lots of it at the Altenew Store and Blog and probably on Pinterest as well.