Showing posts with label The Card Concept. Show all posts

Wednesday, October 17, 2018

The Card Concept #100 - Elegant Fall

Hello everyone! It’s time for a new Challenge at The Card Concept! Today I have a guest at The Card Concept Blog and here on my blog to celebrate our 100th Challenge! My Guest is Marybeth Lopez from Marybeth’s Time for Paper.  She has a blog post for the challenge as well, so be sure to follow the link to see more details about her project.  I have admired her work since I started making cards just over 3 years ago.  Each of the Design Team Members has a guest for this challenge so there are double the stops along the hop!

You know that if the challenge has the word "Elegant" in it, that I am going to find a way to add some gold and probably some shimmer or shine as well.


Here is Marybeth's Gorgeous Card!  I was super happy when she said yes to being my guest.


For this card, I used the Gina K Designs Autumn Wreath Builder Stamps with primarily Papertrey Ink cubes.  For the heat embossing, I used Versamark with Simon Says Stamp Antique Gold Embossing Powder.  Initially, I stamped the tall leafy sprig in Kraft Ink, but once I was finished, I decided to do it again only with Antique Gold heat embossing.  I used Pure Poppy and Berry Sorbet for the red and orange leaves, and ripe avocado for the green leaves.

Then to tie all the elements together, I also heat embossed the word grateful across the banner (from Paper Clippings: Birthday) using the Papertrey Ink Never Enough Thanks Stamp Set.  I popped that up on two layers of foam tape.  Next, I decided to use the same ink colors on some watercolor paper to do a bit of ink blending.  I used the MFT Falling Leaves die to cut the larger leaves for a leaf bouquet.  Once I had the card assembled, I added a few embellishments with Nuvo Drops in Autumn Berry and Gold.

For my card, I used the Gina K Designs Wreath Builder in the rectangle orientation.  If you haven't seen how this is done, I have a step by step photo tutorial from a previous post here.

I just love all of the many options the wreath builder provides and I love using mine to its maximum potential.  I've done several posts lately for many different styles of cards including Christmas and Thanksgiving or fall themed cards.  Just scroll through recent posts and you will see many of them.  

This will actually be my last post as a Design Team member for The Card Concept.  I've enjoyed my time here very much, but I am spending much more time with my daughter and grandkids which was the purpose of us moving back to Texas, so I want to be able to do my cards without having to meet a deadline.  It is important to me that my word means something, so I decided to leave the Design Team rather than saying I could do it and not being able to meet a deadline.  I plan to continue playing along with the challenges as often as possible, I just won't be posting as a DT Member.

Tangii's Guest Designer - Amy Tsuruta
Vicki Finger (You are Here)
Vicki's Guest Designer - Marybeth Lopez
Michele's Guest Designer - Jeanne Jachna
Kim's Guest Designer - Danielle Vincent
Nancy's Guest Designer - Marcia Hill
Maureen's Guest Designer - Cheryl Scrivens
Susan's Guest Designer - Nanette Tracy
Angel's Guest Designer - Brianna Loeffelbein
Mackie's Guest Designer - Debbie Marcinkiewicz
Marcie's Guest Designer - Shona Chambers
Pam's Guest Designer - Brynn Thornburgh

I hope you all enjoy the many extra guests with their beautiful projects.  Thank you so much for stopping by to spend time with me today and don't forget to hop along.  

Wednesday, October 3, 2018

The Card Concept "Sunflower Serenade"

Hello everyone!  It's time for our new challenge, "Sunflower Serenade" over at The Card Concept Challenge!  Being a Kansas girl myself, I am quite familiar with this sight as it is the State Flower and Kansas is known as" The Sunflower State".  However, in recent years there have been some new varieties and there are several colors available now, including Pink which is the Strawberry Blonde Sunflower.  I thought these bright happy colors would make a nice get well card.

I make cards for a friend who lives in Kansas and who unfortunately knows several people who are battling cancer so I know she would really enjoy a bright happy card to send to one of those people.  Because I love pink Sunflowers so much, I also decided to make a second card using Pink Sunflowers.

"Native Americans were using native sunflowers for food over 3,000 years ago. These wild sunflower seeds were only about 5 mm. long. Over hundreds of years and careful husbandry (selecting only the largest seeds for cultivation), the Plains tribes began the development of today's large modern sunflower, rich with oil.
Sunflower heads consist of 1,000 to 2,000 individual flowers joined together by a receptacle base. The large petals around the edge of a head are actually individual ray flowers, which do not develop into seed.

There are more than 60 species of sunflowers. The native sunflower grows to 15 feet tall with flower heads up to 2 feet in diameter and can produce over 1,000 seeds from one plant. The flower head turns and faces the sun throughout the day - tracking the sun's movement. Sunflower seeds are rich in protein and yield a high-quality vegetable oil".  Source: here.


I don't have a specific stamp set for Sunflowers, but the 2016 Papertrey Ink Anniversary Set has this flower that is similar enough that I use it as such.  It's called Painted Petals and unfortunately is no longer available so I'm thinking I might have to look for a set that has sunflowers.  The "Strawberry Blonde" sunflower has yellow tips on the petals with kind of pink or coral inner petal color.  It probably depends on soil conditions like other flowers do such as Hydrangeas.


I also happen to really love the leaves from the "Gran's Garden" Set by Papertrey so I took a lot of liberties to use them instead of the ones that actually go with the Painted Petals Anniversary Set.


That is it from me today!  Be sure to hop along with all the Design Team Members to see their projects today.   Here's the hop list!  

Vicki Finger (You are here)

Wednesday, September 19, 2018

The Card Concept - Pastel Party

Hello Everyone!  It's time for the next Challenge for The Card Concept, "Pastel Party".  Lately, I have been playing a lot with the Wreath Builder Templates from Gina K Designs for both square and A2 sized card panels and making lots of different styles of wreaths for all seasons.  For this challenge, I decided to try to do a pastel wreath for a Christmas card!  This is a great way to use some of those small images that we all have in stamp sets!  Look through your stamps to see what small images you have and you'll be surprised at how many will work with the Wreath Builder Templates.  A lot of it is trial and error to find what looks good and what doesn't.  We have a great line-up with the design team members so be sure to stop and visit everyone's blog!  Here are the links:

Vicki Finger (You are here)


I used four colors of ink and a few Stickles for this card.  Sweet Blush, Aqua Mist, Autumn Rose and Vintage Jadeite.  The Stickles were Pink.  The stamps I used were from WPLUS9 Be Merry Florals, Papertrey Ink's Enclosed Bell, and Papertrey Ink Happiest of Holidays for my Sentiment.  I actually really love this card and another I made for a little gift card.  

Slightly larger images can work if you think through them beforehand.  While this wreath is more asymmetrical, it still worked out great for a kind of wreath although it is not as busy as some of the others I've made.  I still have a few more variations to try this week (hopefully).  I would encourage you to play on some scrap paper or cardstock before actually trying them on your good cardstock the first time or two.  
One thing that is super important when using the wreath builder templates is that you must always start in the square orientation, not the diamond.  There's a lot of little tips and tricks that you can find in Stamp TV YouTube Videos and also Jennifer McGuire and Cathy Zilske have done a few as well.  There's probably many more out there but I don't have a lot of time to watch too many. The link above is to the wreath builder Tutorial for how to stamp for panels which will be 4 x 5.25 to fit in the template but still be mounted on an A2 Card base.  Here are a few samples I've done.


It just takes a bit of practice to get the hang of the "oval" wreath orientation and you can't get in a hurry or else you will really mess it up.  The Thanksgiving card I posted below was stamped the same way but when it came time to add the acorns, I took the template out of my Misti and Just lined it up to be centered then rotated my panel 180 degrees and stamped it again so that whichever way it ended up on the panel would work out okay because I had kept the symmetry.  I hope that makes sense.  I like how well the Thanksgiving theme card worked out and I would only change a few things about it.  Since it was a trial run to see if it would work, I was happy with how it turned out and it was the basis for today's card for The Card Concept.


I am still so busy with the new house.  It's not like I'm actually doing the work but we had a lot of upgrades that were not done when we closed.  I spend my days chasing stuff down trying to pin down dates for completion.  Absolutely nothing ever gets finished the first time and often one contractor messes up another's work and I am the one who is cleaning up each and every mess.  Let me just say, there were many extenuating circumstances that we needed to be moved, but you should never close on a house before it is completely finished.  And if I wasn't on top of everything, every single day, nothing would ever get finished.  We have part of our sod, but all of the hurricanes have left many of the sod farms unable to be accessed.  In addition to that, we are still waiting on plans for our additional garage and landscaping.

The happy news is that all of my beautiful flower bulbs will be delivered today in preparation for planting.  I got 12 different varieties of  Daylilies that are re-bloomers in colors from Pink to Coral to Purple and also a Bethlehem Sage Ground Cover that flowers.  Until the rest of our landscape is put in place, we won't plant anything else which at this point.  Hopefully next spring that will be finished and we will be able to decide what, if anything else we want to put in.  We do have a Jasmine bush that absolutely loves it here in Texas and has bloomed continuously since we moved it here at the end of May.  But we're going to have to move it to the ground or a larger pot soon.

Thanks so much for stopping by today and I hope you'll have time to join us with a project of your own.

Wednesday, September 5, 2018

The Card Concept - Colorful Basics

Hello! It's our first challenge back after summer break and we have a fun image to use as inspiration for a card.  If you'd like to join in and play along, you can choose whatever elements you like to make any style of card you would like.  The styles are listed over at The Card Concept Blog as well as inspiration from all of my fellow teammates!  There is a lot of colorful inspiration for you this week! 

I'm currently going through the Altenew Educator Certification Program.  I've completed Level one and I am moving on to level two.  I made quite the elaborate card for my daughters' birthday (at this link) so I was definitely up for something clean and simple for this challenge.  

Three of my Granddaughters have birthdays starting next Tuesday and going through Saturday - September 11, 12, and 15th.  The girls definitely don't want frilly or fussy cards but would rather have something that just fun for their birthdays.  So at least I have one of them done now!  Two more to go.

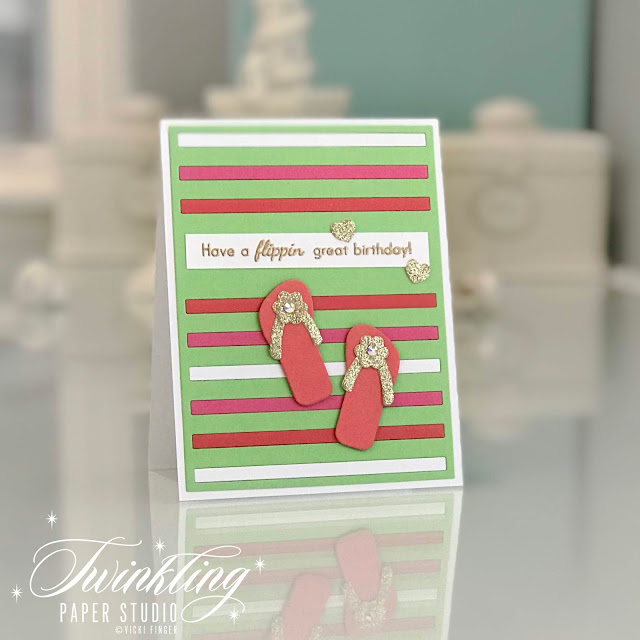
This card uses a die cut from MFT called "Striped Sentiment Coverplate".  I cut 4 of them and then mixed and matched the stripes using the Die Cut Inlay Technique with Micro pore Tape on the back side.  Then I used Flipping Out Stamps and Dies from Papertrey Ink to create the little flip flops out of some scraps of glitter paper and cardstock.  I embellished the flip flop's flower embellishment with a little gem in the very center.  I heat embossed the Sentiment in Antique Gold Embossing Powder and added the two little hearts around the sentiment.  


This is just a quick and easy card to create for a teen-aged girl.  I am pretty sure this stamp set has been discontinued now so I'm not going to link the products this time.  Sometimes, it's nice to relax and not take card making so seriously.  Just have fun with it and join in.  Thanks for stopping by today.   

Wednesday, June 27, 2018

The Card Concept #96 - Golden Table

Hello everyone and welcome back to my blog after an extended absence due to our move.  I'm excited to be back with my teammates participating in The Card Concept's Challenges.  This is actually the last one until back to school starts in the Fall, but I wanted to join in now that we're starting to get settled in.

It's a long process to get moved at this stage of our lives.  We downsized considerably this time around as it just doesn't make sense to have so much room when the kids don't all visit at the same time.  So this time around we converted a bedroom and formal dining room to be studio space for me.  I am already enjoying it so much!  There's a lot of little touch-ups that have to be done on the interior and exterior but this space is just pretty awesome!

For my card for this week's challenge, I wanted to keep the coral blooms as part of my card but I also wanted to include the wood grain of the table that is easily seen in the inspiration image.  And of course, as a girl who loves all things gold, I had to keep that bit as well.

The background paper is some I found at Michael's last Christmas and with the gold, it adds an instant element of texture to my card.  I die cut it with a Stitched Rectangle Die from the WPLUS9 Gift Card Layers Die and attached it to my horizontal card base made from Stamper's Select White Cardstock.

The blooms are from Altenew's Beautiful Day were first heat embossed with Versamark and Simon Says Stamp Antique Gold Embossing Powder and then I stamped each of the various layers in beautiful coral shades from the Altenew Tea Party Collection and then die cut.  The leaves were stamped in Altenew's Frayed Leaf and Forest Glades before die cutting them as well.  As I was finishing my card, I decided to add a gem to the center of my flowers to give them a special touch.  The sentiment is also from the same Altenew Beautiful Day Stamp Set and is probably the one I use most often.


I'm so glad I got a chance to participate in The Card Concept challenge one last time before summer break.  I linked as many supplies as possible below for your convenience (Affiliate links may be used).  Thanks so much for stopping by today.  I hope you'll come back soon.


Altenew Beautiful Day
Shop at:
SSS | ALT
Altenew Beautiful Day Dies
Shop at:
SSS | ALT
Altenew Beautiful Day Stamp & Die Bundle
Shop at:
ALT
Altenew Green Fields Mini Cube Collection
Shop at:
SSS | ALT
Altenew Tea Party Collection
Shop at:
SSS | ALT
Cuttlebug Die Cutting Machine
Shop at:
SSS
Gemini Full Size Die Cutting Machine
Shop at:
SSS
Kokuyo Long Dot Runner Adhesive
Shop at:
SSS
Mini MISTI Stamping Tool
Shop at:
SSS | ALT | GKD
PTI Number the Stars Banner Die
Shop at:
PTI
PTI Stamper's Select White Cardstock
Shop at:
PTI
Scotch 3M Foam Tape
Scotch 3M Foam Tape
Shop at:
SSS
SSS Antique Gold Embossing Powder
Shop at:
SSS
Teflon Bone Folder
Teflon Bone Folder
Shop at:
SSS
Tim Holtz Tonic Paper Trimmer
Shop at:
SSS
Versamark Ink
Versamark Ink
Shop at:
SSS
Wagner Heat Tool
Wagner Heat Tool
Shop at:
SSS
WPLUS9 Gift Card Layers Designer Dies
Shop at:
SSS

Thursday, April 5, 2018

The Card Concept {Sweet Treats}

Hello there!  It has been a few months since I've gotten to make a card for the The Card Concept Challenge.  I took this term off from the Design Team because I am so busy with the house that we are building in another state. We've been traveling back and forth every two weeks or so since December but we are making some real progress this week.  Many of the things we've been waiting on have finally arrived and are getting put in place.  This week the wall color got painted. I have a picture, but it was taken in low light, so you can't see very well.  But you can see what this guy is working on for my studio!  That entire wall will be lined with Ikea Cabinets that are being built in.  I would have loved to do more, but it all comes down to money.

The cabinets themselves will sit on a base structure a bit higher than they are right now and the top will have some built in paper cubbies for my most used colors.  That will have a top that is white and then tempered glass will be covering the whole thing.  That will be my staging area for photos.  I am hoping I can give up my very rigged lighting system, but I just won't know until I start working in that room. Because my desk is so large (8 x 8), it will take up the rest of the space in this room which is why we converted the formal dining room into additional studio space. We're not formal dining folks anyway.  We don't entertain or anything so this room will actually get used.  This picture was taken on Monday so they will be a lot farther along when we get pictures later today.  When we started this house last year, I asked Jennifer McGuire if I could use the pictures of her "craft room" in her old house to show to my builder and she said I could.  So this bank of cabinets follows a similar design.

Anyhow, I saw the post yesterday with the inspiration image and I wanted to play along, so I grabbed my Stitching Garden Stamp and Die Set to mimic the big rose on the one cupcake.  Not all of my color follows the inspiration photo and I ended up with a very monochromatic palette with the exception of the roses, but I hope you'll enjoy it anyway.

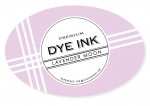
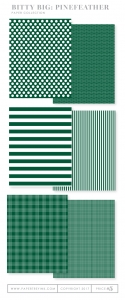
The products I used are all from Papertrey Ink and will be linked below for your convenience.  For the leaves, I stamped the base layer in Stormy Sea and the detail layer in Ocean Tides. For the blooms, I stamped the base layer in Lovely Lady, the 2nd layer in Lavender Moon and the detail layer in Autumn Rose.  The card base is made from Ocean Tides Cardstock and the striped paper is one of the patterns in Pinefeather Bitty Big.  I cut the card base using the Noted A2 Vertical Scallop Die Set.  The sentiment is from Botanical Blocks stamped on the banner from Tag Sale Quilted using Versamark and heat embossed using Simon Says Stamp Antique Gold Embossing Powder.  The little gold leaves were leftovers from another project, but I love the special little touch they added.


Thanks for popping in today to see my card.  I'm not blogging as much as usual  with our upcoming move, but I hope you'll keep coming by.  We hope to close on our house May 1st so by June 1st, I should be back in the swing of things.  The supplies are linked below (Affiliate Links may be used).

I wanted to sneak back in here to post a picture of my cabinets all assembled. The top bins are for my White Cardstock, Pre-Cut Card bases in vertical and horizontal and all of the specialty papers I use - 3 types of watercolor paper, X-Press-It Blending Card.


Cuttlebug Die Cutting Machine
Shop at:
SSS
Kokuyo Long Dot Runner Adhesive Refill
Shop at:
SSS
MISTI Stamping Tool
MISTI Stamping Tool
Shop at:
SSS | GKD
PTI Botanical Blocks Stamp Set
Shop at:
PTI
PTI Ocean Tides Cardstock
Shop at:
PTI
PTI Perfect Match Lavender Moon Ink
Shop at:
PTI
PTI Perfect Match Lovely Lady Ink
Shop at:
PTI
PTI Perfect Match Ocean Tides Ink
Shop at:
PTI
PTI Perfect Match Stormy Sea Ink
Shop at:
PTI
PTI Pinefeather Bitty Big
Shop at:
PTI
PTI Stamper's Select White Cardstock
Shop at:
PTI
PTI Stitching Garden Dies
Shop at:
PTI
PTI Stitching Garden Stamp Set
Shop at:
PTI
PTI Tag Sale: Quilted
Shop at:
PTI
Ranger Multi Medium Matte
Shop at:
SSS
Scrapbook Adhesives Thin 3D Foam Squares
Shop at:
SSS
SSS Antique Gold Embossing Powder
Shop at:
SSS
Teflon Bone Folder
Teflon Bone Folder
Shop at:
SSS
Tonic 6 Inch Personal Trimmer
Shop at:
SSS
Tonic Aqua Shimmer Pen
Shop at:
SSS
Versamark Ink
Versamark Ink
Shop at:
SSS
Wagner Heat Tool
Wagner Heat Tool
Shop at:
SSS