Friday, May 31, 2019

Altenew 50 K Followers Instagram Hop & Giveaway!

Hello all! Today I am part of a special Instagram Hop for Altenew in celebration of reaching 50,000 followers! What an accomplishment! I am happy to have been a part of this over the last few years!

Each Designer will be listed below and over at Instagram. There are several Gift Certificates up for grabs there! You don't have to have an Instagram account to follow the hop, but you do need one to be able to comment which provides opportunities to win one of the Gift Certificates up for grabs at the Altenew Store.

**GIVEAWAY** Hooray for 50K followers!!! Altenew is celebrating this incredible milestone with our very first Instagram Hop featuring some amazingly talented crafters! Altenew is also giving away 3 - $50 gift certificates and 39 - $15 gift certificates to the Altenew store! Giveaway ends on 6/6/2019. All winners will be announced on Altenew’s Instagram page on 6/12/2019. Have fun hopping along! #Altenew #Altenew50KHop 

I thought I would do a coordinating blog post because there is limited space to write an actual post on Instagram but if you just want to enjoy the Instagram Hop, you can start over there and come back for more details here.

@altenewllc
@tasnimadventures 
@mayholicdesign 
@debbyhughes 
@zsoka_marko 
@norinehope 
@hussena_cal 
@ziniaredo 
@mindyeggendesign 
@gaay3 
@dressingwithclassblog 
@craftwalks 
@happy_arty_days 
@houses_built_of_cards 
@mojosanti 
@maryampdesign 
@olga_moss 
@lilitheeckels 
@ilinacrouse 
@vicki.finger 
@alexsyberia 
@jaycee.gaspar 
@ishagupta_ig 
@erica_cacacraft 
@ashlea_crafts 
@kreativekymona 
@_michelleomurray 
@tachita55 
@yesvirginialu 
@mona.toth 
@patricia_roebuck 
@notablenest 
@lisafonseca1985 
@calyperson 
@scatteredconfetti 
@notableink 
@skypaperscissors 
@kelly.janes 
@irenemcbeatle 
@thehedgehoghollow

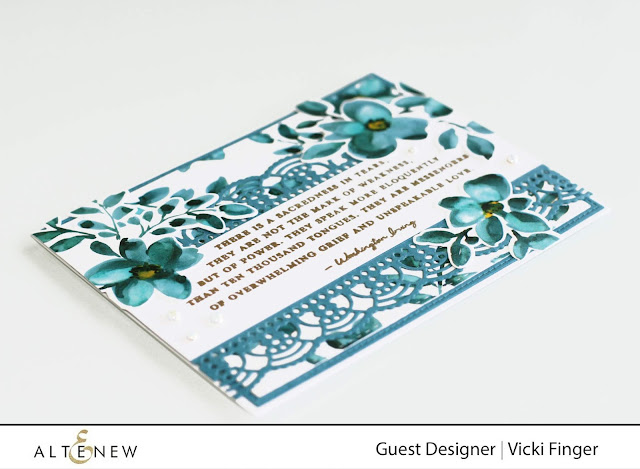
Now, let's get on to a bit about my project. We were to use a favorite floral for this hop and lately, I have certainly been enjoying the Floral Shadow Stamp and Die Set along with the coordinating Teal Shadow Washi Tape. I absolutely love that I can use the dies to create a bouquet on my card. It's super easy too. I just take a piece of 4.25 x 11-inch cardstock and cover it with the Washi Tape. Then I die cut the various pieces using the dies from the Floral Shadow Stamp and Die Bundle. This gives me plenty of different pieces to work with and is so easy to put together!

 
For my card, I started by covering a white A2 panel with the Washi Tape and then die cutting it with a large stitched rectangle for my background panel. Next, I die cut a piece of peacock shimmer cardstock and made a band to go across the card front using the Creative Edges Lace Die at the top and bottom. Then I cut a strip of Cougar Digital White Cardstock that would fit along the center of the band and stamped a sentiment from Wings of Hope Stamp Set. 


I carefully arranged my die cuts so they wouldn't obscure my sentiment and added a few Glossy Eggshell Pearls from Little Things From Lucy's Cards. I just love these glossy pearls and there are three sizes in there making them perfect for adding that special finishing touch to your card.  Once that was complete, I mounted it to a top folding white card base.  


I didn't buy anything to make this card but rather used things I already had on hand.

DISCLAIMER: Giveaway is in no way sponsored, endorsed or administered by, or associated with, Instagram or Facebook. Unfollowers/giveaway accounts do not qualify. You must be 18 and above to enter. Winners will be chosen randomly and will be given instructions on how to claim their prize. Giveaway is open worldwide.

Altenew will choose 3 lucky winners of a $50 gift certificate and 40 winners of a $15 gift certificate from the comments left in each featured designer's post. Giveaway ends on 6/6/2019. All winners will be announced on Altenew's Instagram page on 6/12/2019.

Affiliate Links Used Whenever Possible
Altenew Antique Gold Crisp Embossing Powder
Shop at:
ALT
Altenew Creative Edges Lace Die
Shop at:
ALT
Altenew Floral Shadow Dies
Shop at:
ALT
Altenew Floral Shadow Stamp
Shop at:
ALT
Altenew Foral Shadow Stamp and Die Bundle
Shop at:
ALT
Altenew Teal Shadow Washi Tape
Shop at:
SSS | ALT
Altenew Teal Shadow Washi Tape and Die Bundle
Shop at:
ALT
Altenew Wings of Hope Stamp Set
Shop at:
SSS | ALT
Cuttlebug Die Cutting Machine
Shop at:
SSS
GKD - Connect Glue
GKD - Connect Glue
Shop at:
SSS | GKD
Kokuyo Long Dot Runner Adhesive
Shop at:
SSS
Little Things from Lucy's - Glossy Eggshell Mix
Shop at:
SSS
Marvy Jewel Picker
Marvy Jewel Picker
Shop at:
SSS
PP.com - Cougar Super Smooth Digital White - #110, 200 pack
Shop at:
PP.com
PP.com Curious Metallic Peacock
Shop at:
PP.com
Ranger Multi Medium Matte
Shop at:
SSS
Teflon Bone Folder
Teflon Bone Folder
Shop at:
SSS
Tim Holtz Tonic Paper Trimmer
Shop at:
SSS
Versamark Ink
Versamark Ink
Shop at:
SSS
Wagner Heat Tool
Wagner Heat Tool
Shop at:
SSS
WPLUS9 Gift Card Layers Designer Dies
Shop at:
SSS

Saturday, May 25, 2019

May 2019 Keeping Christmas Blog Hop


Hey everyone.  I do not have a post today as we had several of our grandkids graduating this year and have been traveling non-stop for about the last 10 days.  Our last graduation was this morning, so I'll be back next month with a new group of cards or projects for you.

In the meantime, please join in the hop which starts at Kelly Lunceford's Blog.


Anita Madden (off this month)


Julee Tilman (off this month)


Vicki Finger (off this month)


Thanks for stopping by!

Wednesday, May 8, 2019

Graduation Cards Introducing PaperPapers.com

Hey everyone!  I don't know about you, but I have a whole bunch of graduation cards to make this year.  For my husband and his siblings, many of our grandchildren are graduating from High School in the next few weeks.  Three of our grandchildren are graduating and two of our great-nephews are as well.  There's no way possible for us to be in so many places all at once as we are scattered across several states, so in those cases, a card will let them know we are thinking of them on their special day.

I've also been switching some of my white cardstock over to another brand that I like even more than Neenah Solar White which is Cougar Digital White Super Smooth - 8.5X11 Letter Card Stock Paper 110lb COVER - 200 PK.  This is a 298 GSM/#110 Cardstock.  I love the super smooth surface of this cardstock for stamping.  I still use Papertrey Ink for the majority of my card bases, but I love stamping on the super smooth surface of the Cougar for stamping my images and die cutting.  The surface is so smooth that the ink blends right away and doesn't take as long to even out after stamping.

Last month, I decided that I wanted to have a broader selection of specialty cardstock available to me and so I started out buying one here and one there to see whose I liked.  I found a great source for bulk cardstock in a variety of styles and colors.  I had bought a couple of things from them since I started my blog, but this was the first time that I really paid attention to what they had to offer.


You know how I love shimmer, shine, and sparkle so metallic cardstocks are right up my alley!  But at most stores, they are quite costly at $1.00 or more per sheet. And it can be difficult to find the right color when you can't be there to shop in person.  So I went back to the place where I had made my most recent purchase to see what they offered and I ordered a few colors that I thought I might like.  The nice thing about this company is that when they send your order, they also send some sampler packs of other colors and styles of paper.  I was specifically looking for shimmer and metallic cardstock.  That ended up giving me more colors to look at in person and so I ordered more.  I have pretty much all the colors I want at this time.  I have been so impressed with this company that I asked if they had an affiliate program.  They did not, so I shared the company that I am an affiliate through with them.  They signed up and got approved and asked me to apply so they could approve me.  Now, I get to share this resource with you.

Introducing PaperPapers.com.   They have an enormous selection of cardstock and specialty papers available and many sizes as well. They will also cut cardstock for you if you so choose.  When you are searching for any kind of paper, narrow it down to the size paper and the quantity you are looking for and that will eliminate most of the extra sizes that as cardmakers we aren't interested in.  This company also has envelopes if you want something coordinating for a particular occasion.  They offer sample packs by color for purchase and in everything else, the smallest available quantity is a 25 pack.  So if you narrow it down by size and quantity, that also eliminates looking through thousands of possibilities.  Their selection is huge!  Since mostly I was looking for metallics, I selected that as my first criteria.  Then I told it 25 as my quantity so that greatly reduced my list of what I had to look through.  There's a whole section on the left-hand sidebar for ways to search; size, color, weight, quantity, etc. 

Pay close attention to the GSM and weight of your selections.  If you don't understand about GSM and how that translates to weight, PaperPapers has a great guide on their website here.  I was quite surprised to find that a few of the papers I selected were only available in 249 GSM which equals 92# but it's still quite heavy and will certainly work for most of the purposes I have.  I like to use this type of cardstock for backgrounds and that type of thing but rarely use it for a card base.  However, it is heavy enough that I could.  In fact, on one of the graduation cards I made, I did use the Silver Metallic as a card base.  I have a wide variety of weights here from 92# up to 111# cardstock.

I store my cardstock in the same way as Jennifer McGuire, using Job Ticket Holders so I have it labeled by the company and then color.  In this first picture, you can see that there is only one metallic cardstock that is from another company and that is the Misty Rose Metallic because PaperPapers didn't offer anything in this color.  I wanted Mauve but I had to buy 50 sheets of this and pay shipping in addition to that.  It was reasonably priced until then.  I had previously ordered some mauve papers from other suppliers that turned out to be baby pink, not mauve or were so thin because they call it heavy weight and don't list the GSM.  I don't like sending stuff back, so when I got my first order with samples from PaperPapers, I was super excited to see the quality and to order additional colors. I have about one and a half shelves of the metallic cardstock, so I have my most used favorites sharing a shelf with regular favorite cardstock.


As you can see, I also cut the label from the shrink wrap on the paper pack itself and tuck it into the cardstock holder.  This tells me the GSM, Weight, Color, and Brand of Paper it is.  In this case of the top image, the brand is Curious Metallics, the color is Peacock and it is a #111/300 GSM Cover Weight Cardstock.


Let's get into the cards so I can show and tell you which colors I used.  These cards consisted mostly of die cutting and assembly with not much stamping involved so let me show you some samples.


For this card, I chose Peacock Metallic cardstock with White Cardstock and Gold Foil Cardstock.  Gold foiled cardstock is hard to find at a reasonable price, so when I find it at a reasonable price, I buy a few packs.  So far as I can tell, PaperPapers does not carry gold or silver in the shiny metallic (mirror) finish, only the shimmer but for this card, I wanted the shiny gold.  I used the Pink Fresh Studios Gatsby Die cutting the background piece from Shine Pearl White Metallic cardstock and the front piece from gold mirrored cardstock.  I had a lot of trouble the first time around with the skinny detailed piece and messed it up before getting it on the card, so for the second try, I Xyroned my paper strip before cutting it.  This worked much better.  The Hooray Die is from Simon Says Stamp and is a favorite.  The whole front of the card is done with the specialty papers while the card base is Stamper's Select White which is a nice heavy weight #110 cardstock.  I like using it for all my card bases. This card is for my granddaughter, Emily, whose favorite color is teal.


Inside, I stamped a greeting from Poppy Stamps Art Deco Frames & Phrases that says, Congratulations, you did it!  Each of my cards is the same style and sentiment and only has different colors.


This card is for one of my grandsons, Charlie.  He loves Red - all colors and shades of red to include pink, coral and everything in between.  He also really prefers silver over gold so I actually did use Curious Metallics Silver cardstock for this cardbase.  Again I used Shine Pearl White Metallic with Silver Matte Foil Board.  Having learned my lesson from the first attempt, I Xyroned the cardstock first and then die cut it.  I did the same with the Hooray Die cut.  Mostly, I am okay with using Ranger Multi Medium Matte or Connect Glue, but these are very intricate dies, so I was trying to make my life simpler.


I also have a Navy with Grey and White and a different Red with Gold and White version of this card.  I have just one more to do to be finished for this year.  Once I figured out my design, it went pretty quickly.

If you've hung around till the end of this post, I'll be sharing another post with all of the metallic cardstocks I got and sharing photos of it with you in my next post.  I should warn you to start with a few colors at a time.  It's pretty easy to hit the $39.00 mark for free shipping.  I planned ahead for this year to get reinkers and specialty card stocks and to try not to buy stamps unless I know that I will use them. There's definitely a purge coming in my future!  There were so many times I wished I had more colors in the Metallic Cardstock and now I feel like I have pretty much every color.


Thank you for your support!  There's a couple of colors that my friend, Cindy O, will be especially interested in seeing, so stay tuned to see all of the colors I got. 

Thursday, May 2, 2019

Creating New Colors Without buying New Inks

I promised last week that I would get working on this post for many of you who asked about how I created the colors I used for the Butterflies and Lady Bugs using the Petals & Wings Stamp Set from Gina K Designs.   I wanted colors that matched my patterned papers, but no one brand of inks had the colors I wanted so I did a bit of experimentation.

I received a package in the mail that included the card on the left from Karen Hightower.  While I realized where the butterflies came from, I hadn't used my set yet, so I hadn't realized there was a ladybug in the set.  My best friend loves ladybugs so after that,  I got my stamp set out to use it!

I had four sheets of this patterned paper in my stash from an older My Minds Eye paper pad that I knew would match the style of cards I was planning to make and that it was also a similar style to the design of the stamp set itself.   So I set about to play around with colors to see what I could do to make the colors a bit of a better match.

Because I wanted to stick with all Gina K Designs Inks as much as possible, I just pulled out my tray of Gina K Ink Cubes and started playing around a bit with color to see what I could do.  While these are not a perfect match, they are pretty dang close so I wanted to share with you what I did.

Here are some of the many Images I stamped to get just the right color for the cards I was planning to create.


If you have a basic understanding of how colors work, it's pretty easy to figure out what to use for your combinations.  All of the bodies were stamped with Black Amalgam Ink.  In order from left to right are the following:  Tranquil Teal, with no other color added.  Next, I used Bubble Gum Pink for the base layer with Passionate Pink added on top.  The third set is Cherry Red (my favorite Red) all by itself.  Next up comes Peach Bellini with 2 layers of innocent Innocent Pink on the top layer.  That gave me the kind of peach pink I was looking for.  The last set on the top row is Blue Lagoon with no additional color added.

For the second batch of Butterflies and Ladybugs, I used Dusty Rose with Bubblegum Pink on the top layer.  The next set was done using a base layer of Lovely Lavender with Innocent Pink for the Top Layer.  Next up, I stamped Wild Lilac with Passionate Pink for the Top Layer.  And they last two sets are both done in Turquoise Sea which is such a gorgeous color all by itself.  The softer colors were the ones I mixed two colors to achieve the ones I wanted a blended color for.


On this particular card, I used two layers of Peach Bellini with two layers of Innocent Pink.  I needed the slightly pinker version to go with the DSP, so I did double layers of each color to make it really pop off the background panel.  I used the Gina K Designs Elegant Oval die for the DSP.


I should also mention that is is the rare card that doesn't get some shimmer mist added to it somewhere.  That's the kind of "sparkly" areas that you can see on the images in all the photos.


I actually mailed one of these cards to Gloria (my BFF) before I photographed it but these cards were all along these same lines. You can see that the DSP I used was a great fit for the style of the butterflies and ladybugs.  Once I ran out of DSP, I grabbed some of my Alcohol Inked Backgrounds that I thought I might never use and went to town with them. Dies used for these backgrounds are the Elegant Oval, Heart Circle Die, Single and Double Stitched Circles which are all Gina K Designs.


For this card just above, I did a very light layer of Plum Punch with a heavier layer of Passionate Pink.  I used Plum Punch Cardstock as well as white and Gold Cardstock.  I saved a few of the little hearts from the Heart Circle Die to add to my greeting and then went over them with Crystalline Drops from Gina K Designs.  These work like Glossy Accents, but are much easier to control because of the dispenser.  The other card was one layer of Lovely Lavender with one layer of Innocent Pink.  I still have my MISTI set up to stamp more of these.


This card uses an alcohol inked background that I die cut using the Elegant Oval Die with Turquoise Sea ink.  I added a few Sequins with gems in the center for a pop of color.  It also so happens that I am a shimmer cardstock Junkie and this particular cardstock is called Peacock.  What a perfect color, huh?


I rarely buy DSP unless it is foiled but I do have the odd sheet or two of it in my stash.  I also really love the way this particular card came out.  These butterflies were stamped using tomato soup with two layers of Peach Bellini over it.  I used a scrap of soft aqua cardstock to cut the background panel because it tied into just the very few little aqua colored flowers in the paper.  I think those colors just pop off the paper together.  Again, a few sequins with gems in the center add a finishing touch.


And last but not least, a traditional colored Ladybug card done with Cherry Red Cardstock, Black Onyx, and some Creative Memories Gingham from many years ago for a fun card.  Once again, I used the Crystalline Drops for the hearts.  I also used Crystalline drops on many of the dots on the ladybugs in all of the cards.  It was a fast and easy way to add the dimension to the spots and more forgiving that Nuvo Drops although I did a few of the cards using them.  But the first time I messed one up, I switched to the Crystalline drops.


I was making these cards last week when we were expecting company on Saturday, so while I was cleaning off my desk and cleaning up the studio, I came across a few random things plus I put extras in my little dish on my desk.  While cleaning, I had to stop to pull one more card together for an upcoming birthday card.  The pink gingham, the white belly band, the black background panel and the two circles (one with a sentiment) were all in the pile on my desk along with the pink butterfly and ladybug, so it literally only took a few minutes to put this card together.  It's one of my favorites and I already have a young lady in mind that I'm planning to give it to.

The point of this post is this - if you don't have quite the right color of ink, play around with layering them until you get what you want.  For example, Mauve tones are pinks with a bit of purple in them.  So I used a lighter purple for the underneath color and added pink on top.  Just think about what undertones the color you want to use has in it and then add the secondary color.

I hope this information has been helpful to you all.  Stamps, Inks, and Dies are all Gina K. Designs and my affiliate link is here.  I appreciate it when you shop through my link as it supports my blog so I can continue to bring you content, techniques, and ideas.

Thanks so much for stopping by today.  I appreciate you very much!

Wednesday, May 1, 2019

Altenew Build-A-Flower: Snapdragon Release Blog Hop + Giveaway

I am so excited to be joining Altenew as a Guest Designer today for the Build-A-Flower Snapdragon Release Hop!  You should have arrived here from Seeka's Blog.  Here is a list of all the stops along the hop for your convenience.  If you didn't start at the beginning, you can go back to the Altenew Card Blog for the start of the hop.

» Vicki Finger « 


Build-A-Flower Snapdragon Layering Guide
I had so much fun playing with this set!  I have a lot for you to see today and lots to talk about so let's get started.  This is a fabulous layering stamp set and as always, a layering guide and sample cards with color suggestions are provided for you.  

I must confess, as soon as I saw the graphic for the set, I knew I wanted to try a few variations of it, to include one that is not a Snapdragon at all, but a Texas Bluebonnet, which is the Texas State Flower.  I have a group of friends that I used to gather with a few times a year for a scrapbooking retreat.  One particular retreat happened when the Bluebonnets were just beginning to come into full bloom.  

Most of you probably don't realize that I worked as a professional photographer back in 2005.  The physical demands of that became too much for me after I was diagnosed with a few Autoimmune Diseases.  I captured this bluebonnet image while we were all taking pictures with our friends in the bluebonnet field near our hotel.  Most of the ladies who were present at that retreat purchased this image in a large size from me and I had them printed on Metallic Paper which is a specialty photographic paper.  Even back then, I was all about the shimmer and shine.  I actually had a large print of this image in my home for a while but I think I gave it away during our last move.  

This was the first card I made with the new Snapdragon BAF, and it was made with love in honor of those friends and memories of great times together.  The leaves are a little bit different than on a Bluebonnet, but it's close enough that those ladies will know what it is.  

For this image, I use two of the leaf frame die cuts in White and rotated one of them 180° to really get a full looking frame.  I stamped the blooms in Arctic, Ultramarine, and Azurite.  The leaves were stamped in Just Green and Hunter Green.  The sentiment is also from the BAF Snapdragon.  This made a pretty great bluebonnet card. 

Image result for snapdragon images
© Getty Images
Next, I went with some more fun colors for traditional Snapdragons.  My next card used Frosty Pink, Coral Berry, and Ruby Red while the stems and leaves were stamped in Forest Glades and Evergreen.  I used some soft green background paper and a strip of more dramatic green foiled cardstock for a strip along the left-hand side.  I used a sentiment from the Beautiful Heart Stamp Set for this card.


For my next color combination, I stamped in Rose Quartz, Baby Pink, and Fuschia with the stems and leaves done in Forest Glades and Evergreen.  I wanted something a little more fun than my usual style, so I used Black Cardstock for the background panel with some Pink Plaid and Black and White Gingham for the background layers.


The "thanks" stamp was an Altenew freebie that I stamped in Versafine Black Onyx and heat embossed with Clear Embossing Powder on a little tag that was on my desk.  I used a black brad to secure it to the panel before adhering to a white card base.


Last, but not least, I wanted to use some specialty cardstock that I had in a color called Misty Rose Shimmer which is a mauve color.  Now, Altenew does not have inks in that color family so with a bit of experimentation, I was able to come up with a way to make my own.  For the first layer, I stamped Soft Lilac first and then went over that with Rose Quartz.  The two colors combined to give me the Mauve that I was looking for.  For the 2nd layer, I stamped first in Lavender Fields and then in Baby Pink while the 3rd layer was done in Lavender Fields with a gentle inking of Grapevine.

I die cut the frame from Sweet Friend Stamp and Die Bundle using gold foiled cardstock and then heat embossed the frame stamp onto the die cut.  It gives it a tone on tone gold look.  I also die cut the center of the frame from the same Misty Rose Cardstock and heat embossed the XOXO from the Sweet Friend Stamp Set.  Arranging the blooms to kind of circle the frame, I tied a little pink bow at the left center side and added the die cut butterfly.

I got pretty experimental with the color layering of two different color families to produce a color that isn't out there yet and I will be having a follow-up post here on my blog for that very soon.  It was pretty interesting how many other colors could be achieved using this method.
This is a monthly subscription plan for our Build-A-Flower set. When signed up, you are guaranteed a spot in our monthly BAF releases and will receive a set each month - at a specially discounted price! ($35.00 →$29.99)

Prizes:
To celebrate this release, Altenew is giving away a $30 gift certificate to 6 lucky winners! Please leave a comment on the Altenew Card Blog and/or Altenew Scrapbook Blog for a chance to win.

Altenew will also draw a winner to receive a $15 gift certificate from the comments left on each designer’s blog on the blog hop list below. All winners will be announced on the Altenew blogs on 5/10/2019.

The next stop along the hop is the fabulously talented TaeEun Yoo.  If you aren't familiar with her work, you should be.  She is incredibly talented!  Thanks for stopping by today.  I really appreciate your visit and when you take the time to leave me a comment.