Saturday, November 18, 2017

Dahlia Turnabout

Today's card is courtesy of an ingenious design from Concord & 9th that I've been working with for a few days.  I'm going to give you fair warning here that this is going to be a very picture heavy post.  Concord & 9th has some of the most innovative and well engineered products on the market and this one is phenomenal. In recent months, they have released several of the "Turnabout" Style stamps but they were all geared to being background stamps. Customers had asked for a smaller version that could be used in a Mini MISTI and they delivered as well as trying out a new type of die in the same Turnabout Style.

The Dahlia Turnabout Bundle is the stamp set and the die in one bundle and because you are buying them together, you get a bit of a discount vs. purchasing them separately. They are each available for purchase separately if you aren't sure about the die. The cool thing about the die is that it works the same way as the stamp, requiring anywhere from 1- 4 rotations depending on the look you want.  For the first card I made, I opted to use just one die cut position to allow my Rose Gold Metallic Cardstock to show through.

For this first time using the stamp, I didn't get my paper lined up perfectly for the stamping, but it is good enough.  I don't say that lightly because I am a perfectionist.  But the petals on a flower wouldn't be all perfectly symmetrical so this is okay. I used Sweet Blush, Berry Sorbet and Pure Poppy Inks for this card and some Rose Gold Metallic Card stock that I found at Michael's when I was doing some borders for a wedding album back in the spring.  I bought extra sheets because I had such a hard time finding it. I die cut the "awesome" (a Waffle Flower Die) from the same Rose Gold.  The "You're" is from an older stamp set by Concord & 9th called Being Classy and I stamped it in Versamark on a little angled banner and heat set it with Ranger Copper Metallic Embossing Powder.  That was the first Concord & 9th product I ever bought.  It was the perfect size for this card.

I think you can see where the die cuts from this photo that I took this morning.  It was dark outside when I tried to photograph this card last night so I didn't post a very good picture although I did get one up on Instagram.

Greg from Concord & 9th did a video and so did Jennifer McGuire on how to use the stamp.  When I made my first card, Greg's video was the only one up. Jennifer's went up just as soon as I finished my card. Jennifer highlights a few ways to use this set and shows a few other products as well.

These cards are for a card drive that I am participating in and shows just a few of the many color combinations that you could use.  The colors are listed below in the linked supply list.


After I had made a few of these, I wanted to make a Christmas Card so I grabbed some Jewel Toned Inks and some gold foiled cardstock along with the Believe Stamp and Die Set from Simon Says Stamp and made this lovely card.

One of the rotations of ink is stamped with Versamark and heat embossed with Simon Says Stamp Antique Gold Embossing Powder done twice.  Jennifer McGuire showed this technique a couple of weeks ago and since I love gold, I loved learning it.  It just helps make the embossing pop a lot more and I only did two layers here on the bloom.  The Sentiment was only done once.  It's a little hard to see the gold foiled die cut sentiment, so I popped another view in here for you so you can see that it is there.


Thank you so much for stopping by today.  I'll be adding this Christmas Card to the Simon Says Stamp Flickr Challenge #84 and to the Tic Tac Toe Challenge.


Stamper's Select White Cardstock
Shop at:
PTI
Pure Poppy Cardstock
Shop at:
PTI
Pure Poppy Ink
Pure Poppy Ink
Shop at:
PTI
Simon Says Stamp Merlot Ink
Shop at:
SSS
Simon Says Stamp Evergreen Ink
Shop at:
SSS
Simon Says Stamp Antique Gold Embossing Powder
Shop at:
SSS
Simon Says Stamp Believe Stamp Set
Shop at:
SSS
Simon Says Stamp Believe Wafer Die
Shop at:
SSS
Concord & 9th Dahlia Bundle
Shop at:
C+9
Waffle Flower Awesome Word Die
Shop at:
SSS
Concord & 9th Being Classy Bundle
Shop at:
C+9
Kokuyo Long Dot Runner Adhesive
Shop at:
SSS
Simon Says Stamp Maliblue
Shop at:
SSS
Simon Says Stamp Audrey Blue Ink
Shop at:
SSS
Simon Says Stamp Island Blue Ink
Shop at:
SSS
Simon Says Stamp Soft Navy Ink
Shop at:
SSS
Papertrey Ink Hawaiian Shores Cardstock
Shop at:
PTI
Papertrey Ink Perfect Match Sweet Blush Ink
Shop at:
PTI
Papertrey Ink Perfect Match Berry Sorbet Ink
Shop at:
PTI
Ranger Copper Metallic Superfine Detail Embossing Powder
Shop at:
SSS
Simon Says Stamp Lucky Ink
Shop at:
SSS

Wednesday, November 15, 2017

The Card Concept {Retro Holiday}

Hello everyone and welcome to a new challenge at The Card Concept.  This challenge we have a theme of Retro Holiday.  I had the hardest time deciding which way to go with this challenge but I finally settled on Retro looking ornaments and used the Vintage Ornaments II Collection of stamps and dies designed by Dawn McVey for Papertrey Ink.

There are no special techniques or anything here.  I used a piece of green shimmer cardstock leftover from a wedding album I did several years ago for the background panel. I prepared my surface for heat embossing by using a powder tool on it then stamped the ornament outlines onto watercolor paper using Versamark with Antique Gold Embossing Powder. Once I heat set them, I stamped the interior pieces with Hibiscus Burst Ink and Tropical Teal Ink and misted it just a bit with water before stamping it into place. For the highlights I used Summer Sunrise Ink. This just allows the edges to soften a bit to get a better blend of color.  Each of the different parts of the ornament is a different stamp so you can use a variety of colors or just a couple of colors. 


I die cut some gold foiled cardstock using the Tim Holtz Holiday Greens Dies as my tree branches.  I stamped a coordinating "Merry Christmas" Sentiment from the Beautiful Berries: Winter Stamp Set in the same gold embossing powder onto Aqua Mist Cardstock and attached that with some 3D Foam Tape.

This was really simple to create.  I have the original version of Vintage Ornaments from Papertrey and I'm thinking I better get that set out and create some of those as well.  If you have time, create the ornaments ahead of time. They don't have to be heat embossed, I just enjoy doing that. You can make several so that if you need to pull a card together quickly, you can. When I'm working with a specific set, I always make a few extras because until I lay the design out on my card front, I'm not sure how many I might want.  This is also good to do in case you mess one up which I have been known to do from time to time.  Any extras that I don't use, I just tuck into the stamp pocket with the stamp set.  

Be sure to stop over at The Card Concept Challenge Blog to see all of the projects from the Design Team Members.  There are some fantastic cards from my teammates.  

Tuesday, November 14, 2017

Papertrey Ink November 2017 Create Along With Us

It's time for the November 2017 Papertrey Ink Create Along With Us Challenge which is a monthly occurrence most of the time.  I have been inspired by all the lovely snowflake cards and tags this release and I've been anxious to use my Silver White Winters Stamps and Coordinating Dies. I started with a white, top folding card base made from Stamper's Select White Cardstock, an A2 panel of Night Sky Shimmer Cardstock die cut with an A2 Stitched Rectangle Die from WPLUS9, Versamark Ink and some Silver Embossing Powder.  I cut one of each of the snowflakes from Silver Cardstock and then attached the small one on top of the larger one in the same design. I used Ranger Multi Medium Matte to do this. Once that was dry, I set a crystal in the center of the snowflakes, also with Ranger Multi Medium.  Then I placed the the snowflakes loosely on that panel so I could arrange my swooshes and greeting stamps how I wanted them. I put that A2 panel in my Mini MISTI so I would be able to stamp it twice if wanted or needed to.  In this case it was a want.

I inked it lightly in Versamark and heat set it with Silver Embossing Powder.  I don't have any Fine Detail Silver (although I added some to my cart at Papertrey for my next order) so I had to keep a gentle touch with what I was doing.  After I heat set my stamping, I lightly inked it up again with Versamark and Silver Embossing Powder and heat set it then repeated it one more time, giving it three layers of heat embossing.  This really adds a ton of dimension.  Because my silver powder is not a Fine Detail Powder, I couldn't keep the swooshes as fine as the stamp but in this instance, I was going for a bolder embossed looked.  I'm telling you, I love this technique for adding dimension but you definitely must use a light touch and add layers rather than trying to go heavy handed and do it less times. I do have some Ranger Liquid Platinum Embossing Powder that is Fine Detail Powder, but I felt it was too gunmetal grey for these shiny silver snowflakes.  I used Silver Mirror Board from Do Crafts for my die cuts. 


That's it for today.  I hope you like my card and will come back another day.  I'll be back tomorrow with my card for The Card Concept Challenge.  Thank you so much for stopping by!   

Monday, November 13, 2017

White on White Challenges

Good Morning, Everyone! Today I have a project for a few challenges. I will be participating in the Inspired By All The Little Things with a gorgeous photo to inspire us, The Paper Players Challenge with a color challenge theme of White on White and the Tic Tac Toe Challenge using the center row across of Die Cut, Free, & Leaf. I've actually been watching for a White On White Challenge to come from somewhere and I felt pretty lucky today that I get to make 1 card for more than one challenge this time around. It doesn't happen very often. I can regularly combine one project with 2 challenges but I've only ever done one card with 3 challenges a few other times.


I saw quite a few white on white challenges this time last year so I've had in my mind for the last few weeks what I would create if I saw another one.  Part of the trick of doing white on white is texture so that each layer has something it offers that is different from the other layers.  For my card, I knew I wanted to use my Poinsettia Dies from Spellbinders to create my card which both cuts and embosses the die cuts. I wanted something that would emboss well so I chose #140 Watercolor Paper which is thicker and heavier than my normal white cardstock.  I took three A2 sized panels and misted them with Iridescent Gold Glimmer Mist from Tattered Angels.  I buy mine directly from Canvas Corp. I also did an A2 panel of Linen Cardstock at this time so it would have time to dry before I die cut it for my background panel.  Because those two papers are such different textures, it adds that interest when you see it in real life.  I also used a couple of the Tim Holtz Sizzix Holiday Greens Dies for some extra foliage.  

Once everything was dry I started die cutting all of my pieces beginning with the Spellbinders Hem Stitched Rectangle in the largest size.  This cuts the panel to be about 1/8th inch smaller than your card base.  I embossed it as well to give it that extra bit of detailing on the panel.  I mounted that to my card base made from Gina K Designs Heavy Base Weight White Cardstock.  I got several colors of this card stock when I ordered my Stamp TV Merry & Bright Kit last month which was a fun way to try out some of the colors.  I really love the #80 Layering Weight White and the #100 Heavy Base Weight White depending on what I am using it for.  It is the absolute smoothest, silkiest white cardstock I've used. It isn't as heavy as Stamper's Select White from Papertrey Ink, but I know there will be occasions where I want to use it and this was one of those times. The color is a little different than Stamper's Select White as well and I felt it was a better match to the not so stark white of the watercolor paper and the Papertrey Ink Fresh Snow Linen Cardstock I was using.  I like to have options so that I can choose the best fit at the time. Only the White Cardstock is a different feel.  The rest seems comparable to the Papertrey Ink Cardstock I am already using and that I have been very happy with.  I'm not one to think I have to have all of the inks in all of the colors and all of the brands, (you could go broke trying) so I want my ink to match my cardstock and Papertrey Ink's Perfect Match Ink and Cardstock system is fantastic and I am planning to stick with it. 


I took all my die cuts and started assembling the poinsettia blooms and the foliage and laying it out on my card.  I used Ranger Multi Medium Matte to adhere the flowers together using the top two layers for the smaller bloom and the top three layers for the larger bloom.  There is also a 4th and larger layer but I felt that was too big for my card. I used some pre-arranged little pearl clusters for the center of the poinsettias attaching them with Ranger Multi Medium Matte as well. They come with sticky dots on the back but Multi Medium holds much better, even through the mail. Then I started assembling my card.  I adhered the Hemstitched Rectangle to a top folding white card base using my Kokuyo Tape Runner.  For the foliage I used Multi Medium Matte with an acrylic block sitting on the top for a few minutes to give it time to adhere.  Then I added the poinsettia blooms.  Once I had everything attached, I used my Wink of Stella Clear Shimmer Pen over the flower and foliage that was showing. Even though I had spritzed with shimmer spritz, this really added a lot more shimmer to the flowers although you may not be able to see it in the picture.  My current Wink of Stella seems to have a particularly high concentration of shimmer in it.  

After that I die cut the tag from the Keep It Simple Frames Dies little tag banner from some of the leftover watercolor paper scraps.  I chose the Merry Christmas greeting from Beautiful Berries: Winter Stamp Set and heat embossed that with Antique Gold Embossing Powder and then repeated it for a double heat embossed sentiment. I used the Mini MISTI for this.  Jennifer McGuire did this technique a week or two ago and I love the difference it makes in my embossing so you'll be seeing this technique often.  For the final touch, I wanted to put a brad or something in the hole on the tag.  I chose a Christmas Tree brad (it was silver when I started) and covered it with Versamark and then gold embossing powder and heat set it.  I let that cool and then did a second coat on that as well.  


I absolutely love how this card turned out and I am really happy to get to enter it in a few places this week!  This card predominantly consists of die cutting so it went very fast.  You could do lots of die cutting and then sit and assemble the flowers how you want them. I added extra layers to the ones I've created here, but you definitely don't have to. I did because I knew I wanted to go all out for this card.  You could also use larger single pearls or Liquid Pearls or Tonic Nuvo Drops for the flower centers which will also make assembly go fast.  If you have white pearls and want them to be a different color, use an alcohol based marker to change the color (such as a Copic marker).

To get a larger version of the images, right click and "open in a new tab" and it will bring up a larger image for you to see.  Thank you so much for stopping by today!  We have about 11 days left before we go for the Finger Christmas in November Dinner and I have several more projects in mind to share with you so I hope you'll come back often.  

Friday, November 10, 2017

Day 7 of the Official We Love Dawn Blog Hop with Papertrey Ink

Today is the 7th and last day of the Official We Love Dawn Blog Hophonoring Dawn McVey and her joy filled heart, even in the midst of 7 years of very trying circumstances.  I speak from experience when I say that being sick a lot is difficult and being sick every single day can suck the joy, peace and hope right out of you.  Yet, through it all, Dawn has maintained a positive attitude.  I've only known Dawn via the paper crafting industry for about 2 years when I first found Papertrey Ink.  It was December of 2015 and now I don't know how I missed them for so long. I love their products and they just seem to suit my style so much.

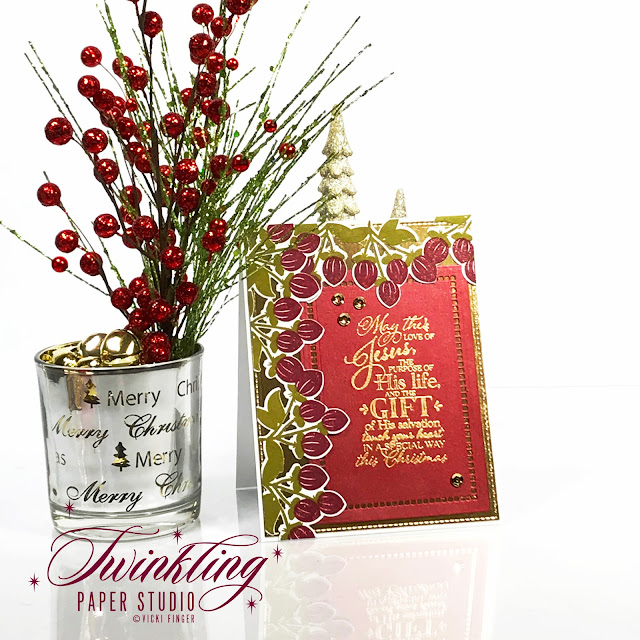
Today's card uses a couple of sets designed by Dawn.  The first is "A Thrill of Hope" which features many faith based holiday sentiments for Christmas Cards.  This particular verse is my favorite of the set and the typography is fantastic.

I started by die cutting a stitched rectangle from gold foiled cardstock for the background.  Then I die cut a smaller hem stitched rectangle (Spellbinders) from the Scarlet Shimmer Cardstock.  I knew that I wanted to use the Holiday Greens Borders Stamps and Dies to create at least one border, so I cut a piece of 4.5 inch x 6 inch Stamper's Select White Cardstock and then cut two of the berry borders from that piece of cardstock.  That way, I could make sure they stamped end to end (the full 5.5 inches) but I could keep the cardstock in place using my Mini MISTI with the die cut negative as my placeholder.  This just makes it incredibly easy to stamp the two layers while keeping everything aligned.  I stamped the greenery in Ripe Avocado Ink and the berries in Scarlet Jewel Ink.

For the sentiment, I went over the Scarlet Shimmer rectangle with my powder tool which is especially important with vellum or shimmer cardstock.  Because the surface is a bit slicker, I find that any residual oils or lotions on my hands are even likelier to trap stray particles of embossing powder so I always make sure to use my powder tool first.   I stamped the sentiment in Versamark and heat set it.  Then I adhered that onto the lower right hand side of the larger background panel so that I could put the greenery on the top and left sides of the sentiment panel.  Once I had the greenery added, I went over all of the berries with my Wink of Stella Clear Shimmer Pen which you may or may not be able to see here. 


For a finishing touch, I added a few gold sequins for a touch of elegance. The way the light caught the shimmer cardstock here, it looks lighter than it actually is.  While not as deep a color, it is a good match to the Scarlet Jewel Ink that I used for the berries.

I hope you've enjoyed this week long festival of projects I've made using products from Papertrey Ink and all the Stamp and Dies that were designed by Dawn. You can read more about Dawn's Journey and help with fundraising efforts on their behalf here.

If you'd like to send a card to Dawn you can do that at this address:

Dawn McVey
PO Box 25322
Overland Park, KS 66213
*Updated Address 11/17/2017*

Thank you so much for checking out my posts each day this week and I hope you'll come back soon.  Dawn is doing incredibly well since her transplant. 

Thursday, November 9, 2017

Day Six - Official We Love Dawn Bloghop with Papertrey Ink

There is just one more day after today to enter up your projects showing support for Dawn McVey who is doing fantastic following her transplant.  As far as I can tell, she doesn't know that we've created this surprise for her.  I'm pretty sure she is occupied with other things right now.  *Ü*  Friendly Flowers is another beautiful floral set designed by Dawn for Papertrey Ink. There are two sets of dies to go with this set if you want to have the coordinating dies; Friendly Flower Die which cuts the largest flower and Friendly Flower Extras to cut the other flowers and both set of leaves.  Not only do I dislike fussy cutting, but I also seem not to be able to do it very well so it's a good thing they make the dies.

I had a few more of Dawn's designs sitting on my desk to work with this week and this was one of them.  I also had Basic Bookmark #3, and It's The Thought which also has coordinating dies although I didn't use them here.

I started by die cutting a few of each size bloom from Stamper's Select White Cardstock and then used my negatives as placeholders I did my stamping.  I wanted to use a variety of pinks (Dawn's Favorites) so I grabbed several ink pads.  I ended up using Lovely Lady, Hibiscus Burst and Raspberry Fizz for the flowers with Ripe Avocado Ink for the leaves.  The flower centers were all stamped with Raspberry Fizz and then I added these faceted dimensional jewels that I had in my stash for the flower centers. They came in three different sizes and were a fun little pop to add to my blooms.  This won't mail very well in a regular A2 sized Envelope because of the thickness but I always have a good supply of padded mailers on hand so I am planning to use one of those.

I created a top folding card base made from Stampers Select White Cardstock, and die cut a stitched rectangle die from Hibiscus Burst Cardstock.  The bookmark was also die cut from Stampers Select White. I stamped the sentiment in Versamark and heat embossed with Antique Gold Embossing Powder, then attached that to the Hibiscus Burst background panel and then that to the White Card Base.  After that, I arranged all the flowers how I wanted and then picked them up with Press-N-Seal to keep the arrangement how I wanted it.  I picked the arrangement up and flipped it over to put Ranger Multi Medium Matte on the backside and then flipped it again and adhered it. Anything that was not firmly tucked in got another little squeeze of Multi Medium to secure it.


I hope you've been enjoying all of the cards that have been entered into the link up this week.  If you haven't seen all of the beautiful projects, you can find the post and the link up here.

Thanks so much for dropping by today!  I will have one more project for this week's hop featuring a sentiment from A Thrill of Hope Stamp Set which is my favorite for Christian themed Christmas Cards.  I hope you'll stop back by!

Wednesday, November 8, 2017

Day Five of the We Love Dawn Blog Hop

I am doing a very quick post for today's card and the Blog Hop in support of Dawn McVey.  These are all things I have used recently and I did do any new techniques.  I had several elements leftover from Day 1 of this hop (Spruce & Sprigs) and I wanted to try to come up with an arrangement that would use them. I also wanted to combine Pinefeather Cardstock with Hawaiian Shores because I've seen that combination on another site and thought it was really lovely and somewhat unexpected!

I started by die cutting a stitched rectangle panel from the Pinefeather Bitty Big Plaid and then attached that to a top folding Stamper's Select White Card Base and then cut a smaller stitched rectangle from Hawaiian Shores Cardstock and adhered that on top of the Plaid.  Next I die cut three of the berry wreaths from Pinefeather Cardstock and adhered them, but offset from each other to make the wreath appear fuller.  Then I simply placed my elements into a pleasing arrangement and placed Press N Seal over the top to keep the arrangement in place. When you pick up the Press N Seal, the arrangement stays in place. Simply flip it over and apply liquid adhesive (Ranger Multi Medium Matte) to all the parts that are visible.

When you flip it back, you can move the piece of Press N Seal (including the arrangement) around to determine best placement for your greenery. Laurie Willison (Soapbox Creations) came up with this little trick and it's fabulous. Here's a link to one of her posts where she has some videos linked up.  I set a couple of acrylic blocks on top of my arrangement while I let the bottom layers of greens attach.  After a couple of minutes I removed the blocks and the Press N Seal and then added Ranger Multi Medium Matte to any of the pieces that were still loose and tucked them in one at a time to be sure everything was attached and secure.  The banner is one from Wine Bottle Tag II and is stamped with a sentiment from Vintage Ornaments II.


This was a perfect solution to use those extra elements in a card.  I only have one little branch left and I stamped it kind of wonky, so it can go in the garbage can.  This would be a great card for anyone who loves a bright pop of color.

Thank you for stopping by today.  There are just two more days left in the We Love Dawn Blog Hop and I plan to have something for each day.  Be sure to come back and to check out all of the gorgeous cards in the Link-Up over at Papertrey.

Tuesday, November 7, 2017

Day Four of the We Love Dawn Blog Hop

For Day Four of the Official We Love Dawn Blog Hop, I am using two of Dawn's Stamp Sets and another one that is also Papertrey Ink.  This card is also for The Paper Players Challenge, Holiday Pines, which you can find here.  I think it was last year that the Holiday Greens Borders Stamp Set  was released.  There is also Holiday Greens and both sets have the coordinating dies found here and here.  I happen to love this row of pine branches and I used it a lot last year.  This is my first time using it this year but with the companion die, it is so easy to create a row of pine across the top of a vertical or horizontal card.

I was going for a Rustic look, so I decided to use a sheet of the wood grain patterned paper pack that I picked up last time I was in Dallas visiting my daughter and my grand kids. Since I was planning to use Pinefeather Cardstock for my greens I chose this wood grain with the green tint to it.  There are several different shades in this paper pad, from grey to brown and a lot of colors in between.  The sheets in this paper pad are 5.5 inches wide by 7.5 inches tall and since I wanted to be able to get two cards out of one sheet, I cut the sheet in half, then put it into my stitched rectangle die which just put the stitch line on it but didn't actually cut anything.  The Pine Border was tall enough to cover the rest of the card panel so that I could get two cards out of it. I attached the wood grain panel with tape runner. 

I needed to heat emboss my sentiment before I could move on to the rest of my card so I chose this greeting from Dawn's A Thrill of Hope Stamp Set.  I think it's a bit hard to read here but it says, "Season Greetings to you and those you love.  May joy dance around you like snowflakes from above."

Today I used the same technique for the pine branch border that I did for yesterday's card which was to stamp, heat emboss and repeat until I had 4 layers.  Let me just say, it took four tries today before I got one right.  Since the border stamp is a bit wider than the background it was very tricky to get it lined up in the exact same place. I didn't have the corner to use in my Misti as I usually do, so my first three attempts were unsuccessful.  Once I had the heat embossing finished, I die cut it using the coordinating die.  I used 3D Foam Tape to mount that to my card base which then covered the rest of the card front.  The ornament is What The Doodle Ornament that was colored previously.


And another card using the leftovers from the wood grain paper.  I used Limitless Layers 2¼" Squares for the gold foil frame and the insert from the same set to die cut the greeting.  I'm sorry you can't really see the gold frame.  As you know, it's hard to photograph. 


There are still three more days in this hop so I will have more projects for you this week. Be sure to stop back by later in the week to check out all of the finished projects. Thanks for stopping today.

Monday, November 6, 2017

Day 3 of the Official We Love Dawn Blog Hop


It's Day 3 of our We Love Dawn Blog Hop!  It is my intention, although I'm not making any promises, to have at least one card each day of the week long hop. Today's card features a favorite stamp set created by Dawn called Give Thanks.  As a Kansas girl myself, the simple wheat stalks and the sentiment really speak to me. Dawn lives in Johnson County Kansas and I grew up there. I moved to Northeast Kansas not long before my 16th Birthday.  I lived in a very small town in an area that is predominantly farming related.  Although my Brother-In-Law farms, he doesn't plant wheat.  However, you can still see lots of it in Kansas, and particularly in Western Kansas. When I was a senior in High School, several of the guys in my class had been on Wheat Harvest and that was my introduction into that. My husband's twin brother even delayed college for a semester because he was away for wheat harvest somewhere in Western Kansas. Since Kansas is the largest producer of Wheat in the world, it's a symbol that represents home to me (and I'm sure it does to Dawn as well) so I have loved this set since it came out a year or two ago.

For my card, I had found some really pretty watercolor paper at Hobby Lobby with all this gold embossing on many of the sheets that looks like paint splatter and I thought of it right away when I pulled out this stamp set to make a card.  The thing is, while I liked the basic design and style of the paper, I didn't feel like the colors were intense enough for a "Dawn Card", so I did something that I like to pull out and use once in a while; I pulled out some of my color sprays.  I like to make my own using shimmer mist or glimmer mist of some kind and reinkers and I now have the rainbow spectrum.  I use a ton of Shimmer Mist and every time I empty a bottle, I set it aside because they have great nozzles and spray a very fine mist. So while I had Coral and Pink sprays that were already made, I needed to make a yellow color spray. I don't like all colors of yellow, but I do have a lot of affection for a warm kind of Tuscan yellow.  I made this using Summer Sunrise Reinker from Papertrey.  I didn't change the location of the three colors on the paper at all, I just intensified each color with a color spray that was more saturated and vibrant. A tip for you here: be sure to spray a few times on a scrap piece of paper to get the solution up into the nozzle so that it sprays correctly.  Those first few burst on a spray that hasn't been used recently will be pretty unpredictable in how they come out of the nozzle. And you'll need to let the paper dry thoroughly before you die cut it or heat emboss it.

Once that was dry, I die cut the heart shape using some Little B Stitched Heart Dies.  I cut one from the watercolor paper and one from heavy white cardstock. Once I had the cardstock cut, I laid the heart die cut into the white negative and put some post it tape on the back to keep it from moving.  That way I could line it up in the MISTI.  I stamped in Versamark and heat embossed using Antique Gold Embossing Powder.  With all the gold on the watercolor paper, I felt like the sentiment kind of got lost so I used a technique that Jennifer McGuire posted in a YouTube Video yesterday; triple or quadruple heat embossing.  This worked so well that I wish I had known about it before, but I will definitely use it again.  The secret to doing this and having it come out well, is stamping lightly each time. I used my powder tool, stamped it again, heat set that layer, put it back in my MISTI and did it again. Use your powder tool between each layer.  The heart and wheat stems on this card were done three times.  I also found that when I had embossed the wheat stalks three times, it made it very easy to get the die lined up for cutting. I stamped and cut those from the negative pieces of the heart to keep that same texture in the paper.

I cut a stitched rectangle from Gold Foiled Cardstock, and a slightly smaller one from more of the watercolor paper for the background panel and adhered those to a Melon Berry top folding card base.  I die cut a piece of fun foam in the heart shape one size down from the other to give it stability from behind. I arranged the wheat stalks and the acorns to the left of the sentiment and adhered them with Ranger Multi Medium Matte and finished off with some sparkle cognac sequins that I got a few years back from Cartwright's Sequins.


I hope you've been enjoying all the cards along the hop.  I'm ready to go check out the newly added ones that have been created.  Thanks again to Nichole for hosting the Link-Up at the Papertrey Ink Blog this week.

I forgot to say that I am linking this card up at the Double D Challenges who has a theme this time around of "Feeling Fallish". 

Sunday, November 5, 2017

Another "We Love Dawn Blog Hop" Encouragement Card

I have another card to share over at the Papertrey Ink Official We Love You Dawn Blog Hop in honor of Dawn McVey who received a small intestine transplant early last Sunday!  She's had major health issues over the last few years and this has the potential to change her life.  Can you even imagine not being able to eat while still cooking for your man every night?  Anyway, she has a recovery period of 4 - 6 months and must live within 30 minutes of the hospital where she received the transplant for the next several months.  So we are continuing to honor her with a Blog Hop all week long.  Be sure to link up a project using Stamps and Dies designed by Dawn to participate, but you can enter as many projects as you wish.  They do have to be separate Blog Posts for it to work and let you put another link in.

For today's card, I used a set that always reminds me of the person Dawn is because she has such a strong faith in God. This set is called New Every Morning and has several different scripture verses to choose from that are meant to be encouraging.  They were designed to fit on the bookmarks that Dawn designed, Bookmark I, Bookmark II and Bookmark III.  They can also be used on cards as I have done here.

A month or so ago, it was love at first sight for me when I saw the Bitty Big Patterned Paper in Spring Rain.  Michelle Leone had made a gorgeous card during release week last month using it and I was excited because this is the first time there has been a pastel offered.  I can hardly wait to see more!  The Bitty Big Collections are beautiful and the best thing is, they do match the cardstock perfectly.  I love Papertrey's Perfect Match Papers and Inks system and these papers are so incredible having different print on each side.  There are two plaids, two stripes and two polka dot patterns to choose from.  But for me, most of the time, I will like the stripes!  I am so anxious for the release of more colors as this is a new patterned paper line from Papertrey so they are being released 3 colors at a time each month until they are all released.  So far there are 9 colors.

I also wanted to incorporate another of Dawn's designs using To The Point: Edgers II to put a decorative edge on my paper.  These dies cut and also emboss some details into the paper when you cut it.  It is a super nice touch.  I like to die cut everything so that I have those super clean edges.  Trimmer blades can wear out and start making raggedy cuts.  I think that looks incredibly sloppy so I like to use dies and these cut just beautifully as you can see.  To get mine the way it is, I used a stitched rectangle die first to get the clean edges and then I die cut with the Edgers Die to finish that off.  The Dark Indigo Cardstock is also cut with a stitched rectangle die in a slightly larger size.  I have 3 that I use pretty consistently with each and every card and they are all different companies.  The stitching detail is my favorite and I have it in a variety of shapes, styles and sizes.  I cut the Center Style: Feminine Die from Dark Indigo Cardstock as well.


For the sentiment, I cut a stitched rectangle out of Spring Rain Cardstock from yet another set.  I keep basic shapes in one place always on my die cutting table.  This one has double stitched edges.  I laid that in my Mini MISTI and then placed the sentiment on top of it to align it to the rectangle.  To get the Dark Indigo Embossing, I stamped the verse twice in Dark Indigo Ink and then stamped it last in Versamark right over the Dark Indigo Ink and heat set it with clear embossing powder.  I learned early on when I got serious about making cards, that you must use some type of powder tool to keep the embossing clean.  Since I love Heat Embossing and use it on nearly every card, I had to learn how to do it well.  My preferred tool is a big fluffy brush with Baby Powder.  It actually works much better than a powder pouch, Embossing Magic Bag or the EK Success Powder Tool.  It's also easy to clean afterward - just wipe with a microfiber cloth and it will wipe away very easily. The double stitched rectangle fits nicely on the Center Style: Feminine Die Cut.

Because Dawn loves flowers so much, I wanted a way to include on on this card so using the leaves from another of Dawn's sets, Gran's Garden and the coordinating dies, I stamped them in New Leaf Ink and then added a little Prima Flower to it again with a little gem in the center.  Prima Flowers are just paper flowers.  I still have lots of them from my scrapbooking days.  To get the color I wanted, I mix my own color sprays using reinkers.  The Tattered Angels Glimmer Mist that I use has fantastic sprayers on the bottles, so I always keep them to make color sprays with.  I have about 8 of them at this time with different colors in them.  But I keep the colors generic, such as red, blue, green, purple.  Since I'm not using the color "straight", it wouldn't be a match to my inks anyway.  In fact, many of the reinkers I have are Stampin' Up Refills that I kept just for this purpose when I got rid of the large ink pads.  Those ink pads were just too big for me to handle and I would drop them, invariably on my card front when it was finished.  I decided to go with Papertrey Inks and I have been super happy with that choice.

Now that I've dragged this post out to be much longer than I intended, I'm going to wrap it up here.  The background panel was attached to a top folidng card base made from Stamper's Select White Cardstock. The Center Style die cut was attached with a vertical piece of foam tape down the center of the die cut and then Thin 3D foam squares at the edges which gives it a slightly rounded appearance. For the floral leaves and Prima Flower I used Ranger Multi Medium Matte with Kokuyo Tape Runner for everything else.

Thank you again for stopping by today.  This was a really fast and easy card to make although I have dragged out the post for a long time.

Saturday, November 4, 2017

Hop Along to Honor Dawn


Welcome to a Blog Hop in honor of Dawn McVey!  Today's projects feature Stamps and Dies designed by Dawn (Raspberry Suite) for Papertrey Ink.  Dawn received her long awaited small intestine transplant in the early morning hours last Sunday. We are so happy for her. She has a long period of recovery ahead of her and several members of the Papertrey Forum wanted to honor her with this Blog Hop. This way, while Dawn is recuperating, she can stroll though all the posts and see the projects made with her designs and how she inspires us.  For me, hands down, it's her faith first but second would be her love for and use of color.  This hop is meant to be an encouragement to her and she can go back and look anytime she likes.  We hope it will tell her that we cherish her and wanted to find a way to encourage her as she is on the road to recovery.  Special thanks to Nichole Heady for setting up the link-up on the Papertrey Blog. The linky will be open for one week and you may post as many projects as you like, as long as they contain stamps and/or dies designed by Dawn.  I hope to have several projects added to the link-up before the end of the week long hop.

My first card uses a well loved set called Spruce & Sprigs.  I used this same set for Thursday's post so if you want to have some details, you can see that post here. The coordinating Spruce & Sprigs Dies cut everything out and if you detest fussy cutting as much as I do, then by all means you should get the dies.

I did a little experimenting here to get the colors I wanted and they are as follows: The holly leaves, pine boughs and pine sprigs are all stamped in a combination of  Prairie Grass & Ripe Avocado with a bit of Olive Twist blended in on the edges. The various berry sprigs are stamped in Enchanted Evening and Amethyst Allure with a touch of Plum Pudding around the edges.  The sentiment is from another of Dawn's sets, Vintage Ornaments II.  When I had this card assembled, I used some little gems on the card front for accents.  The background panel is a shimmer cardstock in a color that I love but haven't seen for quite a while.  I only have about 5 sheets of it left, so you know I am hoarding it a little bit.

My second card uses the same sets plus uses one of those little extra pieces I seem to always have on my desk. It's from a completely different manufacturer, but it totally worked with Dawn's Spruce & Sprigs and I'm planning to make a couple more for Holiday Cards.  I need to get with it as it's time for the Caring Hearts Card Drive which provides Christmas or Holiday Cards to the elderly that live in Nursing Homes.  My mother-in-law lives in a nursing home and I try to send a card every 2-4 weeks.  This month, I will get to deliver one in person.

All of the greenery is stamped in New Leaf while all the berries were stamped in Pure Poppy.  The flower is from a set from another company but it was stamped in Pure Poppy also, so I grouped it with these greens from Dawn.  It even had a piece of foam tape on the back already, so I didn't even have to cut a piece of that to create my card.  The center of the bloom has tiny gold glass seed beads that I adhered with Ranger Multi Medium Matte.  I was having trouble deciding what to use for my background panel and had in fact, decided on a striped piece of Pinefeather Bitty Big.  But I just wasn't convinced it was the right thing.  I had my arrangement picked up with a piece of Press N Seal, so I could lay it over various choices but finally decided (given Dawn's love for color) that the green with gold metallic stripe was just the thing to use for this card.  That also tied in the sentiment strip that was heat embossed in Gold.

Next up I have a couple of encouragement cards using Dawn's Cheerful Heart and New Every Morning Stamp Sets with Center Style: Feminine Die. Again, knowing Dawn's love for color, I used some fun patterned papers here that remind me of some I've seen by Rifle Paper Company.

This first card uses Dark Indigo Cardstock with Sweet Blush Cardstock and was paired with a sentiment from New Every Morning.  I die cut the Center Style Feminine Die to serve as the focal area and as a background layer for the sentiment.  The sentiment was stamped in Versamark and heat set with Gold Embossing Powder.  I used some Tonic Nuvo Drops in Bright Gold for accents.

Next up, we have another of those fun patterned papers in a different color palette.  I paired it with Berry Sorbet, Honey Nut and Pale Peony.  The bloom is a Prima Flower with a little added gem in the center.  As a transplant recipient, Dawn can't have flowers for a while so I wanted to send her this little paper one to make her smile.  If you follow her on Instagram, her feed is full of brightly colored flowers, many from a cutting garden her husband planted this year. Again, I used Tonic Nuvo Drops in Bright Gold.  I wish they made a Coral colored drop but so far I haven't seen any.

Thank you so much for stopping by today. I hope you'll look through all of your supplies and see if you have anything designed by Dawn so you can join in the hop.  You can find the list of her stamp sets here and her dies here.

We hope you'll join in the Blog Hop and perhaps send her a card that you've made using one of her stamps and dies.  Dawn is doing really well and will be moving out of ICU as soon as a bed is available in the transplant unit. We are so thankful for this.

Dawn McVey
PO Box 25322
Overland Park, KS 66213
*Updated Adderess 11/17/2017*

Thanks for stopping by and thank you to all who are participating this week!  I am planning to make several more projects featuring Dawn's Stamps and Dies to share at the link-up this week.  

Thursday, November 2, 2017

Papertrey Ink's Make It Monday #302

Hello there!  Today's card is for this week's Make It Monday #302 with Stephanie Gold showing us less traditional ways to use twine, ribbon, and the like on our cards. Since we were using less traditional techniques I made my colors a little less than traditional by using Pine Feather with Autumn Rose and Scarlet Jewel Inks and coordinating patterned paper.

I started by die cutting a few of each of the die cuts from Spruce & Sprig Stamp Set and Spruce & Sprigs Coordinating Dies.  I used a negative as my place holder in my Mini Misti and stamped the die cuts in this way.  I prepared 2-3 of each piece as this makes it easy when you start assembling your arrangement.  I used Pine Feather for the dark green, Scarlet Jewel for the dark red berries and Autumn Rose for the rose colored springs.  This makes me think of when you do a planter and you need Pillars, Fillers and Spillers.  It's kind of the same philosophy.

I die cut a banner using the Number the Stars Banner Die, then stamped my sentiment from Beautiful Berries: Winter on the banner using Versamark and heat embossed it with Antique Gold Embossing Powder

I die cut a stitched rectangle panel from Scarlet Jewel Bitty Big in the wide stripes and attached it to my top folding card base made from Stamper's Select White Cardstock.  If you haven't seen the new Bitty Big Patterned Papers from Papertrey Ink, they are awesome. There are stripes, plaids and polka dots.  There is a wide stripe on one side of the paper and a narrower stripe on the opposite side so you can use whichever side you want. It's the same with the plaids and polka dots, so you just use whichever side you want. So far, 9 of the Papertrey Colors have been released, but each month a few more get released. I'm ready for some pink ones - Hibiscus Burst for instance.  The Spring Rain is just the most awesome color.  In fact, I think I might take it to do a color match for paint for my studio in the home we are building although I have already selected a similar color.


Next I die cut Rustic Wreath 3 times from Ocean Tides Cardstock.  Rather than stacking them one on top of the other, I staggered them to make my wreath appear fuller.  I put about 6 dots of Ranger Multi Medium Matte on the back side of each one and let them dry for a couple of minutes before moving on.

I had some Hemp Cord in burgundy that I tried out first but I didn't care for the look so I switched gears and used some thread.  I unwound enough of the Gold DMC Thread to make a messy "nest" of thread in front of my wreath.  I wrapped a small piece of Scor-Tape (with the release paper intact) around the side where the ends met so I could kind of keep it in the shape I desired without having to hold it constantly. I knew that my arrangement of greenery would cover that up so it was no big deal.

I adhered the striped paper to the card base and then using 1/8" Scor-Tape, stuck about 4 pieces on the back of my wreath layers to adhere it to the card front.  Using another skinny piece of Scor-Tape, I attached the gold thread on top of that at the left side.

I created the arrangement by using a combination of Scor-Tape, Kokuyo Dot Liner Adhesive, and Ranger Multi Medium Matte.  In the 2nd photo you can really see all the different layers.  The only part that I used foam tape for is the big cluster of berries.  The rest of the layers are laid on top of or tucked under the other parts. Even the banner is just stuck down with Kokuyo Adhesive.  It looks dimensional because it's laying on top of more layers.


In my attempt to really use ribbon and twine (albeit elevated quality twine) I made a small bow from some white sheer ribbon that has a gold accent thread.  Once I got the card finished and photographed, I decided it need a little something more so I added a few sequins from Lucy's Rose Gold Shaker Selection.  It even has those tiny stars in the mix like the one I added to the banner.
Before Sequins
Just for the sake of comparison,  the image on the left was before sequins.  I'm so happy with how this card turned out that I am planning to make a few more that are similar in design for a special blog hop that is coming to you this weekend.  We will be honoring Papertrey Ink's very own Designer and Design Team Member, Dawn McVey with a blog hop starting this Saturday at 7:00 a.m. over on the Papertrey Blog.  Everyone will be using stamps and dies designed by Dawn who received a small intestine transplant early last Sunday Morning.  She has a long recover so we are surprising her with the blog hop.  The linky will be open for 1 week and you can link up as many projects as you wish, as long as they all use one of the products that Dawn has designed. We hope to see you there!!

I am also linking this up to the challenge over at The Paper Players.  They have a Tic Tac Toe Challenge this week and I used the center row across: Christmas, Die Cut, and Wreath.

Wednesday, November 1, 2017

The Card Concept {Rich Holiday}

Hello everyone! Every two weeks on Wednesday, The Card Concept posts a new challenge for you to participate in.  This week, our theme is Rich Holiday and we have this beautiful inspiration photo for you.  I know Christmas is still about 8 weeks away, but in our family, my husband and his siblings take turns hosting and this year is his sister Brenda's turn.  She lives in Arizona and didn't want to worry about travel during what could very possibly be blizzard or icy conditions.  That happened the last time she was hosting and there was ice and snow and no way for some of us to even make it home.  So this year, as Brenda is hosting again, we're gathering for the Family Christmas dinner at Thanksgiving.  As a card maker, I started making Christmas cards back in August so I'm really ready for Family Dinner in November. I've been working on things for my Sisters-In-Law and some of my grands to take to the dinner.  It's also the time of year when I take all the cards I have left from this year and let them select whatever they want.  I make a minimum of 4 cards each week and often more than that so there is always a lot for them to choose from.

For my card for this challenge, I wanted to use a new kit from Gina K Designs called Merry and Bright. This is actually my first kit from there, and I have to say, I have been highly impressed with the products from the inks to the paper and the stamps.  I ordered two ink cubes (Cherry Red and Fresh Asparagus) to try out the colors. Everything is extremely nice quality.  And the layering weight white cardstock is to die for.  It is so silky and stamps like a dream. It is #80 and similar to Neenah Solar White #80 cardstock.  My kit came with several sheets of 7 different color cardstocks and it's been great to get to try it out without having to buy whole packages. I did actually go back and order some of the cardstock to go with this kit specifically in colors I don't have from Papertrey Ink and I ordered two packages of the layering weight white just to have for stamping card fronts; also the Cherry Red, Fresh Asparagus, and Edible Eggplant. As much as I love Purple, I just don't use it as often as I thought I would.

For my card, I stamped a few of each size of poinsettias from the kit in Cherry Red and stamped the leaves in Fresh Asparagus onto Layering Weight White Cardstock. I left them dry for a half hour or so while I did a few other things and then die cut them with the coordinating dies. This is my third card from this kit so far and I made one similar to this last week so I had an idea of what I wanted to do for this card.  So I got all the elements die cut, stamped, heat embossed and ready to assemble.  For the center of the Poinsettias, I applied a generous amount of Ranger Multi Medium Matte and then put gold seed beads into it.  When that glue was dry, I flicked it on the back so that all the extra beads would come off and put them back into the container.

The label is actually an old die from Spellbinders called Bookplate.  Because it is older, you have to run it through a second time to get the embossing effect. I misted it on the back with one mist of water which helps the paper fibers to stretch.  Once I had that done, I made sure to let it dry completely, then used my powder tool before stamping the greeting (from the kit found here) in Versamark and heat set with Simon Says Stamp Antique Gold Embossing Powder.  Using the bookplate die as a stencil, I brushed the label with Versamark and then went over it with Gold Perfect Pearls.  It's very subtle and hard to see in the photo, but I like the effect.


After that I started assembling my card.   I made a top folding card base made from Stamper's Select White Cardstock and added first the gold foiled mat layer and then the Red Velvet panel on the top of that. Red Velvet Cardstock came in the Merry & Bright Kits as well.  Next, I added my sentiment label with Scotch 3M Foam Tape.  I had laid out my arrangement out ahead of time so I'd have a good idea of how I wanted to place everything.  I used Thin 3D Foam Squares to add the flowers and dot liner adhesive to adhere everything else to the card.  This is a very clean card with lots of "White" Space but still lots of layering and dimension.


Be sure to go to The Card Concept Challenge Blog and see all the beautiful inspiration from the other DT Members.  There are some stunning creations.