Showing posts with label Simon Says Stamp Flickr Challenge. Show all posts

Sunday, September 17, 2017

Teacup Flowers

Today's card is for the Simon Says Stamp Flickr Challenge and the Fusion Card Challenge. It's been quite a while since I got to do any water coloring so I chose a stamp that I could use for that this time around.  I adore the pink polka dotted cup in the inspiration image so I chose color to be my inspiration for my card.  Not having any Pink Paper with White Polka Dots, I resorted to one of my often used tricks to make something similar.
 
If you visit me very often, you know that I love to have a touch of metallic gold on my cards. This might be gold card stock, gold heat embossing, gold shimmer mist or a gold pattern in my elements. Sometimes it is all of the above. I often buy Gold and White patterned papers. I recently purchased a few paper pads that were all gold and white.  One was a specialty Die Cuts With a View 12 x 12 Premium Stack that was all gold and white prints and the other 2 were from Paper Studio (Hobby Lobby's brand) 4.5 x 6.5 pads that were more than 50% gold and white patterns. I separate out the gold and white patterns and keep those all in the same cropper hopper paper holder, including the 12 x 12 sheets. Today's polka dot paper came from one of those pads. 

The really cool thing about white and gold is that you can make the white any color you want.  So I used Worn Lipstick Distress Oxide Ink and ink blended the whole piece of cardstock with it using a Tim Holtz Mini Ink Blending Tool. Once I had that done, I gave it some spritzes of Tattered Angels Glimmer Mist in Iridescent Gold.  I buy mine directly from Canvas Corp Brands.  I've requested Simon Says Stamp to carry it several times, but so far they haven't. I do have a few other colors of shimmer mist, but I pretty much stick to the iridescent gold or the sheer sparkle that I use made by Tsukineko.  I set that aside to dry while I did my stamping and heat embossing.

Next, I stamped the image from WPLUS9's Kind Soul onto watercolor paper with Versamark Ink and heat set it with Simon Says Stamp Antique Gold Embossing Powder. I then water colored the blooms and leaves using Worn Lipstick, Seedless Preserves, Shabby Shutters and Mowed Lawn Distress Markers. I have not tried using the Distress Oxides to watercolor with, although I know they can be used that way, because I love the look of the regular Distress Inks.

Once I had the image water colored, I gave it a good spritz of Tsukineko Sheer Sparkle Shimmer Spritz and let it dry before die cutting it with the coordinating Kind Soul Die. I also die cut the polka dot panel with the Simon Says Stamp Stitched Rectangle Dies in the largest size. I chose this particular stamp set because it tumbles across the page at an angle much like the flowers from the inspiration image.


I created a top folding card base made from Stamper's Select White Cardstock. I die cut the banner using the Number The Stars Banner Die from Papertrey Ink and the Hello from a Hero Arts Hello Stamp & Cut.  Using 1/16th inch foam tape, I attached the floral arrangement first, then attached the 'hello" die cut to the banner and the banner with foam tape just on the right hand side of the banner. For the other end of the banner, I just used regular Kokuyo Dot Runner Adhesive.  My favorite foam adhesive is the Thin 3-D Foam Squares from Scrapbook Adhesives.

This finishes this card for these two challenges.  I hope you'll have time to play along or at least go and check out the other cards that have been entered into this challenge.

Saturday, May 13, 2017

Distressed Elegance

Sweet Blush Cardstock
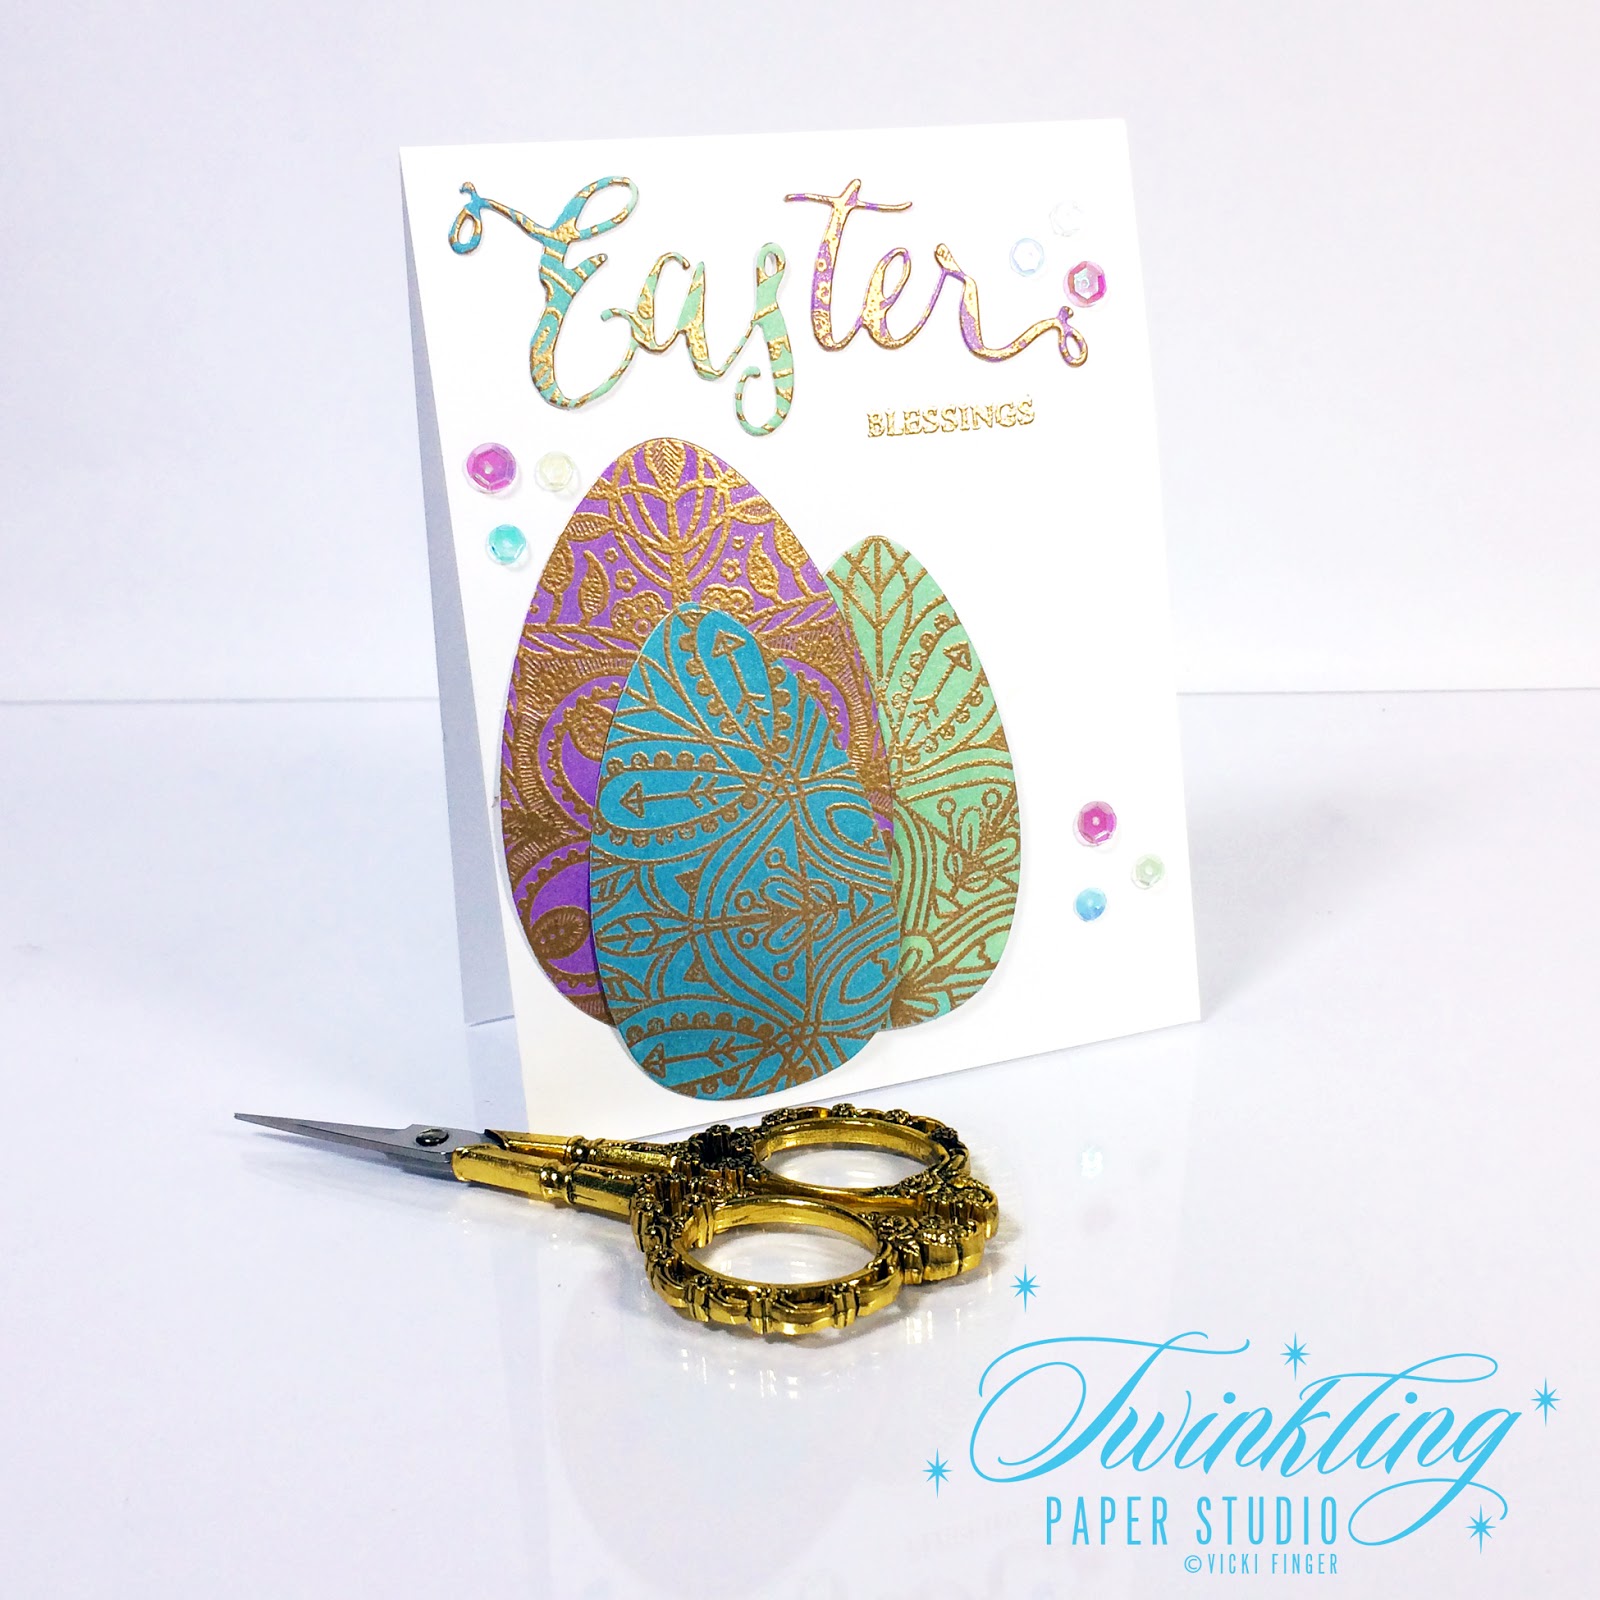
Today's cards are some I made for the Simon Says Stamp Flickr Challenge #71, "Favorite Technique".  I would have to say Heat Embossing is my favorite technique and expands into all of the ways it can be used from simple to complex. I love to heat emboss with Simon Says Stamp Antique Gold Embossing Powder which is my favorite because it's a warmer tone than regular gold embossing powders. The only part of heat embossing I haven't mastered is combining it with Masking. Those sticky little masks leave residue on your cardstock which embossing powder loves to cling to.  I have yet to get a clean image when attempting to combine these two things. If there's a trick here I am missing, be sure to leave me a comment and tell me what it is because I use heat embossing on almost every single card I make.  It's the look I love.  As long as you are consistent about using your powder tool, you'll get good results.

This card uses heat embossing in it's most simple form which is to stamp and heat emboss a sentiment. I often stamp and heat emboss generic greetings onto the little banners of black and white cardstock so they are ready to go. I send lots of just a note or thinking of you type cards so I can always use these types of greetings.

Sweet Blush Cardstock
For the rest of the card, what started as a make-over for something else became a cool new technique for my cards. My Sister-In-Law, Vickie, has a restored Victorian Era Farmhouse with a formal parlor and dining room. I'm telling you this recollection from memory (so I hope it's correct), but those areas of her house have some textured wallpaper that has had some kind of gold "rubbed" on it in this kind of distressed fashion. While the other project I was working on didn't really work out how I wanted it to, the packaging says it works on wood, metal, paper, etc. .... so you know I had to test it out on some cardstock.  I knew I wanted to try it with an embossing folder and this particular one reminds me of that wallpaper in Vickie's house. Once I had the gold rubbed on there, it reminded me of it even more and I loved the look.  So while this card is simple, I think it is also ultra elegant.

For this second technique I used today, this is how it started:  I have a small bronze Eiffel Tower that I use as a prop in most of my photos for social media such as Instagram and Facebook along with a small, fancy, little pair of scissors with Gold Handles. I am pretty neurotic, so it bugs me that that the gold on the Eiffel Tower and the gold on the scissors is not the same gold.  I went to my local Hobby Lobby in search of an inexpensive way to change this.  I wasn't sure what to try but I had a few things in mind.

This white cardstock was the first test I did for this technique. While it has too much product on it, you can see how opulent and shiny it is.  It's like gilding in a jar - incredible!

Way back in 1996, the company I worked for in Topeka, Kansas built a new national headquarters and my boss and I were in charge of that project. One of the big things for the board room in that building was that Gold Leaf was applied to the ceiling. There was tall scaffolding all the way up to about 2 feet from the ceiling. The workers laid on their backs, working with what was about a 4 inch square piece of gold leaf on some type of substrate that they applied to small sections of the ceiling at a time until the ceiling was completely covered in Gold Leaf.  It was tedious and took several days with two workers.  The end result was quite stunning.

Vintage Jadeite Cardstock
I knew that you could get Gold Leaf Sheets at Simon Says Stamp, but I also wanted to see what my other options were.  When I got to Hobby Lobby I went to the area where the spray paints are and figured that would be a good place to start.  To make a long story short, after asking the lady in charge of that department, I decided on a product called Metallic Lustre in the color Gold Rush. This is a wax based product that you rub on and keep rubbing until you get a gold shine. The effect is permanent. While I'm not too keen on how my Eiffel Tower looks now, it was such a cool product and it reminded me of Tonic Nuvo Embellishment Mouse. I think this product is pretty similar but I did order some of the embellishment mousse for a comparison and will let you know the results later.  Nuvo Embellishment Mousse is around $8.00 a jar and contains 2.2 oz. of product. Metallic Lustre contains 1 fluid oz. of product but the jars seem the same size based on photographs.  It costs $7.00 and I used a 40% off coupon for it.  I'll have to let you know later how size, quantity, texture and all of that compares.

Lovely Lady Cardstock
To apply this product, I wore a rubber glove. I buy a box of gloves at my local Sally Beauty Supply for messy jobs such as polishing shoes, hair color or any occasion such as this. I tried a soft cloth first but I didn't have as much control for applying the product and liked the rubber glove better.  As you apply this product, you just keep rubbing until it turns shiny.  It only took seconds for this to happen.

I did find that you have to be very light handed and careful when applying this to paper. It's is very easy to overdo how much product you are using.  There were a few pieces of cardstock I had to trash but I practiced on scraps to begin with so it was no big deal.  I liked so many of the ones I made, that I turned out about 10 cards really fast.  I was sending some cards to Vickie and another friend that had asked for some, so it was nice to include these in there as well.


I cut the background panels with the largest Simon Says Stamp Stitched Rectangle Die and used gold foiled cardstock for the leafy branch (Spellbinder's Romantic Vines) and the Fancy Butterfly (Impression Obsession and my very favorite) butterfly to tie everything in with the background panel and the gold sentiment on the banner. It's hard to capture how pretty this is in photographs, but give it a try and you'll see what I mean.

I tried this technique with a variety of embossing folders but I found that the Victorian Styled Anna Griffin ones were the style I liked best.  The lines of the embossing are very delicate and that particular characteristic seems to work best with this technique. I have a couple of those but you'll just have to try what you have. I cannot stress the importance of a very light touch. Just the barest hint of product on the tip of your finger is all it takes. You can add more, but you cannot take away with this product. I also tried this with a Mini Ink Blending Tool, but there was still not enough control for the light application that's needed. I suggest trying with whatever embossing folders you have in your stash and getting a feel for which ones do and don't work.

I hope you enjoyed this technique and I will be sure to share more information on the Tonic Nuvo Embellishment Mousse as soon as I receive it and can compare the two products.  I was thinking before that those mousses were in the "nice to have" category and now I think I may need a few more colors sometime.

Thanks for sticking with me this long.  If you try this out, I'd love to hear your results! Your sweet comments continue to be an encouragement to me!

Saturday, March 25, 2017

Fancy Easter Eggs

I am trying to be very disciplined with myself today and not play with the new stamp set that came in the mail from Altenew this morning.  If you haven't checked out their release from this week, be sure to stop over and check it out. Garden Treasure Stamp, Die and Bundle is already sold out at Altenew and Simon Says Stamp is waiting for their shipment to arrive and has it on reserve.  It's always a good idea to sign up for e-mail notification so you'll know when either place has it back in stock if you want it. This was fastest shipping from New York - EVER! It normally takes at least 10 days for me to get an order during release week so I was shocked when I got an e-mail saying it was out for delivery.  I'm still waiting on this month's Papertrey Ink order and that was from March 15th.  Anyway, let's get on with the Fancy Easter Egg card!

Today's card is for the Simon Says Stamp Flickr Challenge #67, the Simon Says Stamp Wednesday Challenge and also for the Inspired By All The Little Things Challenge #49. Nancy Penir is the Guest this week at Inspired By and the bunny immediately made me think "Peter Rabbit" which then makes me think of Easter and Easter Eggs.

I actually got this idea from watching my friend, Yana, make an Easter card this week using Spellbinders Dies. You can see her video here. After watching this, I wanted a way to mimic those fancy eggs without the dies she used since I don't have them.  I grabbed my Simon Says Stamp Emma and Elizabeth Background Stamps and stamped three A2 sized pieces of Stamper's Select White Cardstock with Versamark and heat set them using Simon Says Stamp Antique Gold Embossing Powder. Using a Mini Round Ink Blending Tool, I blended Distress Oxide Inks to quickly color these up in Cracked Pistachio, Broken China and Wilted Violet then misted them with a bit of Tsukineko Sheer Sparkle Shimmer Spritz.  Even on white cardstock, these inks blend like a dream.  While I didn't have the fancy filigreed dies, I do have a set of nesting egg shaped dies made by QuicKutz from way, way, waaaayyyy back.  A lot of my dies from waaaayyyy back are made for 12 x 12 inch scrapbook pages and I've got them in my closet, but I've kept my nesting dies handy for easy access on occasions just such as this. *Ü*  

For my sentiment, I used leftover pieces of the ink blended cardstock to cut my word, the "Easter" Die from Simon Says Stamp.  The word cuts in two pieces rather than just one so it was easy to do part of the word on one color and and the rest of the word on another.  Because these are the heat embossed leftovers, there is a ton of extra texture there. This die is frequently sold out this time of year so consider getting the e-mail notification for this as well.  


I often do battle with myself over how much dimension to add because I mail nearly everything I make but this is one time I wished I would have listened to that little inner voice.  The thing is, because I make cards for other people to send, I know that most people don't have the knowledge of the postal system that I do, so I want to keep my cards simple and mail-able. I was the Company Training Coordinator at the company I worked for in Topeka, Kansas and we used to have to do training on everything associated with mailing/shipping via the USPS. This might be a good time to do a little checklist here for my friends.  
  1. A typewritten address label will always be easier for a machine to read, no matter how fantastic your handwriting is.  If it's someone you mail things to often, consider making a sheet of address labels for them.
  2. If you have the ZIP + 4 Zip-Code, use it.  It will speed up shipping by at least 1 day. 
  3. Always use a return address so that whatever you are sending can make it somewhere, even if it's only back to you.  No point in having it completely lost. 
  4. You can use Click-N-Ship for Priority Mail Shipping from your home if you sign up for a USPS account.  This provides you with a small discount since you will be using a "typewritten" and bar coded label printed from your printer that is easy to read.  The post office can collect your packages from your porch or mailbox or anywhere that you specify on the next regular mail day.  I have a small food scale that I use to weigh my mail.  That way I know whether or not to add extra postage.
  5. Mail Art Envelopes along with unique sizes, shapes (squares) or greater thicknesses require extra postage.  The post office has something they can show you so you will know.  I mostly use Thin 3D Foam Squares for exactly this reason.
These are the things that pop into my head automatically but if you think of anything else, you can go to the USPS.gov website and check it out.

Thank you so much for stopping by today to see my project.  I hope you'll come back very soon! 

Friday, March 10, 2017

The Beauty of Distress Oxide Inks

Hello everyone!  Today I got to sit down with a new tool and play for the Simon Says Stamp Monday Challenge and the Simon Says Stamp Flickr Challenge #66. For this challenge, we are supposed to "color" something.  I hope ink blending counts as a type of coloring.  I actually made 4 cards today; two with dye inks and two with the new Tim Holtz Distress Oxide Inks.  It wasn't that I was planning to compare them, but when they came in today's mail, I could not resist stamping a couple more backgrounds to play with.

The original 2 cards were white heat embossing on Canson Bristol Watercolor Paper which is what I use 95% of the time for my card fronts. They take ink much better than cardstock when you want to do ink blending and I use a lot of shimmer mists in my cards so this paper works better and helps to achieve that seamless transition of color.  Once I learned to ink blend, it's a technique that I use often.  I almost had those cards finished when the mail arrived and I set them aside.

I stamped two panels using the Simon Says Stamp Emma Background in the original MISTI on the watercolor panels using Versamark and heat embossed them with Simon Says Stamp Antique Gold Embossing Powder.  I simply can't help it - I love how rich and elegant the gold embossing looks. I do use other colors from time to time, but I use embossing on almost every card I make and I'm never as satisfied with any other embossing powders as I am with gold. The Simon Says Stamp Antique Gold is my favorite because it's a bit warmer and reminds me of WOW!'s Gold Rich Pale.  I used a very pretty sapphire blue the other day and I did like how that looked, but it would have looked equally as good in gold. For me the struggle is how to make cards without gold and that struggle is real my friends.  *Ü* I don't use shimmer mist on masculine cards, but it's hard to restrain myself when I think of how much more awesome it would be with shimmer.

I grabbed a couple of new foam pads for my Mini Round Ink Blending Tools and opened the Broken China and Cracked Pistachio Distress Oxide Inks and started blending the Broken China in the center of the panel. Since I watched Jennifer McGuire's Video from last week, I knew that I could start in the middle and be able to blend it out.  If you've tried this, you know it can be quite tricky with Dye Inks.  I blended the Broken China Distress Oxide all in the center of the panel and then went around the the rest of the panel with the Cracked Pistachio.  One of the first things I noticed was that while initially I thought I wasn't getting very good coverage, it only took seconds for it to saturate the paper.  Then once you hit it with the shimmer mist (or water), it oxidizes and becomes so creamy and smooth. It is very beautiful. For both of these cards I used Tattered Angels Glimmer Mist in Iridescent Gold. It's my favorite, but it takes some work to find it. Happily, I saw it at CHA in the 7 Gypsies Booth and I got a business card so that I can order direct from their site.  Canvas Corp Brands owns Tattered Angel so you can go directly to their website to order.  They have about 50 colors, but I primarily use just Iridescent Gold.  I have some copper, pearl, silver and a couple of others but I had been on my very last bottle of Iridescent Gold when I left for CHA in January, so I was super happy to see it and no that I could still get it.

I grabbed my other embossed panel with Peeled Paint and Worn Lipstick Distress Oxide Inks and did ink blending in the same way, first with Worn Lipstick in the center and Peeled Paint around that. These were so easy and took so much less time (literally minutes) to get a beautiful, vibrant ink blended background. I'm telling you - I am in love!  Because of the busy the background is, I wanted to keep the rest of the card simple.


I cut the Concord & 9th Floral and Flutter Dies from gold cardstock and heat embossed the sentiment from Papertrey Ink's Botanical Blocks Stamp Set onto the same watercolor paper. Then I die cut both of the backgrounds panels using a Simon Says Stamp Stitched Rectangle Die in the largest size.  One is mounted onto a card base made from Papertrey Ink Ripe Avocado Cardstock and the other card base was made from Papertrey Ink Vintage Jadeite Cardstock. Papertrey Ink's Perfect Match Cardstock is super smooth and heavyweight at #110. It is also the most reasonably priced cardstock out there costing just $5.00 for 25 sheets of colored cardstock.


Thank you so much for stopping by today.  Be sure to stop over at the Simon Says Stamp Monday Challenge and the Simon Says Stamp Flickr Challenge to see all the great projects and the Simon Says Stamp Store to order supplies! Happy Friday, everyone!

Monday, February 6, 2017

Love You, Yes I Do!

Today I have one card for three different Challenges.  The Color Throwdown Challenge #428, Inspired By All The Little Things #42 and one for the Simon Says Stamp Flickr Challenge #64, "Love Is In The Air". I keep thinking I am done making all of my Valentine's Day Cards, but there are still a lot of challenges for those color schemes and occasions.  I'll be honest with you - I really wasn't too sure about this color combo until I started trying to pull this card together.  The inspiration images are fantastic but it isn't a typical palette in my arsenal.  I do the challenges to stretch myself artistically and that was certainly true for these colors.  I saw a picture in the last day or two where someone had made soft pink marshmallows that were peppermint flavored. Doesn't that just sound delicious? You could cut them in any shape you want including little hearts. It makes me want to run to Starbucks for the biggest hot chocolate on the menu!

I have made so many Valentine's Day cards for my girlfriends but I thought of one more today that I wanted to make and this will be perfect for her.

I started my card by creating a top folding card base from Stamper's Select White Cardstock. Next, I embossed a 4.25 x 5.5 piece of Dark Chocolate Cardstock with a wood grained embossing folder and then cut it with the largest Simon Says Stamp Stitched Rectangle Dies.  I love the clean finished edge that using a die gives to paper. There's never a raggedy edge from a dull paper trimmer. I use my Stitched Rectangles Dies more than any other dies I have.  In fact, I use them so much that I'm beginning to wonder if I can wear one out!!

Using the Simon Says Stamp All About Love Stamp Set (No longer Available), I stamped the letters in Versamark and heat embossed with Antique Gold Embossing Powder. I used my Cherub Hearts Dies from Memory Box to cut the heart from Pure Poppy Cardstock.


The tulips are a stamp set from Papertrey Ink called Tulip Time and I have the coordinating dies. The easiest way to stamp these is with the MISTI Tool because there are lots of layers.  I place the die cut negative in the MISTI and then lay the positive piece back into the negative. For these, I stamped the lightest layer in Sweet Blush, the medium layer in Pure Poppy and the darkest color in Scarlet Jewel. The leaves are stamped with Vintage Jadeite and New Leaf Inks, all from Papertrey Ink.

I attached the wood grain background to my card base with ATG Adhesive and then I attached the Love Panel and the Tulips with Foam Tape.  That finishes up this card.

I hope you like my interpretation of the inspiration images. I'm glad you spent a few minutes here on my blog today and if you'd like to leave a comment, I really appreciate each one of them.  Have a happy Monday everyone!

Monday, November 28, 2016

Simon Says & Inspired


My card today is for the Simon Says Stamp Wednesday Challenge and Inspired By All The Little Things Challenge #34. The theme at Simon's is A Christmas To Die For (using a die) and the Inspired Challenge gave us this picture to use for inspiration.  I love the black and white with pops of red and green.  For my red and green, I decided to use a Poinsettia.

I started my card by cutting a black card base from True Black Cardstock.  I also cut a white inside panel so there would be a place to write a message. Next I cut a base layer from Altenew Spicy Yogurt Cardstock at 5 3/8th x 4 1/8th .  For the next layers I cut the largest Simon Says Stamp Stitched Rectangle Die (4 x 5.5) from Pure Poppy Cardstock.  The music paper was the final scrap I had left and it had already been cut down into a stitched rectangle previously.  Next I die cut the bloom of the poinsettia using the Spellbinders Layered Poinsettia Die with Pure Poppy Cardstock and the leaves from some scraps of cardstock.  The poinsettia cuts 4 layers of the flowers so they are very easy to put together.

Additionally, I cut three of the "Believe" die cuts and one black shadow.  I put the three layers together using a little bit of spray adhesive and then used Ranger Multi Medium Matte to adhere the shadow to the back of the die cuts.  This Simon Says Stamp Exclusive Believe Die is my favorite from this year's release and I know it will be a favorite for many years to come.


That is my card for today!  It was super easy to put together and I love how it turned out.  Also, there was no stamping, just die cutting so it came together really fast.

Thank you so much for stopping by and be sure to stop over at both of the challenge blogs to see if you find some inspiration there. I really appreciate the kind and encouraging comments you leave for me.

I'm also entering this card into the Simon Say Stamp Flickr Challenge #59.

Sunday, November 20, 2016

Simon Flickr Challenge & Concord & 9th Challenge

I've been making so many Christmas cards that it's left me longing to watercolor so when I saw that the Simon Says Stamp Flickr Challenge was for coloring, in any method, so I used the new Concord & 9th Stamp Set  called  Hello, Lovely which means I am also entering this into the Concord & 9th Challenge. This is a big, beautiful floral arrangement that you can color in your choice of mediums.  All the arranging is done for you. The first card I made with this stamp I used Spring colors but for the second one, I wanted to do something in more Christmas-y colors.

I started with a panel of Canson Bristol Watercolor Paper.  After treating it with my powder tool, I stamped it in Versamark and heat set it using Simon Says Stamp Antique Gold Embossing Powder--still my favorite gold!


I used a combination of Distress Markers (Festive Berries) and Zig Clean Color Real Brush Markers in Persian Blue, Olive, & Deep Green with a water brush. The entire panel was spritzed with shimmer mist once the watercolor had dried. 

I stamped the sentiment from the Sugar Pea Designs Kindness Matters Stamp Set onto the same watercolor paper and used the same embossing powder.  

Next I die cut the sentiment and the watercolored panel using dies from the Simon Says Stamp Stitched Rectangle Die Set then assembled my card onto a top folding card base made from Bazzill Whirlypop Cardstock using my ATG gun.  This was a super simple card for these challenges.  It took a little bit of time to watercolor, but I really enjoy doing that.  

So that's it for a quick post this morning.  I'm hoping to take the rest of the day off!  Thank you so much for stopping by today!  

Saturday, November 12, 2016

Simon Says Stamp Flickr Challenge #58

I have another super quick post today for the Simon Says Stamp Flickr Challenge #58.  Just in case you are wondering, the Flickr Group is actually spelled F-L-I-C-K-R, without the "E" in there. I do occasionally make typos, but this isn't one of those times. *Ü*


This is so similar to other cards I've done in the last few weeks so I'm just going to give you a run down of the products and colors I used here:

Card Base: Simon Says Stamp Audrey Blue Cardstock
Die Cut Word: Simon Says Stamp Believe Dies, Teal Mirror Card Stock
Ornaments: Hero Arts Ornaments Stamp 'N Cut Coordinating Set, Amethyst Allure Reinker, Simon Says Stamp Antique Gold Embossing Powder
Branch:  Sunny Studios Holiday Style Stamp Set, WOW! Neutral Ultra Shimmer Embossing Powder, Papertrey Ink Ocean Tides Ink
Background Ink Blending: Simon Says Stamp Audrey Blue Ink
Canson Bristol Watercolor Paper for the base panel

I ink blended the background color on first and then stamped the branch twice for a wider bough and heat set with the Neutral Ultra Shimmer Embossing Powder. Some of the other ornament dies I have cut closer to the edge of the outline and I definitely like that better, but I just love the shape of these ornaments and the optical illusion of the design.

We are enjoying still very warm temperatures during the daytime hours here.  We went for a drive this morning to see some fall color, but we don't have much color yet here. Enjoy your weekend! Thank you so much for stopping by and taking time to comment.

Wednesday, November 2, 2016

Simon Says Stamp Flickr Challenge #57

Each year right after Halloween, the grocery stores and nurseries start putting out their Poinsettias.  While I love the traditional red ones, it's the lovely pink ones that make me happy and speak to my heart with their beauty.

I watercolored this poinsettia from the Papertrey Ink Botanical Blocks IV using Worn Lipstick and Mowed Lawn Distress Markers with a water brush.  I used Sugar Pea Designs Zig-Zag Stitched Rectangle Dies, Hibiscus Burst Cardstock, Canson Bristol Watercolor Paper, Versamark, Simon Says Stamp Antique Gold Embossing Powder, Gold Foiled Cardstock, and of course the Simon Says Stamp Exclusive "believe" die.  I LOVE LOVE LOVE this die!  I'll be happy when the Simon Says Stamp Believe Stamp Set arrives but I had to wait to order until it was back in stock and it hasn't shipped yet.


Since the sentiment is "believe", I had to dig through some stuff and find some Jingle Bells.  They aren't silver bells like in the Polar Express Movie, but since I used gold accents on my card I saved the silver ones for another time. *Ü*

This card was created for the Simon Says Stamp Flickr Challenge #57 which is still "Anything Goes".  You can still play today or until 9:00 a.m. EST tomorrow!  Have a great day everyone!