Showing posts with label Easter. Show all posts

Saturday, March 25, 2017

Fancy Easter Eggs

I am trying to be very disciplined with myself today and not play with the new stamp set that came in the mail from Altenew this morning.  If you haven't checked out their release from this week, be sure to stop over and check it out. Garden Treasure Stamp, Die and Bundle is already sold out at Altenew and Simon Says Stamp is waiting for their shipment to arrive and has it on reserve.  It's always a good idea to sign up for e-mail notification so you'll know when either place has it back in stock if you want it. This was fastest shipping from New York - EVER! It normally takes at least 10 days for me to get an order during release week so I was shocked when I got an e-mail saying it was out for delivery.  I'm still waiting on this month's Papertrey Ink order and that was from March 15th.  Anyway, let's get on with the Fancy Easter Egg card!

Today's card is for the Simon Says Stamp Flickr Challenge #67, the Simon Says Stamp Wednesday Challenge and also for the Inspired By All The Little Things Challenge #49. Nancy Penir is the Guest this week at Inspired By and the bunny immediately made me think "Peter Rabbit" which then makes me think of Easter and Easter Eggs.

I actually got this idea from watching my friend, Yana, make an Easter card this week using Spellbinders Dies. You can see her video here. After watching this, I wanted a way to mimic those fancy eggs without the dies she used since I don't have them.  I grabbed my Simon Says Stamp Emma and Elizabeth Background Stamps and stamped three A2 sized pieces of Stamper's Select White Cardstock with Versamark and heat set them using Simon Says Stamp Antique Gold Embossing Powder. Using a Mini Round Ink Blending Tool, I blended Distress Oxide Inks to quickly color these up in Cracked Pistachio, Broken China and Wilted Violet then misted them with a bit of Tsukineko Sheer Sparkle Shimmer Spritz.  Even on white cardstock, these inks blend like a dream.  While I didn't have the fancy filigreed dies, I do have a set of nesting egg shaped dies made by QuicKutz from way, way, waaaayyyy back.  A lot of my dies from waaaayyyy back are made for 12 x 12 inch scrapbook pages and I've got them in my closet, but I've kept my nesting dies handy for easy access on occasions just such as this. *Ü*  

For my sentiment, I used leftover pieces of the ink blended cardstock to cut my word, the "Easter" Die from Simon Says Stamp.  The word cuts in two pieces rather than just one so it was easy to do part of the word on one color and and the rest of the word on another.  Because these are the heat embossed leftovers, there is a ton of extra texture there. This die is frequently sold out this time of year so consider getting the e-mail notification for this as well.  
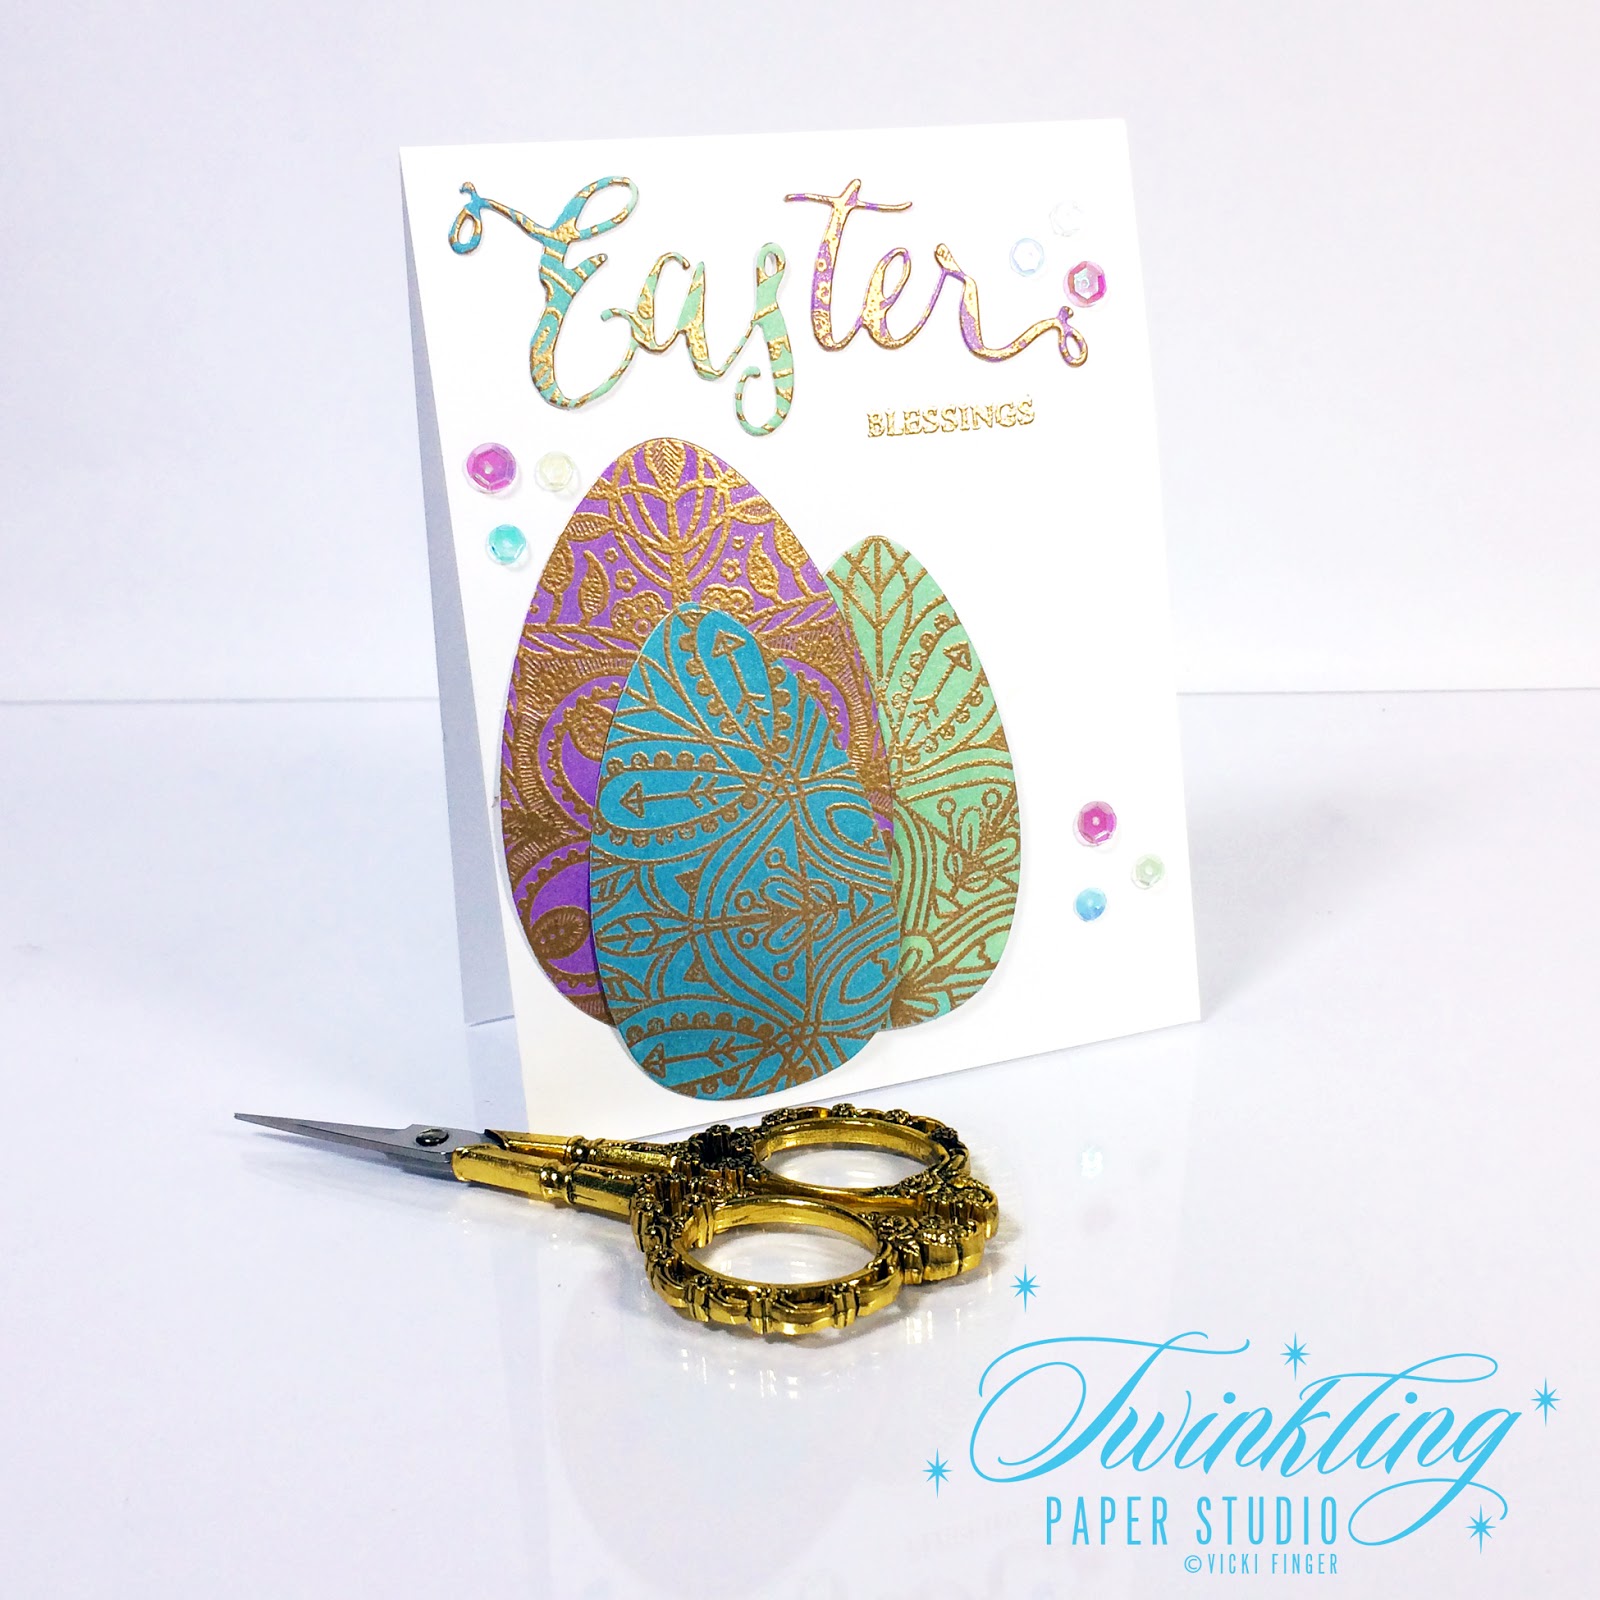

I often do battle with myself over how much dimension to add because I mail nearly everything I make but this is one time I wished I would have listened to that little inner voice.  The thing is, because I make cards for other people to send, I know that most people don't have the knowledge of the postal system that I do, so I want to keep my cards simple and mail-able. I was the Company Training Coordinator at the company I worked for in Topeka, Kansas and we used to have to do training on everything associated with mailing/shipping via the USPS. This might be a good time to do a little checklist here for my friends.  
  1. A typewritten address label will always be easier for a machine to read, no matter how fantastic your handwriting is.  If it's someone you mail things to often, consider making a sheet of address labels for them.
  2. If you have the ZIP + 4 Zip-Code, use it.  It will speed up shipping by at least 1 day. 
  3. Always use a return address so that whatever you are sending can make it somewhere, even if it's only back to you.  No point in having it completely lost. 
  4. You can use Click-N-Ship for Priority Mail Shipping from your home if you sign up for a USPS account.  This provides you with a small discount since you will be using a "typewritten" and bar coded label printed from your printer that is easy to read.  The post office can collect your packages from your porch or mailbox or anywhere that you specify on the next regular mail day.  I have a small food scale that I use to weigh my mail.  That way I know whether or not to add extra postage.
  5. Mail Art Envelopes along with unique sizes, shapes (squares) or greater thicknesses require extra postage.  The post office has something they can show you so you will know.  I mostly use Thin 3D Foam Squares for exactly this reason.
These are the things that pop into my head automatically but if you think of anything else, you can go to the USPS.gov website and check it out.

Thank you so much for stopping by today to see my project.  I hope you'll come back very soon! 

Tuesday, March 14, 2017

Papertrey Ink 10th Anniversary Challenge: Favorite Florals

Even though I have made and sent approximately 25 cards recently that had tulips on them, one more is always good.  Papertrey has several floral stamp sets that I love, but Tulip Time would be my absolute favorite so that is what I used to create this card for the challenge.   

I die cut the tulips from Stamper's Select White Cardstock and then stamped them in my MISTI by using the negative as a placeholder.  To get the softer color of the blooms, I stamped them first in Brilliance Pearlescent White Pigment Ink and then stamped Pale Peony over it, Berry Sorbet for the 2nd detail layer and Pure Poppy as my final detail layer.  The white ink softens up all the colors which was ideal for the look I was going for.  The stems are stamped in Vintage Jadeite and New Leaf Inks


My card base was created from Pale Peony Cardstock using the Noted: Scalloped A2 Vertical Die. I did a bit of ink blending on a background panel with Aqua Mist, spritzed it lightly with Iridescent Gold Shimmer Mist the cut it from the coordinating rectangle die from the Noted: Scalloped A2 Vertical Die to fit on my card.  I added the Tulips with Thin 3D Foam Squares.  The banner is from the Paper Clippings Happy Birthday Detail Dies but I use it a lot for other things and it is one die that I pretty much always have out.  I have a couple of little magnet dishes that sit on my table where my die cutting machine is that hold the dies I use often.  

Tulips always make me think of Spring and that Easter is coming.  Papertrey's Tulip Time is the most beautiful set of  tulip stamps out there.  Have a great day and be sure to stop by Papertrey's Challenge to see all the entries!  

Thursday, March 17, 2016

The Legend of the Dogwood


"At the time of the crucifixion, the dogwood had reached the size of the mighty oak tree. So strong and firm was the wood that it was chosen as the timber for Jesus' cross.

To be used for such a cruel purpose greatly distressed the dogwood. While nailed upon it, Jesus sensed this, and in his compassion said, "Because of your pity for my suffering, never again shall the dogwood tree grow large enough to be used for a cross. Henceforth, it shall be slender, bent, and twisted, and its blossoms shall be in the form of a cross–two long and two short petals.

"In the center of the outer edge of each petal will be the print of nails. In the center of the flower, stained with blood, will be a crown of thorns so that all who see it will remember."


There is nothing in this world that says "Easter" to me more than seeing a Dogwood Tree and Pink Dogwoods are (of course) my favorites!  We saw lots of them on our 2015 vacation as we drove through Tennessee, Virginia, and North Carolina. My husband had not seen pink ones before and it was a definitely a treat for me as well.

As I worked on another card for the The Card Concept Challenge #51 and was admiring the inspiration image, it occurred to me that I should be using some "Kraft" Cardstock with a Pink Dogwood Bloom to create an Easter card. I have had this Dogwood Bloom stamp by Impression Obsession for a number of years but I hadn't ever used it before.  These days you can buy the cling mount version of this stamp which is fantastic. Now that I have fallen in love with water coloring, I had to try it with this stamp. It's not an outline image, but I figured I could work with it.

I stamped the image in Versamark on Canson Bristol 96# Watercolor Paper and heat set it using Simon Says Stamp Antique Gold Embossing Powder.  I love the soft white of this paper over some of the others out there on the market. Since the petals are mostly white, I painted the entire flower using a solution of Perfect Pearls & water, then let that dry.  Once it was dry, I took my lightest pink Zig Clean Color Real Brush Pen in Sugared Almond Pink and went around the outer edge of each petal and blended that with more Perfect Pearls Solution. One of the nice things about the pigment powder is that you can make your solution as shimmery as you like.  I just touch the very tip of my damp brush into the powder and mix it with a bit more water on an acrylic block.

I went back in with the same color to add depth to that area for my second and third layers. The final touch on the blooms was using Pale Rose for the indication of each nail in the petals.  The leaves were mostly covered with gold embossing powder but for what was showing, I used Mowed Lawn Distress Marker. When it was dry, I die cut it using the largest of the Simon Says Stamp Stitched Rectangles.  The mat was a scrap of Pink Pirouette Cardstock that was laying next to my die cutting machine that I cut down to be 4 1/8th x 5 3/8ths.  I adhered it to a top folding A2 Kraft Card Base.


I die cut the Simon Says Stamp Exclusive "Easter" sentiment from some gold foiled cardstock and adhered it using Ranger Multi Medium Matte.  This card is Perfect for the Classy and Elegant Category on The Card Concept #51 Challenge, AAA Cards, the CAS Mix Up March 2016 Challenge and the Double D Challenge to make an Easter Card.  I made quite a few Easter cards this year, but this one is a favorite. It was the simplest to do but really makes an impact.

Thanks so much for stopping by.  Please feel free to leave me a comment.  I really enjoy reading them.

Tuesday, March 1, 2016

Easter Wishes

With Spring right around the corner, it's hard not to think of all the blooms that will be popping up soon.  My mother has loads of flowers in her garden from the earliest Crocuses to Tulips to Daffodils, Iris and more.  I can't even remember all the flowers in her garden.

For this card, I started with a 4.25 x 5.5 inch panel of Canson Bristol 96# Watercolor Paper and stamped the Tulip image from the Clearly Besotted Friends Forever Stamp Set. I wanted the images to be primarily on the left hand side of the panel so I stamped one image higher up and then to the lower right of that first stamped image.  The image contains two (2) Tulips so I stamped it twice then heat set it using Simon Says Stamp's new Antique Gold Embossing Powder

To color the images I used a water brush with Tim Holtz Distress Markers in Seedless Preserves and Mowed Lawn.  I wasn't using much water so it took only a couple of minutes for the layers to dry so I could add more layers in.  I wanted the leaves to be in a "Spring" green so I left them with only one layer of color. Seedless Preserves is one of my two favorite Distress Ink colors, the other being Worn Lipstick (a.k.a. Pink and Purple).  I love it because while it seems to be an ordinary purple when you put it down, the minute you add a single drop of water it changes and has some pink to it also.  I call it "my little extrovert".  It reminds me of myself.  

I have small pile of cardstock pieces to the right hand side of my die cutting machine and the piece of SU! Rich Razzleberry Cardstock was in that pile.  I die cut it using the Simon Says Stamp Stitched Rectangles in the largest size and then used the 2nd largest to die cut my watercolor paper and the scrap of Gold Foil Cardstock.  Like I have done previously,  I just realigned the 4th side of my cardstock in the die to cut that 4th side with the matching stitch-work to get the tall piece.  


The decorative border is a Sizzix Border Die from a set of 4.  I assembled everything to a top folding A2 sized note card.  I trimmed about 1/4 inch off the top and bottom to leave only a very narrow white border all the way around.  

Next I die cut the Simon Says Stamp Exclusive "Easter" Die from another piece of Gold Foil Cardstock.  Using the Simon Says Stamp Decorative Ornaments Stamp Set, I stamped and heat embossed the "Love • Peace • Joy" beneath the Easter die cut.  I really wanted it to say "Easter Wishes", but I couldn't find that in any of my stamp sets so I thought this was pretty good for my 2nd choice. I stamped two of the smallest butterflies from the SU! Papillion Potpourri Set in Versamark, heat set them in the same SSS Antique Gold and used the coordinating punch to cut them out.  I always fold up the wings up and adhere down the center of the bodies using Ranger Multi Medium Matte.

The Simon Says Stamp Monday Challenge for this week is "Take a Leap" into the unknown.  I lept into using 3 different stamp sets from occasions that were different than my theme of Easter; I lept into a new die although the outcome wasn't really unknown; and I lept into using a new stamp for my watercolor panel.  I've used the Gladiolus image before, but not the Tulips. I like the rich, royal purples in this card and I hope you enjoy it also. I am hoping to leap into a few other new things or techniques before the week is out.  Thanks so much for stopping by today!