Showing posts with label Wedding. Show all posts

Tuesday, February 25, 2020

Poppy Stamps Adriana Easel Pop Up Card Die

Hello friends and visitors.  I am going to try to do a quick post for you today, just because!  I have been so sick for three weeks and today is my first day of feeling almost normal.  I still have just a bit of a cough, but the rest of me is feeling pretty dang good!  My MS Treatments have helped already which is so encouraging. 

I absolutely fell in love with this die when Dave Brethauer did a video of this over on the Memory Box YouTube Channel last weekend.  Click on that hyperlink to follow it to their Channel.   I'm on the Memory Box Design Team but Dave included this die in a recent purchase I made from Poppy Stamps. I was so excited to get it because it is simply genius and makes creating an easel card so super easy - no measuring involved.  The score lines are engineered into the die. I also love how it has all the elements built into the die set for easy assembly of Easel Cards so that the recipient can display it.    


My first card uses some of the new Memory Box Glitter Papers from the Delicate Pastels Glitter Pad along with some gold foiled cardstock and two different shades of Pink Cardstock - Hibiscus Burst and Pale Peony from Papertrey Ink.  The die itself comes on a Magnet Sheet to keep all the elements together. If you are very careful you can get both the bottom of the card and the top of the card from a single sheet of 8.5 x 11-inch cardstock using your Gemini Full Size Die Cutting Machine.  A sheet of 12 x 12 is easy peasy by cutting it in half.  I used my Cuttlebug with the extended cutting pads and Cutting a 4.35-inch by 11-inch for4 the card base and then the leftovers for the card top.  You may need to move it up and down the piece to find where it fits the best.  In this instance, because there are many layers and I have a lot of 12 x 12 Cardstock left from my scrapbooking days, I think you could go with a lighter weight cardstock.  I have not tried that, but I don't think you'd have any problem using a lighter weight for the top and bottom.


The decorative layer could be used in many ways and I tried to show you a few more here that are different than what Dave showed in his video. I would definitely say to use a very gentle touch and heavier cardstock for this particular layer as the little branches tear off very easily.  Also, use a traditional die cutting machine vs the electric ones for this layer if you have one.  I found that this piece tore just cutting it in the electric machine, even when I made the sandwich less tight.  I personally, still use my hand-crank machine more often than my electric machine. In the instance where my decorative layer got torn up, I used an oval die to cut the center and heat emboss my sentiment onto.


I made a couple of variations of this card, switching up the colors and papers.  The left hand is done in Blueprint Shimmer Cardstock with Silver Cardstock, the Green is some watercolor I did on a piece of #140 Canson Watercolor Paper with some Fairway Green Shimmer Cardstock and the Pnks as I mentioned above.  Each of these cards has the interior layer cut from Glitter Cardstock from Memory Box.


I used a couple of different Memory Box Dies to add to the little labels that let you pop it up.  The Blue Card has little silver birds from the Birds & Blossoms Die (#94243) and the butterfly is the one that I keep on my desk all of the time.  I used it on the pink and the green cards.


I wanted to challenge myself to use this die in a more masculine way, so I chose Curious Skin Black Cardstock, which is totally matte. It never gets shiny and it feels so unusual.  It's a great paper to use for anything black.  I also used the little birds from Bird & Blossoms again. for the little inside tag again.  I forgot the foam tape here, which helps to give a little height to what is holding the easel part in place for display.  So it still worked, but it would have worked better had I remembered the foam tape.


 I wanted to provide you with this side view so you can see how the easel stays up.  I have so many other combinations I want to try.  I'm waiting on an order from Poppy Stamps for some other sentiments. These cards use Poppy Stamps Butterfly Greetings and Blooming Greetings.

I cannot wait to see how many other designs Dave comes up with for this easel card die design.  I can see Holly and Berries with Mistletoe at Christmas, and many other things that I think I'll have to start making a list of them!

Last but not least is a card that I made for my daughter to give to her best friend that is getting married in a few weeks.  I don't think she has time to visit my blog, so I am going to post it here rather than in my IG feed.


I used an Iceberg Metallic Cardstock which is close to a periwinkle color with a white front panel, and a  Violet Satin Shimmer Cardstock for the interior panel.  I remembered the Foam Tape this time around.


I like to use foam tape on the front end of the butterfly and glue to hold down the back end.  My glue of choice is Ranger Multi Medium Matte.  For this card, since it is for a special occasion, I used Aurora Borealis Swarovski Crystals in the 12 and 16 sizes.


One of the really cool things is that this card still fits in a standard A2 Envelope.  If I were mailing this card, I would probably use a padded mailer or a "flat" mailer.  Since my daughter is the Matron of Honor, I happen to know she'll be delivering it in person.  I hope you enjoy today's blog post, just for fun!  I'll be back on Thursday and Friday with posts for Memory Box!

If you would like to get the Adriana Pop Up Easel Card Die Set, you can find it here:  Adriana Pop Up Easel Card Die Set.

Have a great day all!

Wednesday, February 1, 2017

Love & Romance

There's a new challenge up at The Card Concept and Simon Says Stamp Wednesday Challenge.  The image on the left is our inspiration for the theme of "Love & Romance" at The Card Concept and Simon's theme is "The Color of Love". I never need an excuse to use pink, but I do love to incorporate it into Valentine's Day projects.  Since I enjoy making cards so much, I love having all types of cards ready to go for each occasion and Valentine's Day is no exception.

I love the colors in this particular inspiration image and I wish I had a scrapbook store nearby so I could peruse the paper section for some paper that looks similar to this. It's got the French Country look to it and that's a style I love.

For today's card, I started with a top folding card base made from Stamper's Select White.  The Silver and Pink Paper is a sheet that found at Michaels in Dallas when I was there at Christmas. I only got one sheet because I tend to use a lot more gold than silver, but I think this is so pretty and elegant and I knew it would make a pretty card for just the right person.  The hearts are cut from an Accucut die that I have had for a number of years that cuts and embosses at the same time.  I cut these from Silver Cardstock and Lovely Lady Cardstock.

The sentiments both came from the Hero Arts Love Stamp & Cut Set.  I used Stick-It on both sides of a piece of White Fun Foam, then added the silver cardstock to the top of one side and die cut the whole thing to get the thick word die cut. I'm still not very good at working with Stick-It so I consider this more practice. The small little sentiment on the pink strip is the only stamping I did on this entire project. I used Versamark with Detail Silver Embossing Powder.  Once I had the card put together I added some Sparkling Clear Sequins from Pretty Pink Posh. The ones I have are a mix of sizes in 4, 6, 8 & 10 mm all in one package.


This card was easy to put together once I decided on how I wanted my design to look.  It was simply a matter of die cutting and assembling.

Thank you so much for coming by today and checking out my project.  I love this theme so I hope to have time to make a couple more cards for this challenge. I'm thinking I need to make another of these for a young lady who is getting married in May of this year.  If you'd like to leave a kind of encouraging comment, I do read each and every one of them.  

Friday, July 22, 2016

A Nautical Wedding Card

The Simon Says Stamp Monday Challenge Blog's theme for this week is Nautical/By the Sea. I don't really have any beach themed stamps or dies but whenever I think of Nautical, I automatically think of a Naval Officer's Uniform, Sailor Dresses, Sailor's Suits, Sailor's Knots and even a few Sailor's style outfits I've had through the years.  There's some interesting information on Wikipedia about this style that came to be popular for women and children in the 20th century.  For this card I naturally got out my stash of Navy Blue and Gold Striped Paper. Sadly, this is the last piece of it.  I have a little left from the Diagonal Stripe but only enough to use on maybe two cards.

As I sat and looked through my stamps and dies, I didn't have the one thing I really wanted for this challenge — a compass. So I went to look for one on the Internet and found one in some free clip art.  I had to pull it into my photo editing software to fix the rotation, but I remembered how to do that without too much difficulty. This image was just what I wanted. I tried to print it from Microsoft Word, but that didn't work. When I opened it in Windows Picture Viewer I could tell it to print from there, what kind of paper I was using (Stamper's Select White Cardstock) and it also allowed me to print at 600 dpi for a presentation quality image.  I've tried to print on Cardstock before without success so I was excited to notice these setting as available in that program.  I'm using an HP Inkjet Photo Printer that I've had since we moved to Oklahoma more than 6 years ago. The printer before this one was also an HP Inkjet Photo Printer.

Once I had the compass image printed, I cut it with the 2nd largest My Favorite Things Stitched Square Stax Die.  I cut the striped paper in the largest square die from the same set. I cut a white strip wide enough for the greeting from the Simon Says Stamp Congratulations Stamp Set.  I stamped that using Versamark and heat set it using Simon Says Stamp Gold Embossing Powder. I wanted the little bit brighter gold to match the stripes on the patterned paper. Once I had that stamped and heat set, I went around the edge of that piece with my Versamark Cube and then put the same gold embossing powder on it and heat set it to have the gold all the way around.

I made a mat for the sentiment by using my die creatively with a small scrap of the navy & gold paper.


I used some Navy grosgrain ribbon to tie a Sailor's Knot around the panel with the compass on it. To get it to lay flat I had to cut it in half at the back and tape the ends down.  The knot on the front was positioned and then adhered with Ranger Multi-Medium Matte for a good strong hold. I set a few acrylic blocks on top of that for about 5 minutes so it wouldn't budge. I assembled the card onto a top folding A2 Night of Navy Cardstock Base. I adhered a white die cut panel on the inside of the card for a place to write a sentiment.

So now y'all see how my mind wanders when I am creating a card, but it definitely works for me most of them time.

Tuesday, July 5, 2016

CAS(E) this Sketch #179

I saw this sketch this morning over at the CAS(E) this Sketch Challenge and loved it so I decided to play along. I really love how it looks like a wreath or branches framing in the sentiment and grounding it.  I'm limited to 5 entries on the Simon Says Stamp Wednesday Challenge each week and this will be my 4th entry there, but today is the last day before a new challenge is issued.

I used some already heat embossed and stamped pieces left from another card and added a couple of new ones in.  I started my card by creating a 4.25 x 5.5 inch top folding notecard from Papertrey Ink's Lovely Lady Cardstock.  Next, I cut a background panel from Stamper's Select White using the WPLUS9 Design Studio's Sunshine Layers Die Set. Using a kabuki style makeup brush as my stencil brush, I brushed Lovely Lady Ink all around the outer edges of the panel lightly.  In the future I'm just going to call this my stencil brush without explaining what I am using until someone asks.  I have to say, I am loving this technique and I find it to be great for not getting marks or streaks in the ink.  Ink blending is great too, but I'm glad to have another option in my tool box.

I cut a gold foil oval from Spellbinders Oval Floral and cut the oval center out as well for a true "frame" feel.  I adhered that to my background panel using Ranger Multi Medium Matte.  When that was dry, I arranged the peony and leaves (from Altenew's Peony Bouquet Stamp Set) how I wanted them on the card and attached them with a combination of Thin Foam Squares and Ranger Multi Medium Matte.  I also used the same stencil type brush to lightly ink up the sentiment banner which used Altenew's Beautiful Day Stamp Set and attached it with Thin Foam Squares as well.


Since most of the pieces were already stamped and cut, it made for a quick card. I think this is a sentiment that can be used for a wedding, birthday or even encouragement cards.

For your reference, the leaves were stamped in Vintage Jadeite and the peony was stamped in Spun Sugar Distress Ink for the lightest layer, Lovely Lady for the 2nd and 3rd layers and then the 3rd layer was stamped again in Hibiscus Burst to give it a little more depth.

Typically, I don't do very many dimensional elements because I mail nearly every card I make so I want them to go through the machines.  It's nice that with the Thin 3D Foam Squares it can have a little of that while still being mailable. I'm pretty sure this one is going to my Mother-In-Law, Agnes.  She still enjoys her cards and my sister-in-law, Brenda, made her a binder of all the cards she has received so she can look at them in book format.  She doesn't remember who they're from, but she does like being able to see them.

Thank you so much for stopping by today.  I appreciate that you've spent some time on my blog today.  You can also find me on Facebook and Instagram.  Have a great day, everyone!

Sunday, July 3, 2016

July 2016 Altenew Inspiration Challenge

Hello there!  I don't know about you all, but I have had a very busy week.  I work in my studio every day but I don't always have an idea that comes to fruition right away.  Sometimes I start a project with all the elements but in the end, I just didn't have something I was happy with, so I started over.   

That was the case yesterday when I began my card for the July 2016 Altenew Inspiration Challenge.  Sometimes, you just need a do-over. It's not that the first card was a total disaster, but in the end I felt it was just "too much" and decided to start from the card base I had created a few of at the onset of this project.

I started with a note card cut from Stamper's Select White Cardstock using the Papertrey Ink Noted: A2 Dies.  Once I had the note card folded, I masked off the scalloped border using the stitching lines as my guide.  Using my Fintec Mica Gold Watercolors in the color Inca Gold, I created some spatter. You can use any kind of shallow box to lay the card base in so you don't get spatter everywhere. I still always end up with more spatter on the hand that I bounce the brush off of than I do on my actual project.  I was so excited yesterday when I discovered that Finetec makes individual replacement pans of this watercolor. The set I have has 6 different colors of gold and I use the Inca Gold and Arabic Gold the most.  It will be great that I can replace just the one that is empty.  Simon Says Stamp carries the individual pans of the Kuretake and I'm hoping they will start carrying these as well.  I tried several several different brush sizes on the first card base but quickly decided that my #8 Silver Black Velvet Paintbrush was the size of spatter I liked; big enough to see, but not big enough to overwhelm.  The size of the brush determines the size of the spatter.  I tried everything from a #2 all the way to a #12.  I chose to do the ink spatters because Altenew carries a card stock called "Spicy Yogurt" which has speckles in it and I love the look.  I figured for a wedding card, gold spatter would be good.  Simon Says Stamp carries Altennew Stamps and Dies, but no cardstock so you have to order it from them directly. I've not found it elsewhere. I do have some Rustic White Cardstock from Papertrey Ink, but it is far less speckled than the Spicy Yogurt from what I can tell.  I'll let your know later as I ordered some.  It just hasn't arrived yet.  I'm planning to do at least one other card for this challenge after it arrives.

I wanted to use one of my Spellbinders Labels 42 Decorative Elements as my substitute for the Antique Trims that Altenew also carries. Yana Smakula is leading this challenge for Altenew and I love her stuff.  Her card was nothing less than stunning.  She creates the most beautiful cards all of the time. My own style is similar to hers and I use lots of gold embossing and shimmer in almost every card I make.  Some people don't like the mess of heat embossing but for me, it's still magic — every.single.time.  


Once I had my gold label cut, I stamped each outline image in the Altenew Peony Bouquet Stamp Set multiple times (anticipating errors) and heat embossed them using Simon Says Stamp Antique Gold Embossing Powder, which is my favorite gold embossing powder even over WOW! or Ranger. It is a warm gold and very well suited for almost everything I make. Occasionally I need silver or platinum, but most of the time I use gold embossing powder and this one is a great fit for me.  It melts nicely and the price is great as well. I cut each shape out with the Altenew Peony Bouquet Coordinating Dies so I could stamp them.

To color the blooms, I stamped each different layer of color on the leaves and blooms.  I have a couple of very light pink inks but the only one I really like for multi-layer stamping is Distress Ink in Spun Sugar.  It is a cool pink tone rather than a warmer tone such as Sweet Blush or Pale Peony.  For the first (and lightest layer) I stamped twice using the Spun Sugar Distress Ink on the large blooms and then the 2nd and 3rd layers using Lovely Lady and Hibiscus Burst Ink.  I stamped the 3rd layer again using Raspberry Fizz this time for the brightest pink accents. I stamped the smaller blooms of the peony in Lovely Lady with Hibiscus Burst and then Raspberry Fizz for the pink blooms and Lemon Tart with Harvest Gold for the 2nd and 3rd layers of the yellow blooms. All the leaves are stamped with Vintage Jadeite and the berries were stamped with Raspberry Fizz.  I assembled my bouquet on top of the gold label and then picked the whole arrangement up using Press 'N Seal.  I have a couple of pieces of this in my studio and I use them over and over again until they are no longer sticky.  There are a lot of small pieces to that bouquet and I didn't want to try to get it right from a picture on my phone so this method saves some of my sanity.   I don't normally use this many pieces on a card, but afterall, a wedding is special. The Press 'N Seal was a good way to keep the design together while I glued the pieces down.  You just start by adding glue to the backs of the pieces that you just picked up with the Press 'N Seal.  After that, you can add a drop or two of glue anywhere that you missed before.

I almost forgot the embellishments but remembered at the last minute and added some clear sequins and clear droplets from Pretty Pink Posh. I cut the sentiment piece by re-aligning my paper back into the same small rectangle from the My Favorite Things Stitched Rectangle Stax Dies and cutting again to make it narrower.  I attached it using a thin foam square on the far right end and some Ranger Multi Medium Matte on the left end.  I wish I could buck the system a little but at least in English, we read from left to right, so it's always more natural for me to lead in from the left hand side of the card and work toward the right.  I tried the sentiment with gold spatter on there, but I didn't like and felt it was distracting so I made a new one without the spatter.  

I'll be entering this card in the July 2016 Altenew Inspiration "Wedding" Challenge as well as the Simon Says Stamp Wednesday Challenge with their "Anything Goes" theme this week.  Have a great holiday weekend and stop by again soon!  

Sunday, October 4, 2015

Fall is Here!

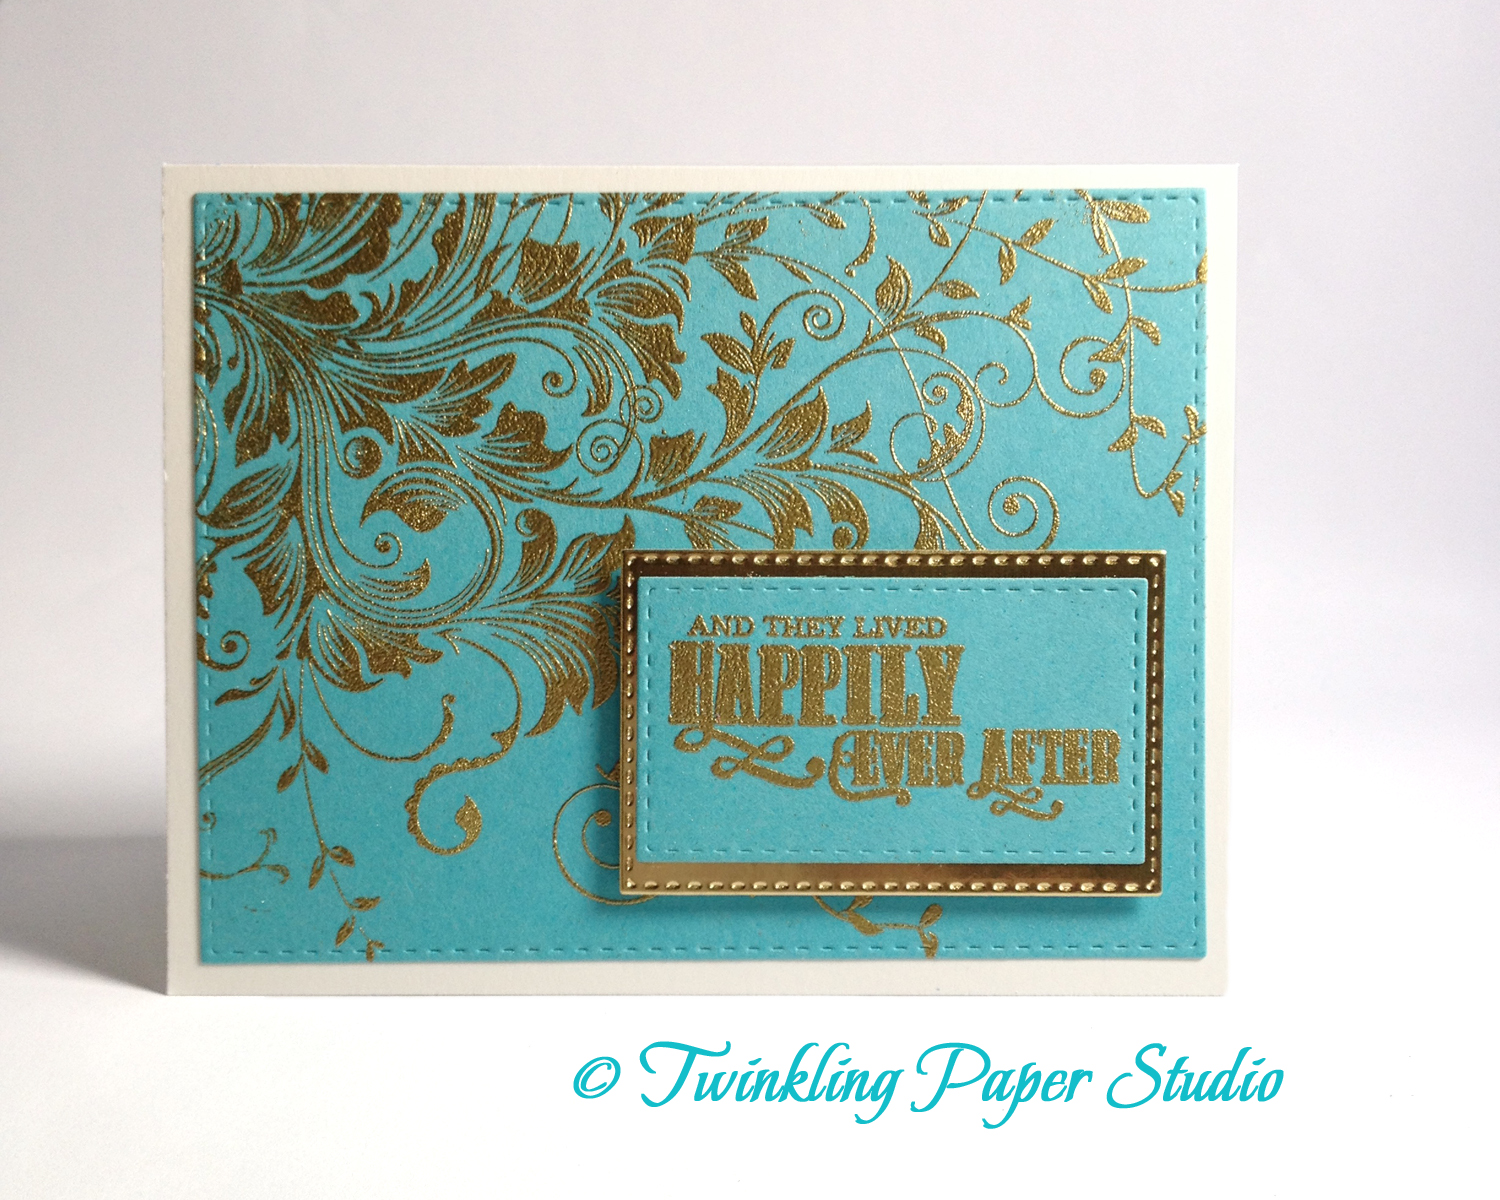
Today's card is one I've worked on for a few days.  It had to be just right for my oldest grandson who is getting married next weekend.  I really agonize over the cards I make for a particular occasion vs. just sending along a note card to someone.   I always want it to be just right for the person and the occasion.

For this card I started with a 5.5 x 8.5 card base scored and top folded at the 4.5 inches made from Bazzill Marshmallow which is a 100# card stock.  Next I stamped a Hero Arts Leafy Vines Stamp onto a panel of 4.25 x 5.5 inch Simon Says Stamp Audrey Blue with Versamark Ink and heat embossed it with Simon Says Stamp Ultra Fine Gold Detail Embossing Powder.  This is one of Simon Says Stamp's many exclusive 100# card stocks.  Being an Audrey Hepburn fan, I, of course, had to get this paper as well as a package of Surf Blue.  It was a bit tricky getting this image stamped and heat embossed but I did manage it on my first try which is always a good thing.  I put the cling stamp onto my largest acrylic block then flipped it over and took the paper to the stamp after I had inked it well. I like the Inkadinadoo Extra Large Block with the wavy sides to hold on to.   I was very careful not to move the paper but to press it down to make sure it was inked well. I carefully removed the paper from the stamp and put the embossing powder on it. Sometimes you can't tell how well you've done until you finish heat setting it. Next I cut that panel with the Simon Says Stamp Stitched Regtangles with the largest die in that set.


Next I used a sentiment from the Clearly Besotted Fairytale Ending Stamp Set for the greeting and heat embossed it in the same Simon Says Stamp Ultra Fine Gold Detail Embossing Powder.  I cut that with a smaller sized Stitched Rectangle then I cut a differently proportioned Memory Box Stitched Rectangle Die Set for the Gold Mat.  This gave me the look I was going for.  Once I had all of the components for the outside of the card done I started assembling it.  The largest panel was adhered using Tombow Mono Adhesive Permanent Tape Runner.   I used the same adhesive to attach the sentiment to the gold mat.  Next I used Foam Squares to pop that panel up just a bit on the card front.

One of the things I really like to do is to incorporate part of the invitation into the card I'm giving back.  In this case I cut the large heart from a part of the invitation that had their photo on it using the largest die from the Memory Box Stitched Hearts Die Set.  Next I used a stamp from the Simon Says Stamp Congratulations Set. This set was a part of the Simon Says Stamp May 2015 Card Kit.  I saw a card that one of my favorite Papercrafters, Debby Hughes of Lime Doodle Design, used way back when that card kit was announced and I loved the papers in that kit.  There's still a few of those kits left and the stamp set is also available separately.  I was glad I wasn't having to find something at the last minute.  I only had to figure out which part of those two stamp sets that I was using and where.

So for the inside of the card, I stamped the inside greeting in Versamark, and heat set using Simon's Gold Embossing Powder again.  Next I cut several hearts from the Simon Says Stamp Holiday Shapes - Hearts and Stars die and the Simon Says Stamp Large Holiday Shapes die set.  I like the variety of sizes offered in these two dies and I use them a lot!  If I have extras I just put them in my little container with the other bits of unused die cuts so they are ready if I need just a few when I'm working on cards.  I cut one set of the large die and three sets of the small die.  Those itty bitty little hearts are so cute!  I used Die Cuts with a View Glitzy Glitter Paper for the hearts and adhered them randomly using Ranger Multi Medium Matte.


This card was not difficult but I did give it a lot of thought as to how I wanted it to all come together.  I hope they appreciate the hand made card as much as I treasure the scrapbook that Lance made me when he was 7 years old.  It's always on display in our home.

I always appreciate it when my blog readers or lookers take time to comment, so thanks to those of you who have done it!