Showing posts with label Die Cuts With a View. Show all posts

Tuesday, September 26, 2017

Sentiments & Quotes

Anyone that I've been good friends with for a while, knows that I am a girl who loves quotes, especially those that speak to my heart. I've used them often in my scrapbooks through the years and I'm always on the lookout to add a new one to my collection. So when I saw that Double D Challenges was having a Sentiment/Quote theme this time around, I had to join in. In fact I have a few that I'd love to play with but I might only have time for one so I wanted to do something that also fit in with Challenge #16 at The Heart Desires using Fall colors. I love the combination of Scarlet and Brown in the fall. The colors are deep and rich and just automatically feel regal and beautiful. If you add a touch of gold into that, it's sure to be a winner. 

For my card, I started with a top folding card base made from Vintage Cream Cardstock. I die cut a piece of  brown shimmer cardstock (DCWV) for the background panel with the MFT Blueprints 15 Stitched Rectangle Die from the set. I adhered that to my cardbase with Kokuyo, which is a sticky dot runner. After using my powder tool on a piece of Stamper's Select Vellum, I stamped the sentiment in Versamark and heat set it with Simon Says Stamp Antique Gold Embossing Powder. It's important to let your heat tool warm up for about 30 seconds before you melt the embossing powder so that your Vellum will not warp.  I found this stamp at Hobby Lobby and it is their brand, Stampabilities.  I was impressed with how well it stamped.  

To cut the layers, I used a much older set of Cookie Cutter Dies from QuicKutz that I think were called frames. I don't have them labeled and I don't remember for sure but I've had them for about 10 years now. The layer behind the vellum is a Scarlet Shimmer that I already had in my stash and the layer behind that is Die Cuts With A View's "Dear Jane" Mat Stack which is a nod to Jane Austen's "Pride & Prejudice".  It's a beautiful collection of papers but it's sometimes hard for me to find a way to use the designs because of the size of many of the patterns and the Victorian Style they are, but they were perfect for this card. Several of the sheets in this stack have gold foil on them. 

Additionally, I cut four of the Spellbinders Corner Flourishes (NLA) and added them to the corners of my card front. To adhere the vellum piece to the Scarlet Shimmer, I put Stick-It Adhesive behind the entire piece. Next I cut a piece of Black Fun Foam in the same size to go behind the Scarlet Shimmer paper so that I could pop that element up a bit. You could also use Black Foam Tape like the kind available from Scrapbook Adhesives or Ranger but I forgot I had some until I had already cut the black foam. 

This is my best imitation of a style that my friend, Yana, creates for Spellbinders often. She creates the most beautiful, layered and dimensional cards. I considered adding tiny pieces of foam tape behind the corner brackets, but since I am actually mailing this card to someone, I decided just to use Ranger Multi Medium Matte to make sure they were held securely. Thank you so much for stopping by today. There are sure to be lots of inspiring cards at the Double D Challenge so be sure to check them out as well as the challenge at The Heart Desires. See you soon!

Tuesday, October 27, 2015

Countdown to the Holidays - TBT


Today's blog post is another card for the Simon Says Stamp Monday Challenge which is having a Throw Back theme.  I threw all the way back to 2013 for this challenge which was "Countdown to the Holidays".

Every year, my husband's family gathers for a family Christmas Dinner.  We book a lodge for this event on the weekend before Christmas and everyone near and far does their best to be there on Sunday for the dinner.  With six children in the family and their spouses we have a small crowd.  With our kids and their kids?  Well, we're numbering in the higher double digits. Each of the siblings and their spouses takes turns hosting and this year is my husband's and my turn. By now many of us have grandchildren that are getting older and in fact, our oldest grandson got married last month.  This means we have the potential to become great-grandparents in the not too distant future.  This both delights and scares me!  I love being a Mimi, though, so whatever happens, it will be okay.

While I have been scrap booking for nearly two decades, I only started making cards this year and not even at the beginning of the year either.  I think I got pretty serious about it in May and it's been a constant learning process and whirlwind ever since.  But since I've started card making, I decided I would create handmade cards for all of my Brothers & Sisters-In-Law this year and I am not one to procrastinate.  Our gathering is less than 8 weeks away.  I want all of the cards to be similar in appearance, using the same design elements and embellishments.  So to that end I started this project today.


I love snowflakes!  They are like diamonds, with no two ever exactly the same. Each one is unique and beautiful and I marvel at the way they look. They shine and shimmer in the light.  I wanted to capture as many of those characteristics as I could in my card.  I also wanted an evening or night sky so the snowflakes would catch in the light and shine in unexpected ways.

I started with a 4.25 x 5.5 inch Simon Says Stamp 120# White Card Stock.  I like to use this heavier card stock when I plan to do some ink blending as I'm not as likely to catch the blending tool on the edge and bend it up.  I used a SU! stamp set called "Snowflake Soiree" and laid them out on my 4 x 6 acrylic block leaving room at the bottom third of the panel for my Sentiment Die Cut.  I like the Inkadinkado Blocks with the side grips for my fingers.


I've searched online everywhere today, but I have been unable to locate where this die came from.  I thought it came from Papertrey, Ink. but they don't have this die.  There are two others in the set of three including "Love" and "Joy".  If anyone knows, please tell me!  ETA:  It did come from Papertrey, Ink but is no longer available!

I stamped all of my front panels and heat embossed them using Simon Says Stamp Silver Fine Detail Embossing Powder.  Using Rich Razzleberry and Pacific Point Ink with a Mini Ink Blending Tool, I inked up each front panel. The color begins fairly soft but the more blending you do, the deeper the color becomes.  Next I sprayed each panel with some Tattered Angels Glimmer Mist in Pearl.  While that was still slightly damp, I took a pinch of Iridescent Sparkle Embossing Powder and kind of sprinkled it over the front panel leaving a touch of sparkle on there in much the same manner that you would a season a dish you were cooking.  To speed up drying time and to set the tiny bit of iridescent powder I heat set it again.  After that, I die cut the panel using the Simon Says Stamp Stitched Rectangles in the largest size and cut my sentiment from DCWV Silver Foiled Paper then attached it to my card front using Ranger Multi Medium Matte.  I attached that to my white A2 card base using my Tombow Mono Permanent Adhesive.

Occasionally I will create a very fussy card with lots of layers and some distressing but overall I prefer a clean and simple design that enhances the elegance of a card.


I hope you enjoyed today's project.  I'll return soon with another one but meanwhile, please feel free to leave me a comment.  I promise, I read every one of them.

ETA:  I got a comment on this post several days after the original letting me know that these dies are still available at Papertrey Ink under the category "One Liners". The three of them are $14.00 which is a great price for such beautiful and intricate dies.

Wednesday, October 14, 2015

Dream a Little Dream

For today's card, I took one of the many images that I have recently colored using Tim Holtz Distress Markers and finished with my Wink of Stella Clear Shimmer Brush Pen.  This image is from Clearly Besotted's Beautiful Friend Stamp Set and has a coordinating die.  After stamping my image on Canson XL 140# Watercolor Card Stock, I heat set it using Simon Says Stamp Ultra Fine Gold Detail Embossing Powder.  I colored the image with Abandoned Coral, Mowed Lawn and Gathered Twigs.  These are super simple to take a few to color when you are on the go. You can literally throw three markers, a few embossed images and a water brush in to a stamp pocket and toss it in your purse.  The stamp pocket helps to keep everything nice and clean.  I buy the Simon Says Stamp brand of Stamp Pockets because the thickness feels identical to the Avery Elle Pockets but I get twice as many for only one dollar more.


I had previously cut a few of these Impression Obsession Butterflies in a peachy-coral color with some vellum top layers so I grabbed one out of my container that I keep spare parts in. I always cut the antennae off of the solid butterfly image and just keep them on the vellum layer so it doesn't look like my butterfly has 4 antennae.  I use a marker to make them black.  I attached the layers as I usually do by putting Ranger Multi Medium Matte down just the center of the butterfly's body to attach the vellum layer.  Using my fingernail or my bone folder, I gently curve the tips of the wings on both layers so that they are pointing slightly downward.  I use a foam square cut in half lengthwise under the butterfly's bottom layer to attach it to my background panel and then a smaller piece of foam adhesive under the tip of each wing.  The rear of the butterfly I attach directly to the card base using Ranger Multi Medium Matte or you could also use a glue dot.  This card panel is cut with my largest Simon Says Stamp Stitched Rectangle Die in Cameo Coral, which is another discontinued SU! color. 


I took 3 foam squares and cut each of them in quarters to use in attaching the floral image to the background panel.  You always need to put a little of the foam adhesive in the center of whatever image you are attaching so it doesn't "cave in" at the center.


Next I cut three of the "Dream" die cuts and stacked them up so I would have a nice, dimensional word.  This die cut came in a set of three words from Little Yellow Bicycle at Hobby Lobby but the only place I've seen it since I got mine is Amazon.  The bottom two layers are just scraps of watercolor card stock and the top one is from some scrap pieces of watercolor paper that I had painted.  I try to always look at and utilize my scraps.  If something is a nice color or special in some way, I try to find die cuts that I can use with it.  I sort my scraps by color families from time to time when the pile near my Cuttlebug starts getting too big.


I cut a thin strip of Gold Glitter Cardstock and started assembling my card.  For the word "Dream", I put a tissue underneath it and added a layer of Wink of Stella and then Ranger Glossy Accents on top, setting it aside to dry for about an hour.  When I came back, it was ready to attach to my card.  Using Ranger Multi Medium Matte, I adhered it and held it down for a few minutes so it would not come loose.  I could have set some acrylic blocks on it, but my hands were free for a few minutes Ü.  I love the simple but elegant touch that just a narrow strip of glitter card stock makes on a card.  This is a tip that I picked up from Jennifer McGuire and I find it works often when you need just a touch of something more on your card.  I considered sequins, but I like this option better for this card at least.  

Wonderful Watercolor II

I made another card today for the Wonderful Watercolor Challenge over at the Simon Says Stamp Monday Challenge Blog.  Since I just went into a ton of detail yesterday, I am going to try to keep it simple today.

The card base is made from a pale pink card stock cut to 4.25 inches x 11 inches and top folded at 5.5 inches.  The Green is Wild Wasabi cut into the scalloped & stitched panel using the Sunshine Layers Die by WPLUS9.  The background panel was water colored using Abandoned Coral and Worn Lipstick Distress Inks then cut with the Simon Says Stamp Stitched Rectangles.


The floral branch is from the same Clearly Besotted Beautiful Friend Stamp Set I used yesterday and then cut with the Beautiful Friend Coordinating Dies.  Using Distress Markers I colored the flower first using Abandoned Coral for the base layer of color.  Next I added in more color with Worn Lipstick marker.  The leaves were all colored with Mowed Lawn Distress Marker.  After coloring the image I applied Wink of Stella in clear on the flowers and leaves. The greeting is made from 4 die cuts stacked and glued on top of each other for added dimension.  The floral branch was adhered to the background panel using Ranger Multi Medium Matte as was the sentiment and the sequins.  The rest of the pieces where adhered with my ATG Gun


After I assembled the card, I decided I wanted some sequins for that touch of whimsy.  This card uses Pretty Pink Posh Watermelon 6mm cupped and an 8mm green from the Go Green Collection.


Since I already had the image colored and the background water colored, it took only a little time to assemble everything. 

Have a great day!  Leave any questions or comments below and thanks for stopping by.   

Wednesday, October 7, 2015

Clean & Simple II

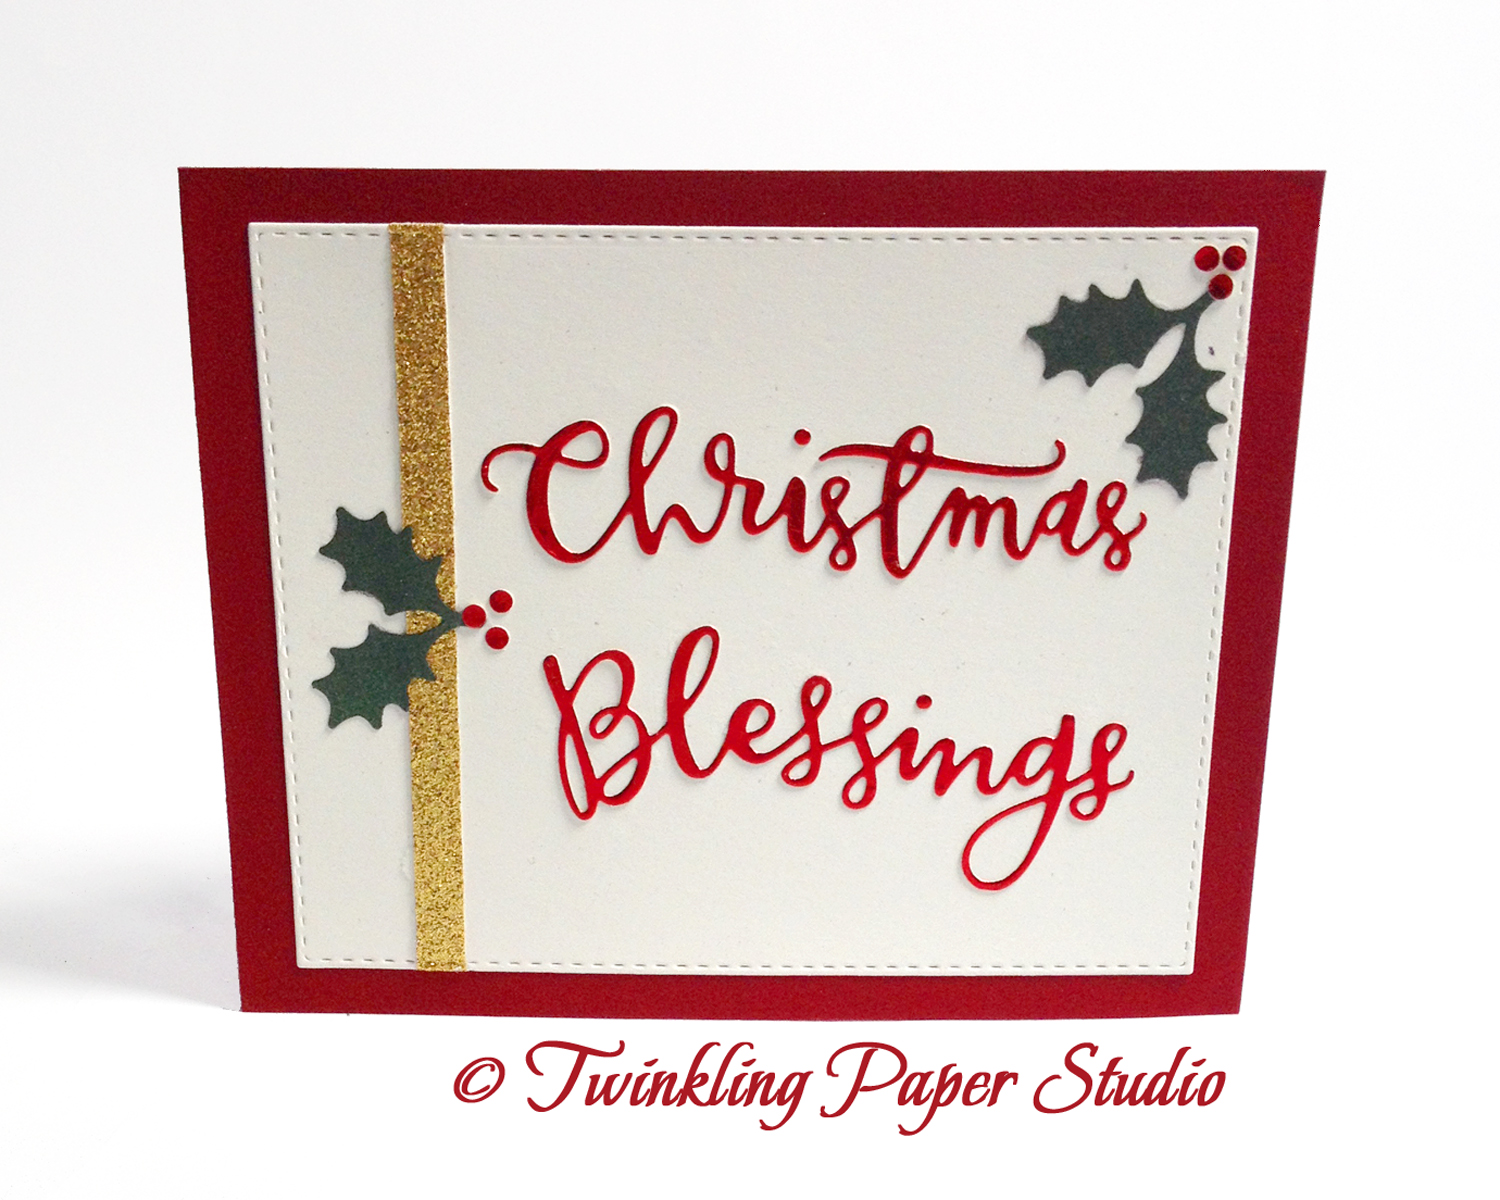
I don't normally enter more than one card in the Simon Says Stamp Weekly Challenges but I've been anxious to play with some of my Christmas Dies.  Since that is what the Wednesday Challenge is this week, it was a good afternoon to do a little work in my studio.

I'm still trying to figure out what design I am going to use for my Christmas cards this year.  It has to be pretty simple as I will need to mass produce them. Cards just don't get much simpler than this design.

For this card I started with a landscape, side folded Lipstick Red card base.  This is one of Simon Says Stamp's 100# card stocks.  They are thick and smooth and make beautiful cards.  I treated my card front with some Shimmer Spray made by Tsukineko and set it aside to dry while I designed the rest of it.  This spray gives your paper a sparkle but you can't get too heavy handed with it or it will warp your paper.  Two light coats is far better than one saturated coat.

Next I wanted just a bit of sparkle on my card so I attached a 1/4th inch strip of gold glittered card stock from a mat stack by Die Cuts With a View onto a piece of Bazzill Marshmallow 100# Card Stock.  After that I cut the panel with my ever faithful Simon Says Stamp Stitched Rectangle Die.  That extra little touch of stitching just adds that finishing touch to whatever project you are working on and I always prefer the finish of a die cut over a trimmer cut.


A new trimmer is on my wish list as the one I have no longer has replacement blades available.  I've also learned that if you buy titanium blades, they will last much longer than a regular trimmer blade.  I cut a lot of paper, so I'm totally going for that.  The one on my wish list is a Fiskars Wire Guide Premium Cut Line Trimmer and Simon's also has Titanium Blades available for purchase.

I cut the Christmas Blessings die cut in a Die Cuts With a View Red Foil Card Stock. The little dots on the I's are very tiny, so its important to keep track of them.  For the final element on my card panel, I cut some Holly & Berries with a Martha Stewart Punch that I've had for several years out of green shimmer card stock and red foil for the berries.  My goal was to accent the greeting without overwhelming it.  To me, nothing says "Christmas" quite like Holly & Berries does.

I assembled everything with Ranger Multi Medium Matte and attached the panel with Tombow Mono Permanent Adhesive.   I have two of these dispensers and several refills on hand.  This particular card would have been a good one for the ATG because I was not using watercolor card stock.  There are 36 yards of adhesive on one roll of that and the refills come in a 2-pack for $5.99 at Simon Says Stamp.  That is the most economical adhesive that I use but the size is pretty intimidating.

I have a few more works in progress on my desk so I'll have more cards for you soon. Thanks for stopping by and please feel free to leave me a comment.