Friday, October 28, 2016

Simon Says ... Anything Goes

This week at the Simon Says Stamp Wednesday Challenge, the theme is Anything Goes.  I always appreciate this type of challenge since it lets me create anything I want rather than trying to fit into a certain category.  I have so many ideas flitting around in my head right now that I'm actually having difficulty making them conform to specific criteria.  I want to be able to mix and match across different product lines which is how I came to create today's card.

In the October releases from Papertrey Ink and WPLUS9 Design Studio, there were new products featuring Holly. I happen to really love Holly and have a few other things with Holly as well.

In the last few days my friend, Yana, created a card utilizing Spellbinders Jolly Holly Die D-Lites. She used a tone on tone pattern paper, ran them through with the die cutting and embossing sandwiches, and then spritzed them with some Distress Mica Spray and let them dry.  I really loved the look of Yana's holly leaves, so I set about to create a similar look with things I already had.  I didn't have any suitable patterned paper so I ink blended a piece of watercolor paper in various shades of green (Pine Feather, Olive Twist and New Leaf from PTI and Lucky from SSS), misted it with enough water to get the color moving and set it aside to dry.

In the meantime, I stamped in Versamark and heat embossed the Holly Leaves and Berries from Botanical Blocks IV from Papertrey Ink. I used Simon Says Stamp Antique Gold Embossing Powder and watercolored them using Pine Feather and Festive Berries.  Botanical Blocks IV was part of the October release. Once I had that finished and set aside to dry, I decided I wanted to try some of the Holly Leaves from the WPLUS9 stand-alone dies called "Woodland Basics". I went back to the ink blended piece and gave it some spritzes with Heidi Swapp Color Shine Spray in Gold Lamé and set that aside to dry again.

I had been trying to keep the entire set of Woodland Basics Dies together but I finally snipped the Holly Leaves (there are two of them) apart from the rest of the set and filed them down.  I use a diamond burr tip on my Dremmel Tool to grind down all the sharp points of my dies that have been snipped apart.  If there is a way for me to cut myself, I will find it, so I eliminate dies as one of those ways right off the get-go. The nice thing about a diamond burr vs. an aluminum dioxide tip is there are no sparks during grinding, which is always a plus. *Ü*


While I was waiting for the Color Shine Spray to dry, I cut out the Botanical Block and matted it on Gold Foiled Cardstock.  I adhered that to a top folding Pine Feather Card Base using my ATG. Then I cut several of the Holly Leaves to use as accents on my card. I tucked them in to the two corners using Ranger Multi Medium Matte. Since they stick out a little bit rather than laying completely flat I wanted to make sure I used a good strong adhesive.  I used the same adhesive for the Ruby Slipper Sequins from Cartwright's for the Holly Berries. When I was experimenting with the layout, I wasn't sure it was going to work but in the end I really like how it came out.  The extra Holly & Berries adds another layer of texture and dimension to my card.  I know I am going to try a few variations of this card in the next couple of days.

Thank you so much for stopping by to visit today!  I read and appreciate your kind and encouraging comments.

Wednesday, October 26, 2016

Inspired By All The Little Things

We have a young man in our subdivision who just started his own business called Candry's Car Care which is a car interior detailing business. Now I have to say, I really like it when an enterprising young man starts his own business at the age of 12.  I want to encourage him if I can.  So I left my car yesterday after school for him to detail.

I am not usually hauling around young children or eating in my car or that kind of thing, but I'm lucky if my hubby washes my car - forget detailing the interior.  I actually did remember that the last time I had warranty work done on it, they did vacuum it, but that is a far as it went and that had been at least a year.

When I went over to get my car last evening, Candry showed me everything he had done.  It was a job very well done indeed and I wanted to make a Thank You note to send him as encouragement for doing such an outstanding job.  All the floor mats had been removed and vacuumed under, the carpeted floor mats had been vacuumed, the seats were cleaned and treated with leather cleaner, all the vents had been cleaned, etc.  Even the inside windows had been cleaned.  Really, he paid so much attention to detail that I feel like I have a new car!

On the Inspired By All The Little Things Challenge this week, they have the beautiful image of fall leaves as our inspiration and I thought it would be a great choice for a young man.  I had actually made some of the leaves several days ago for another project and ended up not using them, so I did have them ready to go. I like to do ink blending in stripes of color on watercolor paper well misted with Shimmer Mist to help all the colors blend and smooth out.  I die cut several of the leaves using the MFT Falling Leaves Die Set which has the embossed details as well as the outline that is achieved in one pass through a die cutting machine.

I cut an oval from the Copper Crinkle Paper to form the shape of my "wreath" and then placed the leaves around that shape.  I cut three layers of the Mama Elephant "thanks" die from gold foiled cardstock and glued them, one on top of the other, for a thicker embellishment. I used Elmer's Craft Bond, which is a spray adhesive, with a shallow box so I can keep it contained.  I put the wreath onto a Pure Poppy panel that had been cut with a Simon Says Stamp Stitched Rectangle Die and then adhered it all to a top folding horizontal card base using my "new" ATG dispenser.


My ATG has been giving me fits for the last few refills.  When I called 3M/Scotch about the tape refills to see if there had been issues with some of it, they told me there had been an issue with some of the dispensers and offered to send me a new one plus a shipping label to return the duddy one to them.  That came a couple of days ago and I have to say, it is a definite improvement. Only time will tell if it really makes a difference, but I'm hopeful. I also noticed that they used a different refill than the one I had been getting so I made a note of the correct one.

Be sure to stop by Inspired By All The Little Things and check out all the beautiful interpretations of the inspiration photo.

Tuesday, October 25, 2016

Papertrey Ink October 2016 Blog Hop


Welcome to the Papertrey Ink October 2016 Blog Hop!  Nichole always has such a way of finding inspirational images for us and this month is no exception.  It's also a great way to celebrate the arrival of Fall.

Today also happens to be the 20th anniversary of mine and hubby's Catholic Church Wedding.  We have been married for 32+ years, but we didn't have a Catholic Church wedding until 1996.  It was a big deal at the time and I even had a real wedding dress although I skipped the train and the veil.  It was wonderful and lots of our family and a few close friends were there with us.  We even had a small cake and punch reception at our home afterward and one of my Sisters-In-Law had a small wedding cake made complete with a Robbie & Rachel Topper (Cherished Teddies).

I love fall weather.  Give me days filled with sunshine and 70 degrees and I am a very happy girl. I don't need a coat or jacket but a cup of hot tea, hot chocolate or a Mocha Latte tastes really good!  It's my practice session for the coming Winter season.

All of the different colors and textures in our inspiration image are so warm and cozy feeling and that was the main thing I wanted to portray with my design.  I started my card by doing ink blending on a piece of Canson #140 Watercolor Paper in Orange Zest and Pure Poppy.  By using the watercolor paper, it allows me to be able to spritz the paper generously and really blend those two colors out.  I used Tattered Angels Iridescent Gold Glimmer Mist and set it aside to dry while I made a top folding card base from Dark Chocolate Cardstock.  That particular shimmer mist is no longer made but I am planning to try this one by Tsukineko once mine is all gone.  I still have a couple of bottles of Iridescent Gold left.

I love the old hymnal in the inspiration image and I tried to incorporate Sheet Music or Music Notes in some way to my background, but then it just competed with the beautiful plaid paper so ultimately I removed it.  I have a sheet music embossing folder, some sheet music patterned paper and even some sheet music background stamps.  I actually tried all three but I love the plaid paper and it just gave cleaner design lines for my project.

I cut the largest Simon Says Stamp Stitched Rectangle Die out of my Gold Foiled Plaid Paper.  I love this paper and I used a leftover piece for this card but I only have 3 sheets of this left and I've had it for at least 10 years which means I can't get more.  Sigh.... I had to use it for this card though because it popped right into my head as soon as I saw the Inspiration Image.

Once my watercolor paper was completely dry, I cut it using my Little B Hearts Dies.  The outside die cuts while the inside die just leaves the criss-cross impression all the way around. I have other heart dies but these are the ones I reach for over and over again.  There are six different sizes included in the set including one that is quite a bit larger than this and could be used on a 5 x 7 card.


After treating my die cut heart with my powder tool, I stamped the sentiment from Give Thanks in Versamark and heat set it with Simon Says Stamp Antique Gold Embossing Powder.  I also stamped the Acorns from the same set and heat embossed them as well.  To help define the edges of those elements, I went around the heart with Pure Poppy and Dark Chocolate for the Acorns. Additionally I stamped and heat embossed the wheat from the Paper Clippings: So Thankful For You Stamp Set in gold embossing powder on some of the scraps left from the ink blending.  The wheat always makes me think of home which always make me feel warm and cozy!

I was born in Missouri, but I was raised in Kansas and my husband was born in Kansas and grew up there. Winter Wheat accounts for 70 to 80 percent of total production in the U.S., with the largest amounts produced in Kansas (10.8 million tons) and North Dakota (9.8 million tons). To me, the image of wheat is synonymous with Kansas and in Western Kansas in particular, there are miles and miles of interstate highways that run along side the wheat fields. No matter what time of year it is, it's a sight that always evokes a feeling of being home. My husband's family has been farming in Kansas for over 100 years and his brother still farms there, so we feel very connected to the land there.

When assembling my card, I die cut another heart from Fun Foam just one size down to put behind the front one so it would be nice and stable for mailing. When you use foam tape, the paper can get bent up between the pieces so I like to use the fun foam for something this large.  I attached the acorns with a couple of foam squares.

The Simon Says Stamp Monday Challenge for this week is "Autumn", so I'll be entering this card over on their Challenge Blog as well.  Be sure to stop over at both places and check out all the fabulous entries!

Saturday, October 22, 2016

The Challenge #83

Hello!  I'm back today at Always Playing With Paper and The Challenge #83, a Christmas Inspiration Challenge.

I loved the bright pops of color on the white packages in the photograph and really wanted to use the same colors for my card.  In fact, I have two cards for you today featuring the Be Merry Stamp and Die Combination from WPLUS9 Design Studio.  I love the big bold graphics of this set with its mixed typography and how the die is designed to go around the entire sentiment including all those fun little details like the lower swoosh of the "g". There are a couple more choices of greetings you can use in the same set as well.

Both of these cards were made with Stamper's Select White Cardstock for the bases. This is my very favorite cardstock of all that are out there.  It is #110, heavy weight, super smooth and stamps beautifully, no matter what kind of ink you choose.  All of Papertrey Ink's card stocks are just beautiful and the quality simply can't be beat. The greeting was stamped in Versamark and heat embossed using Simon Says Stamp Antique Gold Embossing Powder which is my favorite embossing powder and and my favorite gold as well. *Ü*  I love that it has a warm rich tone to it.

Dawn created a card similar to this on the WPLUS9 Blog during the first week in October and I loved it.  There is set of stand-alone dies that were created to work nicely with this set called Woodland Basics and that is what Dawn used in her video tutorial.  I already had the Tim Holtz Holiday Greens Dies which are along the same lines, so I wanted to try those out first. I'm okay with how they look but I think the Woodland Basics are a better scale for the stamps so I'll be trying those in the near future.  I did some ink blending on watercolor paper in blues & greens then die cut them with the Holiday Greens Dies.

I stamped the flowers on Pure Poppy cardstock, heat set them, die cut them, then arranged them around my sentiment. The Be Merry Coordinating Dies have a few little flowers and stems in it and I used those in combination with the Holiday Greens die cuts.  I also have a sentiment stamped and heat embossed using WOW! Opaque Bright White Embossing Powder, but I haven't used it for a card yet.  I have to say, I really loved Dawn's card that she created using black cardstock and I definitely have it on my list of cards to make. I also have a few other stamps and dies that I want to try with this sentiment but I really love how large it is and the detail in the stamp as well.


I also wanted to try this card in some classic colors as well which is what I like to use for masculine cards.  I really like how it turned out. The sentiment was stamped on True Black, then die cut.  The greens are cut from gold foiled cardstock and the flowers on Pure Poppy Cardstock again. The greens on the cards were adhered with Ranger Multi Medium Matte and the sentiments with Thin 3D Foam Tape.  


Be sure to stop over at The Challenge to check out all of the Design Team's projects and inspiration!  Thanks so much for stopping by.  Have a great weekend everyone!

Tuesday, October 18, 2016

Make it Monday #264 - Die Cut Stencil Shapes

This week on Papertrey Ink's Make it Monday, Melissa Phillips showed us how to use die cuts as stencils.  I've done this on occasion previously but a reminder of techniques can always be a good thing.  We have so many little tips and tricks in our arsenals that we sometimes forget some of the classics.

For my card, I die cut a snowflake and used that as my stencil.  Melissa showed how she uses a paper towel to gently sponge on color.  I used a stencil brush with Lavender Moon Ink, moving the stencil around until I had the background pretty full, but still soft.  Lavender Moon Ink and Cardstock, despite the name, is more of a mauve than a lavender.  I hadn't actually realized that until I ordered the card stock for the first time. The stencil brushes give a softness that I don't think could possibly be achieved with a mini ink blending tool.  Melissa is an expert at delicate, vintage and shabby chic projects.  She often incorporates all three of those things into one project. You can find her beautiful projects on her blog here or regularly at the Papertrey Ink Blog.  


Once my stenciling was complete, I set out to create my card.  I wanted to use lavender/pinks and even the softer greens to make this card for a girlfriend. It's just ultra feminine which describes my friend to a "T".  The What The Doodle: Ornament was stamped in Versamark and heat embossed using Simon Says Stamp Antique Gold Embossing Powder .  I cut it out with the coordinating dies then colored it with Hibiscus Burst Reinker.  I went over the top of the color using a water brush with Interference Red Perfect Pearls which gives it a somewhat deeper color and, depending on the light, a bit of a Sugarplum color. While the ornament finished drying, I stamped the rest of my card front using Holiday Greens Borders which is one of my current favorites.  I love that the border is the entire width of a card so I am not having to stamp a single branch over and over. I do stamp multiple times to get the fullness of an actual Christmas Tree but it is super easy - about three rounds makes it as full as you'd like.  For this card, I inked up the stamp in Versamark first and then also inked it up with Ocean Tides which is a soft green, and then stamped. While the inks were still wet, I sprinkled WOW! Neutral Ultra Shimmer Embossing Powder on the branches and heat set them.  This is what gives the branches their iridescent look.

For the greeting, I used Fancy Pants: Holiday Sentiments with WOW! Metallic Gold Sparkle Embossing Powder.  There are coordinating dies for these stamps, but I did not purchase them. Except for the ones I put on a banner, I mostly do sentiments directly to the card front like I did here.  Everything is attached to a top folding card base that I made with Lavender Moon Cardstock.

Since there's a video tutorial over at the Papertrey Ink Blog, I'm going to spare you all the details. If you have a question, be sure to send a contact me form and I will get back to you right away! Thanks so much for popping in today.

Treat Box, Bag or Envelope

This week over at the Simon Says Stamp Monday Challenge, the theme is "Treat Bag or Box". It just so happens that I had something perfect for this challenge. The limited edition Holiday Kit from Papertrey Ink this year is called Post & Parcel and has the dies to create these adorable letter boxes that are large enough for chocolates, mints, or candy, and the optional Gift Card Envelope Die that has been added to the regular line is the perfect size to hold those gift cards.  There were so many dies included in the kit this year and that made it very hard for me to resist.

Betsy Veldman's Post & Parcel Sneak Peek
This is the first time I've had a chance to sit down and play with this set, but it was so easy to put together having Betsy's download and YouTube Video available to reference.  Even the adorable little padlock is part of the die cuts included in the kit.  As soon as I saw Betsy Veldman's and Kay's projects, I knew I was in trouble because I loved both of them.  I didn't even have to look at what the rest of the Design Team had done to know I was getting the kit.

Kay Miller's Post & Parcel Parcel Peek
As I mentioned, there was a separate Gift Card Envelope Die that you could purchase and that is one of my favorite things and will be able to be used for many things in the future.  I can hardly wait to make Valentines next year, especially keeping in mind that Betsy has other ideas for the Gift Card Envelope Die.  It is separate item from the Post & Parcel kit which sold out, so it will continue to be available for purchase.

Truthfully, these pastel colors don't photograph all that well, but I had this stripe and damask patterned paper from American Crafts that I've held on to for a long while.  I knew it would be perfect to use with these dies.  I was careful to line up the stripes before cutting the paper. I had thought this paper would match Aqua Mist Cardstock from Papertrey, but it wasn't quite the right shade, Aqua Mist having just a touch more green than the Robin's Egg Blue of the patterned paper. You can see it a little bit in this photograph, but it's okay using elements with such a small amount.  It's just not that noticeable.

One of the things I discovered when assembling my letter boxes is that although there is a die included in the kit that makes a slot for receiving "mail" (such as a gift card) in the box, I felt it weakened the box lid and opted not to use it on most of the ones I made. The one thing I didn't try was a double thickness so I need to try that another time.  The boxes are easy to assemble using 1/4th inch Scor-Tape and I used the 1/8th inch wide Scor-Tape for the envelope flaps and Letter Box top.  


The Gift Card Envelope Die will make a really quick way to dress up any kind of gift card any time of year.  All of the greenery for the swags is included in the kit and the stamp set to make more in whatever color you like is also part of the kit. Think of all the ways you can give a gift card and how many lovely papers you have that you can make envelopes out of.... The possibilities are endless. The die cuts the shape and puts in the score lines for you as well as cutting the little slit for the envelope flap to tuck into.  The Post & Parcel Pre-printed Papers and pre-printed envelope cuts are available in the Papertrey Ink Store on an ongoing basis and are printed on Papertrey's Signature White Linen Cardstock. There are so many elements to this kit and I touched on only a few.  I used one of the kit stencils to add the "Post" word to my letterbox and the stamp set to the insert of the Gift Card Envelope.  Betsy always thinks of all the details.  Everything was assembled using Scor-Tape, Ranger Multi Medium Matte and Thin 3D Foam Squares. Simon Says Stamp carries all of these products.  

Thanks so much for stopping by my blog today.  If you have time, drop me a comment because I love hearing from you!  

Monday, October 17, 2016

The Paper Players Challenge #317

This week over at The Paper Players, they have a Clean & Simple Leaf Challenge.  One of my favorite color combinations for Fall this year is Scarlet Jewel and Dark Chocolate so I created my card using those two reinkers.

I started by stamping a couple of the WPLUS9 Autumn Leaves outline stamps onto Canson  #140 Watercolor Paper using Versamark and heat embossing with Simon Says Stamp Antique Gold Embossing Powder.  Since I was coloring in the leaves all the way it didn't matter that the paper was a little more cream colored than white.  Putting a few drops of reinker onto an acrylic block and picking it up with a waterbrush, I colored in the leaves. I wasn't going for a "watercolored" look, just a colored look but I wanted the paper to stand up to the water without pilling. There's some variation in the color just where the paper was more or less wet. Once I had those colored I set them aside for a little while.

While I was waiting, I made a top folding card base from Dark Chocolate Cardstock and cut a stitched rectangle panel from Rustic White Cardstock using the Simon Says Stamp Stitched Rectangles Dies.  I stamped the sentiment from WPLUS9's Grateful Greetings Stamp Set  in Simon Says Stamp Antique Gold Embossing Powder. This is a small stamp set with three different sentiments in it for $6.00 and it pairs well with the Autumn Leaves Stamps & Dies. In fact, last year, Dawn made some gorgeous place cards with both of these sets as you can see in these photos on the right. These were all created by Dawn Woleslagle, owner and designer of WPLUS9.

Next, I went back to the colored pieces while they were still a bit damp to do a trick I learned from my friend, Yana Smakula. She shapes her leaves, petals or what-have-you while they are a little damp and then lets them dry the rest of the way.  If you wait until the paper is completely dry, it can tear or mess up the heat embossing, but not if you do it while they are still damp. Be sure to stop by and check out Yana's blog.  She always has great projcts there and does awesome videos as well.

Before I started assembling my card but after the die cut pieces were dry, I went back to them and did a bit more shaping.  I didn't change the shape of anything, only intensified the gentle creasing I had done in the centers of the stems.


I attached the Rustic White background panel to my card base using my ATG Gun and then attached the leaves down the center using Ranger Multi Medium Matte.  Once the glue was dry, I selectively placed a few Thin 3D Foam Squares to add a little bit of dimension without making the whole thing popped up and too thick for easy mailing.  

Thank you so much for stopping by to see my project.  I have several more finished for this week and just need to get the blog posts written.  I am wishing you all a beautiful fall week!

Saturday, October 15, 2016

The Challenge #82

Hello!  This week is my first as a designer over at the Always Playing With Paper Blog and The Challenge #82.  With Fall settling in here in the southern part of the United States, the temperatures are cooler but the inspiration image made me think of late summer naps at a little beach cottage. Can't you just imagine one of these over-sized Wood Palette chairs covered with those pillows for a great place to take a nap or even to read a book?  I keep telling my husband that when he retires in a few more years that he is going to have to take up some crafty furniture-making kinds of hobbies.  I have a crib at my daughter's house to make into a bench and we have three enormous pergolas over our back patio and it would be awesome to have one of these jumbo chairs out there!

I really love the designs on the pillows with their "seashore" theme but I don't have any stamps or dies resembling that so I used some flourishes for my decor.

Starting with a piece of Spring Rain Cardstock, I dry embossed the front of the card base with a SU! Wood Grain Embossing Folder.  Next I used a 2 inch square from the My Favorite Things Stitched Square Stax Dies to cut out the four squares representing the pillows in Papertrey Ink's Hawaiian Shores & Vintage Jadeite along with Simon Says Stamp's Surf Blue and Bazzill Whirlypop Card Shoppe Cardstock (also from Simon's). I cut 3 of the My Favorite Things Leaf Filled Flourishes from Stamper's Select White to use for the decorative trim on the pillows. This flourish is no longer available but there are some similar ones available here. I glued those pieces onto the squares using Ranger Multi Medium Matte and then snipped off the excess from the back side of the squares.

The "Dream" sentiment is from Little Yellow Bicycle and was cut from Stampers Select White cardstock and inked up with Simon Says Stamp Island Blue Ink. The banner is from the Paper Clippings: Birthday Details Dies and is one I keep out all of the time.


I was really wishing I had gotten the Papertrey Ink What The Doodle: Waves stamp set so I could use it on these pillows, but I didn't so I had to try to convey the same feeling using something I already had.  Thanks so much for stopping by today and leaving a kind or encouraging comment for me. Each one means so much.  I look forward to seeing your interpretations of the inspiration over at The Challenge #82.

Friday, October 14, 2016

Sunday Stamps #137 - Part Two

So while I was playing with the papers and inks from the Sunday Stamps Challenge #137 today, I decided to go ahead, while I had everything out try my other idea for this challenge. I actually like this card as much as the first one I made.  I used all the same color of inks and papers (Kraft, Dark Chocolate, Spring Rain, Rustic White) along with Simon Says Stamp Gold Embossing Powder. I wanted to see the difference between the Antique Gold and Gold since I haven't used the plain gold for a while. The Antique Gold is just a little bit warmer than the Gold embossing powder in the Simon Says Stamp brand.   I think this color combination will be a bit unexpected for this time of year and I like that. I also feel like I could have used Smoky Shadow Cardstock for my base but I already had the Dark Chocolate on my desk so for once I decided to go with the flow.

I have some Thanksgiving cards to send out and I'm really happy with this particular design, especially since hubby and I are from Kansas. I was born in Missouri, but I was raised in Kansas. Winter Wheat accounts for 70 to 80 percent of total production in the U.S., with the largest amounts produced in Kansas (10.8 million tons) and North Dakota (9.8 million tons).  To me, the image of wheat is synonymous with Kansas and in Western Kansas in particular, there are miles and miles of interstate highways that run along side the wheat fields.  No matter what time of year it is, it's a sight that always evokes a feeling of being home.  My husband's family has been farming in Kansas for over 100 years and his brother still farms there, so we feel pretty connected to the land there.  I know his family will enjoy these cards.


Since I already did another post today for this challenge, I am going to keep this one short, but I hope you enjoy this "Take Two" version of my card.

Sunday Stamps # 137

Woodland Warmth color tones are the inspiration for the Sunday Stamps Bi-Weekly Challenge this time around. There is something so warm and comforting about the rustic tones in the inspiration image and this always makes me think of cool autumn nights and Mocha Latte (Cafe Mocha), a perfect combination in my humble opinion.  It's especially good if you ask for Extra Whip. I don't hang out at Starbucks too often but if I am there (which seems to be about once a year) I will splurge for a Mocha Latte and a Venti or Trenta at that. Now you know why I don't hang out at Starbucks very often. *Ü* Can you imagine the calories in one of those every single day or even once a week?

For today's card, I started with a card base made from Dark Chocolate Cardstock. For the wood grain background, I misted a panel of Rustic White Cardstock just once with plain water and ran it through my Cuttlebug with a SU! Wood Grain Embossing Folder.  Once it was embossed, I went over it with Kraft Ink and then sprayed it with some Iridescent Gold Shimmer Spritz and set it aside to dry.  I cut the little Stitched Heart Die from Spring Rain Cardstock and sat and did the Spirelli while I was waiting for the other papers to dry. I used DMC Gold Embroidery Thread for this which comes on a spool rather than in a bundle. Since the holes are already pierced in the paper for you, the needle doesn't need to be sharp. I have one with a really big eye that I use and it's a lot easier on fingers than an actualy needle.  I think they must be needles for Crewel Embroidery.  One of my grandmothers used to do that.

Once I had the Spirelli done, I die cut and stamped all my elements and assembled the card.  The sentiment is from the Give Thanks Stamp Set by Papertrey Ink and was stamped on a Kraft Cardstock oval from the My Favorite Things Stitched Oval Stax and heat embossed in Simon Says Stamp Antique Gold Embossing Powder.  I really would have liked to try stamping the sentiment on a die cut heart, but I didn't have one that was large enough to accommodate both the Spirelli and the Greeting so I'll do that without the Spirelli another time.


I used a layer of fun foam behind the oval and at the top portion of the heart but otherwise this is a very clean and simple card.  As I often do, I put a plain white stitched rectangle panel on the inside of the card for a place to write a message.

Thank you so much for stopping by today and if you'd like to leave a kind or encouraging comment, I really treasure each and every one of them.  Have a great weekend everyone!

Tuesday, October 11, 2016

Papertrey Ink's October 2016 Create Along With Us

It's the Create Along With Us Challenge over at Papertrey this week and without even seeing the full release, it was easy to pick the project and colors that inspired me the most. Betsy's project with the new What the Doodle: Snowflake (releasing on October 15th) is easily one of my favorite winter color combinations.  I started by doing some ink blending on a panel of watercolor paper using Amethyst Allure and Hawaiian Shores inks.  I started with Aqua Mist but decided I wanted a bit more color.  I spritzed the panel with shimmer mist and set it aside to dry while I went to work on my ornament.

In order to keep the ornament the same shade of purple as my background, I continued to ink blend on another piece of watercolor paper using Amethyst Allure with my Mini Round Ink Blending Tool. Once I had it colored and shimmer spritzed, I set that aside to dry for a bit while I went back to work on the first panel.

Using several of the snowflakes from the Fab Flakes Stamp Set, I stamped them on the background panel with Versamark and heat embossed them with WOW! Metallic Platinum Sparkle Embossing Powder.  Next I used the pine branch from Holiday Greens Borders and stamped it in Pine Feather Ink, then inked it up again and shifted a bit to the right, then stamped it again for really full pine branches. Quickly, while the ink was still damp, I sprinkled it with WOW! Neutral Ultra Shimmer Embossing Powder and heat set it.  You have to move quickly, but your stamped image will have a bit of the moisture from the ink allowing some of the embossing powder to stick to it while you heat set it.

Next I inked up the What The Doodle: Ornament in Versamark and heat embossed it in the same Platinum Sparkle Embossing Powder from WOW! The dies for this set have a solid (outline) image and the detailed cut.  Using the solid ornament die, I cut it out so that I could see exactly where to place it then laid it into the detailed die and cut it again.  I really messed up the first one I did, so I had to figure out how to do it better and this was my solution.  It worked great.

For my greeting, I stamped the "Merry & Bright" from Mama Elephant Jingle Greetings first in Versamark and without wiping that off, inked it up in Royal Velvet.  Again, I sprinkled WOW! Neutral Ultra Shimmer Embossing Powder on it and heat set it which gave me a nice bold greeting with a lot of shimmer and shine.  This is one of my favorite tricks for bold greetings on my cards.  Even though I stamped the snowflakes before I stamped the greeting, they appear to be in front of the greeting.  If I would have embossed with the Platinum Embossing Powder, the greeting would have been lost.


I die cut that panel with the Simon Says Stamp Stitched Rectangle Die in the largest size and then attached my ornament using Silver DMC Metallic Thread and slivers of Thin 3D Foam Squares that had been cut in half to make them narrow so they would fit on the back side of the ornament. I secured the string on the back of that panel with a small piece of Washi Tape (you could use any kind of tape) and adhered the panel to a top folding A2 card base made from Royal Velvet Cardstock.  Royal Velvet is decidedly K-State Purple!

I think this will be one of my main Christmas Cards this year although I still have a lot of time to think about it.  I really like the design.  It is a lot of steps, but I think it was worth the effort.  You could make it easier by changing up a few of the elements for mass production like stamping all of the snowflakes at once using MISTI, stamping the ornament onto Amethyst Allure Cardstock and then die cutting it or die cutting all the ornaments out of Amethyst Allure Cardstock and then stamping it using the MISTI and a few more options. I enjoy the stamping process and the unique, one of a kind design so I'm really happy with how this turned out.  Even if you did all of those things to speed along the production, it is still a very unique and beautiful card.  I love all the shimmer and shine!

Thank you so much for stopping by my blog today and taking time to comment. I'll be back soon with another project and starting this weekend, I'll be designing over at "The Challenge" for Always Playing With Paper.  I hope you come by to check us out!

Sunday, October 9, 2016

Always Playing With Paper #81

We have such a great inspiration image today over at The Challenge #81 and it's so colorful that I wanted to play along. I find the Red blooms in the turquoise jars to be beautiful and the touches of gold in the photo add instant elegance and is one of the reasons I like to use gold in my projects.

I started by stamping the Poppy image from Botanical Blocks III Stamp Set in Versamark onto Canson Bristol Watercolor Paper and heat setting it using Simon Says Stamp Antique Gold Embossing Powder.  I watercolored the poppy using Pure Poppy Reinker for the bloom, Deep Green Zig Marker for the foliage, and Light Blue Zig Marker for the sky.  I also used a Black Zig Marker for the center of the poppy.  I had watercolored a few other things yesterday morning so I set each aside as I completed them, returning back to them after they were dry. That was actually a very efficient way to work rather than doing all parts of each card one at a time. Once my image was completely dry, I gave the watercolor paper an all over spritz of Shimmer Spray and then went back over the petals on the bloom with my Wink of Stella Clear Shimmer Pen.

Next I trimmed out the piece of watercolor paper and matted it in gold foiled cardstock then attached that to a top folding card base that had been cut using the Noted: A2 Scalloped Card Base using Simon Says Stamp Audrey Blue Cardstock.


I added a sentiment from the Caring Hearts Stamp Set using Versamark directly on the card base and heat set it using Simon Says Stamp Antique Gold Embossing Powder.

This is such a striking color combination and not one I would have thought to try on my own. That is part of what makes challenges so great! Happy Sunday everyone! I hope you are getting to enjoy some of this same gorgeous fall weather we're having here in Oklahoma.

Saturday, October 8, 2016

Inspired By So Many Things

They have some great photographic inspiration this week over at Inspired By All The Little Things #27 and Sugar Pea Designs Mix It Up Challenge #18. I always enjoy photo inspiration challenges because they can be interpreted in so many different ways. In my case I was inspired by the repeating patterns of the umbrellas as well as the colors in the first photo and again the repeating pattern of the pumpkins in the second photo.

Sugar Pea Designs had a special release for the start of the Caring Hearts Card Drive which runs from October 1st through November 25th. The Caring Hearts Collection consists of three stamp sets and three die collections. You can see and read about them here. Sugar Pea is also donating 20% of the proceeds from the sale of these items from September 30th to November 30th to the Alzheimer's Association.

You can find the whole Caring Hearts Collection in the Sugar Pea Designs Store and they will soon be arriving at Simon Says Stamp as well.  The items are currently on reserve at both locations. I was super happy to get mine already as they sold out in a matter of hours.

The purpose of the card drive is to collect holiday cards for the elderly that live in nursing homes. Last year, they received over 22,000 cards and distributed them to over 100 nursing homes throughout the US, Canada and Australia.  It's a fantastic cause involving lots of your favorite cardmakers and designers like Jennifer McGuire, Laura Bassen, Debby Hughes and many others.

I started my card for these two challenges by stamping the envelopes from the Sugar Pea Designs Caring Hearts Stamp Set in Versamark and repeating a few times to create a vertical band of the images to watercolor for a border on my card. I heat embossed using Simon Says Stamp Antique Gold Embossing Powder.  Once I had it watercolored with my Zig Markers and some Wink of Stella Shimmer Pen, I cut it first with the largest Simon Says Stamp Stitched Rectangle Die and then cut lengthwise with one of the Simon Says Stamp Wavy Scalloped Stitches Die.  I also cut the patterned paper with the largest Simon Says Stamp Stitched Rectangle.  The patterned paper is from Lawn Fawn's Perfectly Plaid Collection.  I also stamped and colored a couple of the single envelopes to fussy cut and use on my sentiment banner.  The banner is from Papertrey Inks Paper Clippings: Birthday Details Die.  I love it and keep it on my table all the time.  There are many great sentiments in the Caring Hearts Stamp Set but I keep this small set from Create a Smile called "Happy Mail" on my desk and I wanted to use that on my banner.  Everything is adhered to a top folding card base made from Simon Says Stamp Surf Blue Cardstock using my ATG gun


This was another quick and easy card to make.  It took me a lot longer to write and link up this post than it did to make the card.  We have a gorgeous, sunny Autumn day on tap here in Oklahoma so happy Saturday, everyone! 

Friday, October 7, 2016

Color Throwdown & Muse Challenges

It's been a busy week and I'm kind of slow getting around this week but finally got my project done for these two challenges which I combined. The Color Throwdown Challenge #413 has this graphic for us to use as well as the designated colors of Navy Blue, Kraft, Orange and White as well as any neutrals we want to use.

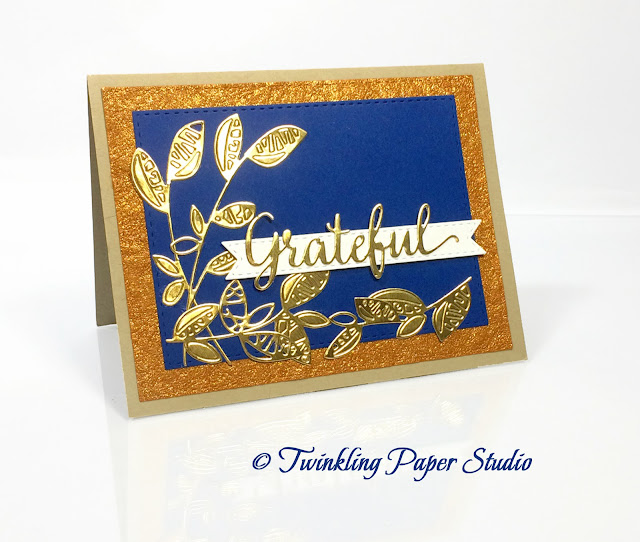
Often in my card making I see certain colors in metallics as is the case this time with the Copper colored paper I used here.  Copper is my perfect "Orange" just as Gold is my perfect "Yellow". This particular copper is a handmade paper and it already had the tons of shimmer in it.  I didn't add any shimmer to it at all.  I die cut the largest Simon Says Stamp Stitched Rectangle Die from it and added that to my Kraft card base.

With the inspiration image from The Muse Challenge #186, Anita's color choices were Kraft and White but I really love leaves of all kinds and wanted to incorporate some into my project which I feel is an easy way to create a less "girlie" and more masculine looking card.  I cut just one each from Gold Cardstock using the Fancy Foliage Details Die from Papertrey Ink and arranged them on a panel of Bazzill Whirlypop Cardstock cut from the second largest Simon Says Stamp Stitched Rectangle Die.  The banner die is from Tag Sale: Quilted and the Grateful die was a Stamptember Release from Simon Says Stamp.  I wanted to use the white banner to help the sentiment stand out from the other gold elements in the background and I definitely achieved that here. There is also a shadow to go along with the word die, but I didn't use it here.


Since I didn't do any stamping on this card, it came together very quickly. It was simply a matter of selecting what elements I wanted and pulling them into my design.  When I first started making cards, this was how I did them all.  Stamping was not a part of card making for me back then.  I never dreamed I would grow to love stamping as much as I do.

I've got several other projects I want to work on this weekend but I really do appreciate you stopping by my blog today.  I hope to be back tomorrow with another project.

Tuesday, October 4, 2016

Make it Monday #263

I have a really quick pretty card today for the Make It Monday Challenge this week!  Amy Sheffer has been using a design where she incorporates frames into her background panel on a card.

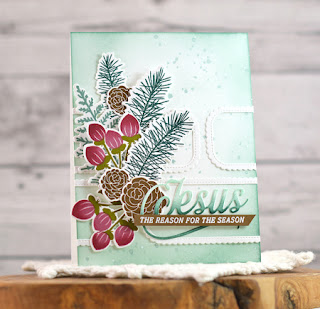
The image on the right is Amy's card. We both used the Holiday Greens Stamp and Die Combinations for our cards. I used the exact same set as Amy and only did my colors slightly different.  We also used the Inspired: Jesus Stamp and Die Combination as well.  This set, like What The Doodle: Ornament, packs a big punch for a mini set.  The stamp set is $5.00 and the Die cut word is $3.00.

I had made a card with a background similar to the one Amy showed us here just the night before so I wanted to go with a different color for my background shading.  One of my current favorite color combinations is Dark Chocolate with Scarlet Jewel so I used the Scarlet Jewel ever so lightly on the background, making the color more intense at the center and fading out to the edges.  I spritzed it with Iridescent Gold Shimmer Spritz and set it aside to dry.  While I love White On White Cards, they are more difficult to photograph so I often try to make the card base in a coordinating color as I did here with the Dark Chocolate Cardstock.  I used the two smallest Simon Says Stamp Stitched Rectangles Dies to make my frames for the background, cutting 4 of them.  I die cut two of each of the Holiday Greens from Stamper's Select White and then stamped the pieces in Pine Feather, Olive Twist, Autumn Rose,  Dark Chocolate, and a touch of Scarlet Jewel on the rose colored buds.

I cut three of the Jesus die cuts and adhered them one to the other for a thick embellishment then used Scarlet Jewel Ink with an ink blending tool making it darker and the bottom and lighter as it went up.  I stamped the rest of the sentiment on Dark Chocolate Cardstock and heat set it with WOW! Opaque Bright White Embossing Powder.


I used Ranger Multi Medium Matte to attach everything to the front panel and then my ATG to attach the panel to the Dark Chocolate Card Base.  I stamped all of the greenery by hand rather than in my MISTI.  I hope you enjoy my take on this challenge.  This definitely is a style I probably wouldn't have come up with on my own but turned out so great.  Thanks for the Make it Monday Challenge, Amy!  Be sure to pop over to Nichole's Blog to watch the video from Amy. Thanks for stopping by and especially for those kind and encouraging comments.