We have a young man in our subdivision who just started his own business called Candry's Car Care which is a car interior detailing business. Now I have to say, I really like it when an enterprising young man starts his own business at the age of 12. I want to encourage him if I can. So I left my car yesterday after school for him to detail.
I am not usually hauling around young children or eating in my car or that kind of thing, but I'm lucky if my hubby washes my car - forget detailing the interior. I actually did remember that the last time I had warranty work done on it, they did vacuum it, but that is a far as it went and that had been at least a year.
When I went over to get my car last evening, Candry showed me everything he had done. It was a job very well done indeed and I wanted to make a Thank You note to send him as encouragement for doing such an outstanding job. All the floor mats had been removed and vacuumed under, the carpeted floor mats had been vacuumed, the seats were cleaned and treated with leather cleaner, all the vents had been cleaned, etc. Even the inside windows had been cleaned. Really, he paid so much attention to detail that I feel like I have a new car!
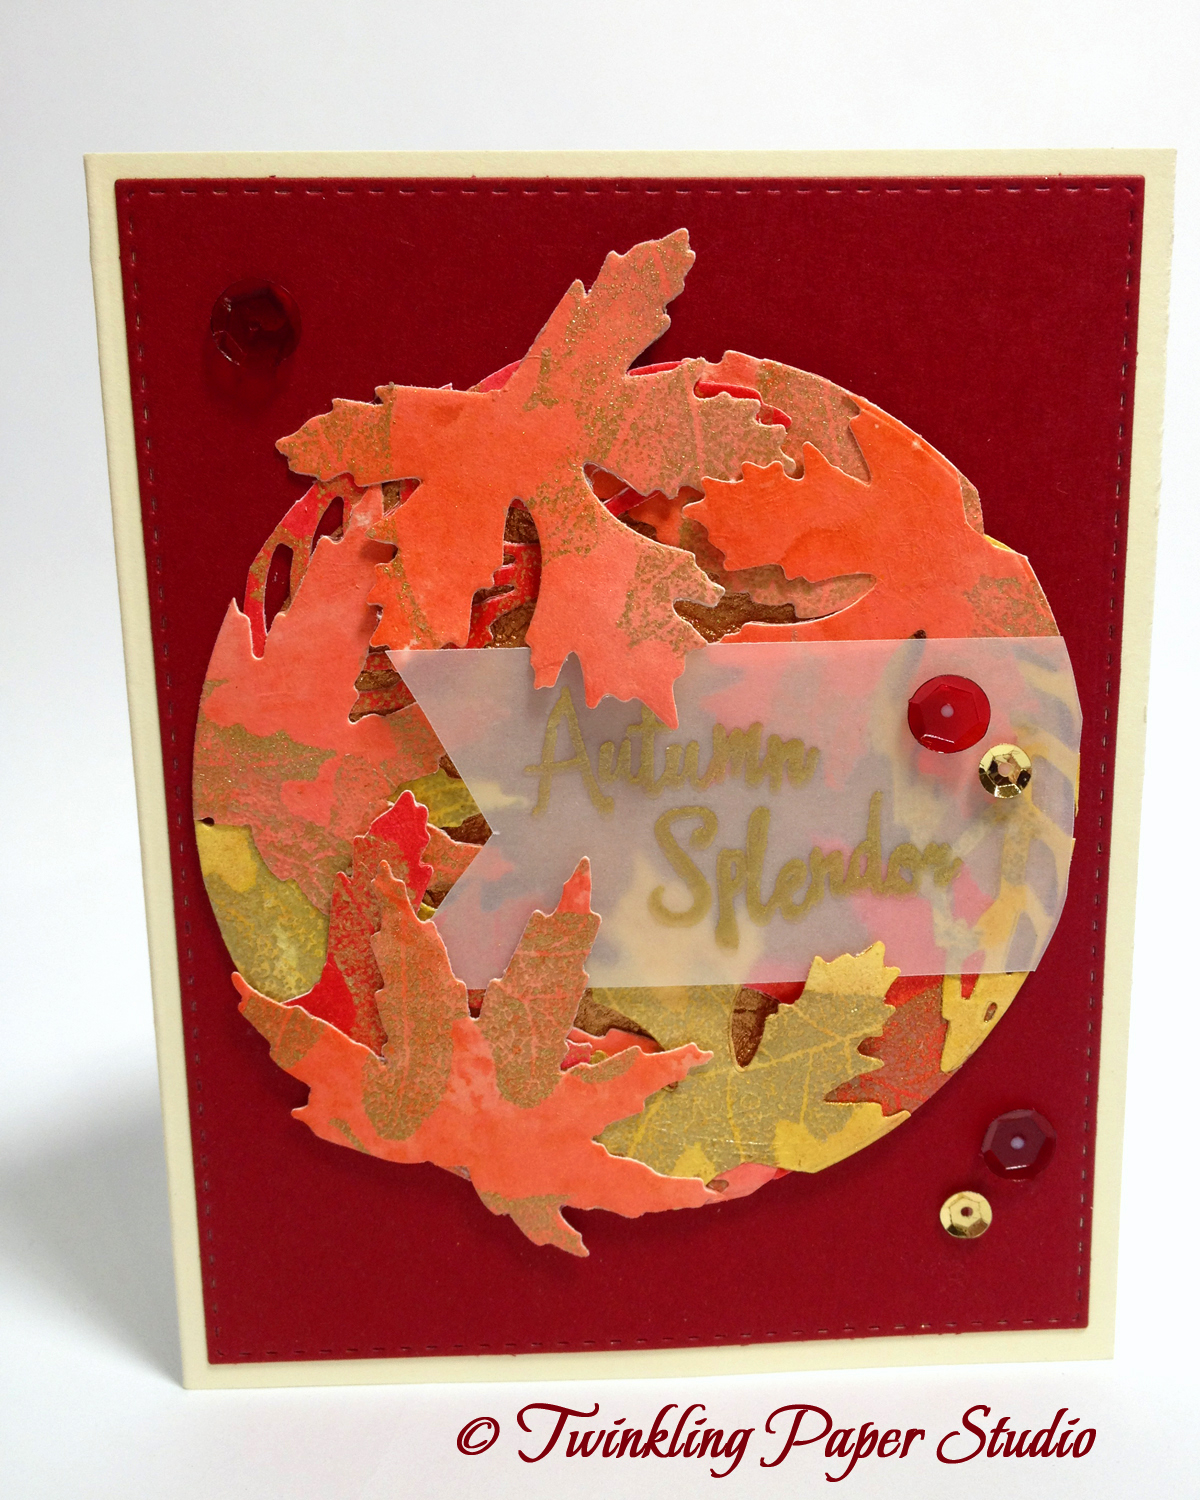
On the Inspired By All The Little Things Challenge this week, they have the beautiful image of fall leaves as our inspiration and I thought it would be a great choice for a young man. I had actually made some of the leaves several days ago for another project and ended up not using them, so I did have them ready to go. I like to do ink blending in stripes of color on watercolor paper well misted with Shimmer Mist to help all the colors blend and smooth out. I die cut several of the leaves using the MFT Falling Leaves Die Set which has the embossed details as well as the outline that is achieved in one pass through a die cutting machine.
I cut an oval from the Copper Crinkle Paper to form the shape of my "wreath" and then placed the leaves around that shape. I cut three layers of the Mama Elephant "thanks" die from gold foiled cardstock and glued them, one on top of the other, for a thicker embellishment. I used Elmer's Craft Bond, which is a spray adhesive, with a shallow box so I can keep it contained. I put the wreath onto a Pure Poppy panel that had been cut with a Simon Says Stamp Stitched Rectangle Die and then adhered it all to a top folding horizontal card base using my "new" ATG dispenser.
My ATG has been giving me fits for the last few refills. When I called 3M/Scotch about the tape refills to see if there had been issues with some of it, they told me there had been an issue with some of the dispensers and offered to send me a new one plus a shipping label to return the duddy one to them. That came a couple of days ago and I have to say, it is a definite improvement. Only time will tell if it really makes a difference, but I'm hopeful. I also noticed that they used a different refill than the one I had been getting so I made a note of the correct one.
Be sure to stop by Inspired By All The Little Things and check out all the beautiful interpretations of the inspiration photo.
Showing posts with label Autumn. Show all posts
Wednesday, October 26, 2016
Tuesday, October 25, 2016
Papertrey Ink October 2016 Blog Hop

Welcome to the Papertrey Ink October 2016 Blog Hop! Nichole always has such a way of finding inspirational images for us and this month is no exception. It's also a great way to celebrate the arrival of Fall.
Today also happens to be the 20th anniversary of mine and hubby's Catholic Church Wedding. We have been married for 32+ years, but we didn't have a Catholic Church wedding until 1996. It was a big deal at the time and I even had a real wedding dress although I skipped the train and the veil. It was wonderful and lots of our family and a few close friends were there with us. We even had a small cake and punch reception at our home afterward and one of my Sisters-In-Law had a small wedding cake made complete with a Robbie & Rachel Topper (Cherished Teddies).
I love fall weather. Give me days filled with sunshine and 70 degrees and I am a very happy girl. I don't need a coat or jacket but a cup of hot tea, hot chocolate or a Mocha Latte tastes really good! It's my practice session for the coming Winter season.
All of the different colors and textures in our inspiration image are so warm and cozy feeling and that was the main thing I wanted to portray with my design. I started my card by doing ink blending on a piece of Canson #140 Watercolor Paper in Orange Zest and Pure Poppy. By using the watercolor paper, it allows me to be able to spritz the paper generously and really blend those two colors out. I used Tattered Angels Iridescent Gold Glimmer Mist and set it aside to dry while I made a top folding card base from Dark Chocolate Cardstock. That particular shimmer mist is no longer made but I am planning to try this one by Tsukineko once mine is all gone. I still have a couple of bottles of Iridescent Gold left.
I love the old hymnal in the inspiration image and I tried to incorporate Sheet Music or Music Notes in some way to my background, but then it just competed with the beautiful plaid paper so ultimately I removed it. I have a sheet music embossing folder, some sheet music patterned paper and even some sheet music background stamps. I actually tried all three but I love the plaid paper and it just gave cleaner design lines for my project.
I cut the largest Simon Says Stamp Stitched Rectangle Die out of my Gold Foiled Plaid Paper. I love this paper and I used a leftover piece for this card but I only have 3 sheets of this left and I've had it for at least 10 years which means I can't get more. Sigh.... I had to use it for this card though because it popped right into my head as soon as I saw the Inspiration Image.
Once my watercolor paper was completely dry, I cut it using my Little B Hearts Dies. The outside die cuts while the inside die just leaves the criss-cross impression all the way around. I have other heart dies but these are the ones I reach for over and over again. There are six different sizes included in the set including one that is quite a bit larger than this and could be used on a 5 x 7 card.
After treating my die cut heart with my powder tool, I stamped the sentiment from Give Thanks in Versamark and heat set it with Simon Says Stamp Antique Gold Embossing Powder. I also stamped the Acorns from the same set and heat embossed them as well. To help define the edges of those elements, I went around the heart with Pure Poppy and Dark Chocolate for the Acorns. Additionally I stamped and heat embossed the wheat from the Paper Clippings: So Thankful For You Stamp Set in gold embossing powder on some of the scraps left from the ink blending. The wheat always makes me think of home which always make me feel warm and cozy!
I was born in Missouri, but I was raised in Kansas and my husband was born in Kansas and grew up there. Winter Wheat accounts for 70 to 80 percent of total production in the U.S., with the largest amounts produced in Kansas (10.8 million tons) and North Dakota (9.8 million tons). To me, the image of wheat is synonymous with Kansas and in Western Kansas in particular, there are miles and miles of interstate highways that run along side the wheat fields. No matter what time of year it is, it's a sight that always evokes a feeling of being home. My husband's family has been farming in Kansas for over 100 years and his brother still farms there, so we feel very connected to the land there.
When assembling my card, I die cut another heart from Fun Foam just one size down to put behind the front one so it would be nice and stable for mailing. When you use foam tape, the paper can get bent up between the pieces so I like to use the fun foam for something this large. I attached the acorns with a couple of foam squares.
The Simon Says Stamp Monday Challenge for this week is "Autumn", so I'll be entering this card over on their Challenge Blog as well. Be sure to stop over at both places and check out all the fabulous entries!
Monday, October 26, 2015
No Ordinary Paper
Fall is just kicking in to high gear here in Northeastern Oklahoma. I love Fall more than any other season. The brilliant colors of the leaves are every bit as beautiful to me as the flowers in Spring. The last couple of mornings the house has been cool; cool enough that my baby girls (as I refer to them) don't want to get out of the warm covers on the bed. I like that in the evenings you need a jacket or sweater if you are going to be outside. Here is a picture of one of my little cuties, Holly Noelle, from this past Winter.
This little girl wants to be on my lap at some of the most inopportune times, but who could resist that face? I guarantee I can't!
I've been thinking about die cutting some leaves out of water colored card stock. The 140# paper I use makes really nice die cuts that are thick and crisp. I was wishing I had some leaf dies with more details in them like veins. I don't, so I stamped some leaves from a CTMH set called "Autumn Splendor" on to the water colored panels I had made using the "smooshing" technique with the watercolor paper and Stampin' Up Inks.
Right now I am using the Canson XL Brand of water color paper. It's great for most things but I have a few sheets of a different one that is whiter and brighter than the Canson so I'll need to see what kind that is next time I buy some. I buy the large pads of watercolor paper and cut my own panels. I do a couple of sheets at a time which gives me 16 panels that I keep ready in a stamp pocket. I've used both the Avery Elle Stamp Pockets and the Simon Says Stamp brand pockets. I've found the Simon Brand Stamp Pockets to be equal to the Avery Elle Brand in thickness and I can get twice as many for only $1.00 more. Keeping the panels in the pocket keeps them from getting dusty or splattered or whatever. Have I mentioned before that my creative process is very messy?
Next I cut the leaves out with my die. The one I have is an old Quickutz Revolution die that has 4 leaves on it. Since I had 3 different watercolor panels in Yellow, Orange and Red, I was able to cut several leaves for my wreath. I don't have a coordinating set of stamps with matching dies but the stamping I did on the leaves gave them a little more texture than a flat piece of paper or card stock would have. I did my stamping in Delicata and used Simon Says Stamp Clear Embossing Powder on top, then heat set it. You have to make sure the watercolor paper is dry or the dies don't cut very well and the embossing is a mess! You can probably tell that experience was my teacher here, *Ü*.
I cut the largest Simon Says Stamp Stitched Circle Die on some leathery looking copper colored paper to be a base for the wreath I wanted to make and started arranging and attaching the leaves around the edge using Ranger Multi Medium Matte. Because of the thickness of the die cuts, I stacked a few acrylic blocks on the top while it dried to keep everything stuck down and glued together. Once that was dry, I used an even bigger plain circle die just to cut off the excess from all the leaves. In hindsight, I could have used much smaller leaves but these were okay.
I cut a Simon Says Stamp Stitched Rectangle panel out of Cherry Cobbler card stock and mounted that on an ivory card base. I stamped the sentiment on 40# Vellum using Tsukineko Golden Glitz Delicata Ink and heat embossed it with Simon Says Stamp Clear Embossing Powder. I actually tried the sentiment a few ways until I got one I was happy with. I originally used Brilliance Galaxy Gold Ink but when I put clear embossing powder on it, it was too light. I think I might need to investigate some other embossing powders as the silver embossing powder I have melts quickly, and is nice and smooth, but my gold takes forever to heat emboss and doesn't have the smooth appearance of the silver. Both are the same brand, but I hadn't realized before that they were so different from each other in how they work.
I cut one side of the sentiment with a swallowtail end and for the other I followed the shape of the wreath, snipping off the excess with a pair of scissors. I pulled out a few points of the leaves to go over the sentiment rather than under, popped on a few Ruby and Gold Sequins and called it done. I love the richness of the gold to go with the fall colors.
I hope you enjoyed this card and I'll be back with my next project very soon. Please feel free to leave a comment as I really enjoy reading them.
Monday, October 5, 2015
The Colors of Autumn
I'm so excited to get to do a fall card today for the Simon Says Stamp Monday Challenge. Fall is by far my favorite season. I love the vibrant colors against the crisp, cool temperatures that call for hot tea or hot chocolate.
For this card I started with a side folding ivory card base. Next I took a piece of Canson 140# Watercolor Paper and did the background using the ink "smooshing" technique. I inked up each color, one at a time on an acrylic block starting with yellow. I don't think there is much yellow left visible, but I'm okay with that because I think the background is so beautiful. After inking up my acrylic block, I gave it a spritz of Perfect Pearls Solution then turned the block over and "smooshed" it on to my watercolor paper. Then I repeated the same process for coral and then my deepest red ink. I walked away for a bit to let that dry so I could see what I had to work with or if I was going to use this background at all. I always love the shimmer that a solution of Perfect Pearls gives to anything I am working on and this was no exception.
I set that aside for a little bit while I stamped the greeting and heat embossed it with Simon Says Stamp Embossing Powder in Ultra Fine Gold on Vellum. This is another Close to My Heart Stamp Set called "Happy Autumn". For the solid color background I used Calypso Coral cut with the Sunshine Layers Designer Die. Next I cut the watercolor with a different die from the same set that has the rounded corners. Since they are from the same set, the size is perfectly proportioned.

I wrapped the vellum around the smaller panel and adhered it to itself on the back side of that piece. I punched a couple of maple leaves from the watercolor leftovers using a punch that I have had for a number of years and attached them with a foam square cut in half, corner to corner.

All in all, this was a pretty simple card and the background was very easy. The hardest part for me was actually walking away to let the ink dry on the watercolor paper. *Ü*
I was unable to get a good picture that really shows the shimmer in the paper. I even treat my solid color paper so it has it too. I always love to hear feedback on the cards I post so if you've got a minute, drop me a note here in the comment section. Thanks for looking!
For this card I started with a side folding ivory card base. Next I took a piece of Canson 140# Watercolor Paper and did the background using the ink "smooshing" technique. I inked up each color, one at a time on an acrylic block starting with yellow. I don't think there is much yellow left visible, but I'm okay with that because I think the background is so beautiful. After inking up my acrylic block, I gave it a spritz of Perfect Pearls Solution then turned the block over and "smooshed" it on to my watercolor paper. Then I repeated the same process for coral and then my deepest red ink. I walked away for a bit to let that dry so I could see what I had to work with or if I was going to use this background at all. I always love the shimmer that a solution of Perfect Pearls gives to anything I am working on and this was no exception.
Next I used a stamp set called "Autumn Splendor" that I already had from Close To My Heart. I selected four different leaf stamps and stamped them randomly one shape at a time over the color in Brilliance Archival Galaxy Gold Ink trying not to overlap too much. This set of images has lots of detail in them, so they weren't suitable to watercolor but I love the veins that show all of the details in the gold ink against the vivid colors of the background. I was surprised at how visible the leaves are!
I wrapped the vellum around the smaller panel and adhered it to itself on the back side of that piece. I punched a couple of maple leaves from the watercolor leftovers using a punch that I have had for a number of years and attached them with a foam square cut in half, corner to corner.
All in all, this was a pretty simple card and the background was very easy. The hardest part for me was actually walking away to let the ink dry on the watercolor paper. *Ü*
I was unable to get a good picture that really shows the shimmer in the paper. I even treat my solid color paper so it has it too. I always love to hear feedback on the cards I post so if you've got a minute, drop me a note here in the comment section. Thanks for looking!
Subscribe to:
Posts (Atom)


