Showing posts with label Watercolor Detail Stamping Technique. Show all posts

Tuesday, August 28, 2018

Altenew Educator - Irresistible Inking Techniques

I am happy to be here today with my last project for the Level 1 Classes of the Altenew Educator Certification Program.  Today's card features Irresistible Inking Techniques.  In this class we learned several different techniques for using our inks in less than traditional ways and there were a few I hadn't tried before.  So I chose to combine a couple of the techniques from the class with a twist of my own  for this project. 

I started with one of the Stamp Sets from Altenew's July 2018 Release, Beautiful Heart.  One of the techniques we learned was how to use ink with a brayer or an acrylic block for a soft background on our cards.  I had a brayer that I had never actually used and I loved the texture it added to my background panels.  You can smoosh some ink onto a craft mat, spray it with water (or in my case I used shimmer mist) and then run your brayer through it and then onto your cardstock panel.  For all of my panels and elements today, I used Bristol Cardstock because water moves so well on it.  This gives a kind of uneven texture to the ink so it looks like you've added a loose wash of watercolor.  I wanted to bring in both color families that I used, so I decided to create a background panel and a smaller panel done in this way.  I die cut both panels with Spellbinders Hemstitched Rectangles.


I tried several different colors before I settled on the backgrounds I had brayered with Frayed Leaf and Coral Bliss.

One of the other techniques in the class is one you've seen me use often - Heat Embossing using inks for watercolors.  I must say, this is still my preferred way to color images.  I love the translucent quality of the dye based inks and I'm not technically an artist, so it doesn't bother me that I'm not using watercolor.  However, I did a little change up here to the technique taught in the class and did a technique that I call Watercolor Detail Stamping.


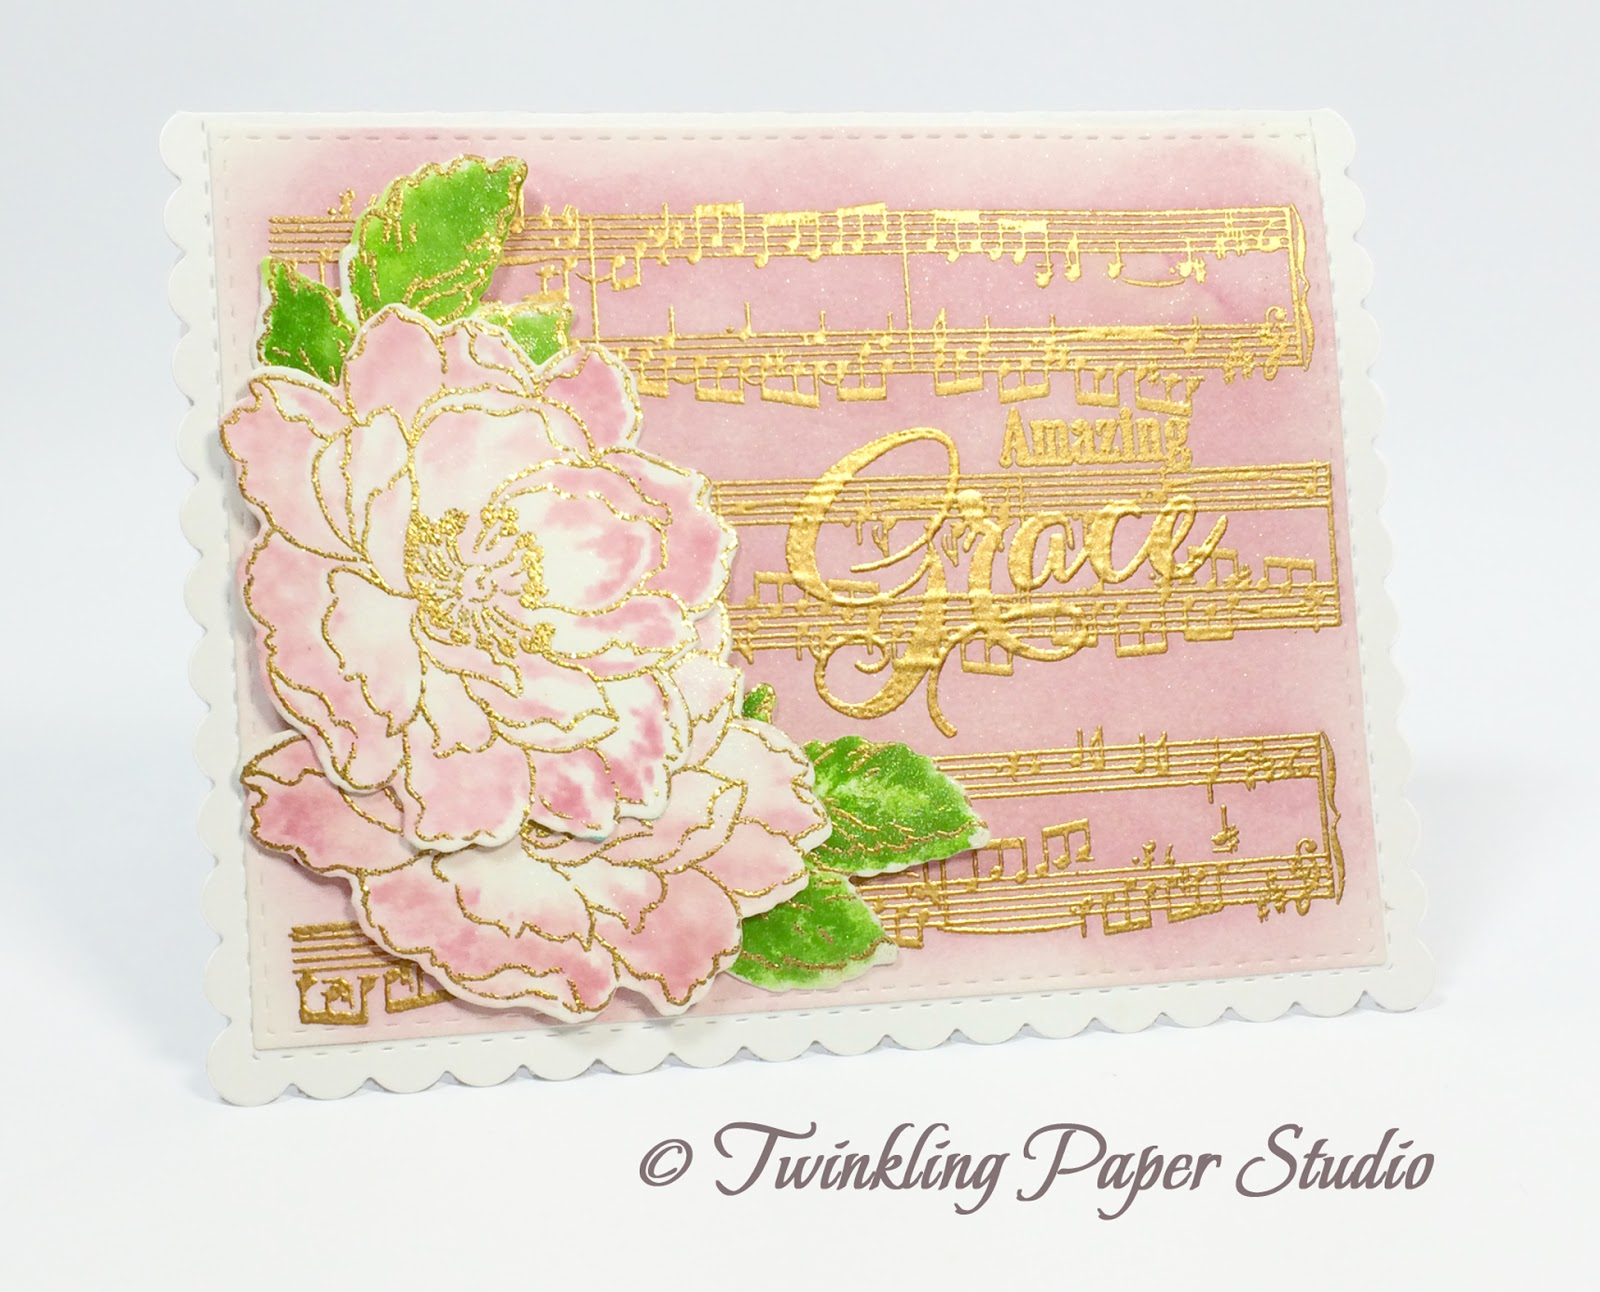
I started by heat embossing the outline images using Antique Gold Embossing Powder.  For the larger area of the bloom, I used Pink Pearl Ink.  I inked up the image very well and then gave it a couple of spritzes of shimmer mist, then stamped it down into the outline of the image.  For the leaf I did the same thing using Frayed Leaf and Forest Glades for the one under the bloom.  For the 2nd layer of the bloom, I used Coral Bliss.  For the detail layer of the leaves I used Forest Glades on the light image and Evergreen on the darker leaves.  The little bit of moisture from the shimmer mists really softens and blends the edges together.  I try to use a light hand when I apply the water or mist to the blooms so that I am not getting drips and it's important to have a sprayer that produces a very fine mist.  I love the ones that come on the Tattered Angels Shimmer Mists and so I have one that is now labeled "Water" and another that is labeled "91% Rubbing Alcohol" that I use with Alcohol Inks sometimes.  Just find one that works the way you want it to and put a label on it.


This image is not quite as straight on, so you can really see the Gold Embossing on the images and the sentiment as well.  The sentiment I chose is one from Altenew Build-A-Flower Sakura Blossom.


Of course, I had to put an image in here for you where you can really see the reflection of the gold. 

Thanks so much for stopping by today!  I hope you enjoyed my little spin on this class.  As usual, I've linked the products I used below for your convenience.  Affiliate Links are used. 


Altenew Antique Gold Crisp Embossing Powder
Shop at:
ALT
Altenew Beautiful Heart Die Set
Shop at:
ALT
Altenew Beautiful Heart Stamp & Die Bundle
Shop at:
ALT
Altenew Beautiful Heart Stamp Set
Shop at:
ALT
Altenew Build-A-Flower Sakura Blossom
Shop at:
SSS | ALT
Altenew Green Fields Mini Cube Collection
Shop at:
SSS | ALT
Altenew Tea Party Mini Cube Collection
Shop at:
SSS | ALT
Canson Bristol Paper
Shop at:
SSS
Cuttlebug Die Cutting Machine
Shop at:
SSS
PTI Stamper's Select White Cardstock
Shop at:
PTI
Ranger Multi Medium Matte
Shop at:
SSS
Ranger Non-Stick Craft Sheet
Shop at:
SSS
Scotch 3M Foam Tape
Scotch 3M Foam Tape
Shop at:
SSS
Spellbinders Hemstitched Rectangle Dies
Shop at:
SSS | SPB
Versamark Ink
Versamark Ink
Shop at:
SSS
Wagner Heat Tool
Wagner Heat Tool
Shop at:
SSS

Saturday, July 30, 2016

Happy Anniversary To Me!

Today's blog post is in celebration of my one year anniversary as Twinkling Paper Studio. My first blog post was July 31, 2015 but the name came to me one year ago today. It seems that once I could think of a fitting name for me and my style of card making, the blog part got easier.  In the past year I've done 207 Blog Posts, made a few hundred cards and learned a lot by watching how others create.  My favorites include Jennifer McGuire, Yana Smakula and Marika Rahtu all of whom generously share their talents with this industry. I don't typically copy anyone's projects exactly, but I do use many of the same techniques tweaked to what works for me personally. From the beginning I have loved heat embossing and using gold on my cards. My friend, Yana, shares my love of gold and gold accents. I'm always happy when she has a new blog post or video up because I know somewhere in there she is going to have some shimmer, some sparkle or a bit of gold. Sometimes, (like me), she has all three.

Today's card (also for the Simon Says Stamp Wednesday Challenge for their "Anything Goes" theme) has all three (of course) and in colors that are slightly different for me although I do love this Salmon color nearly as much as I love Pink. I started with a panel of Canson Bristol Watercolor Paper and did some ink blending in Berry Sorbet with a stencil brush going from upper left to lower right.  The stencil brushes (i.e. cosmetic brushes in my case or you can find Clarity Stencil Brushes HERE) give such a soft overlay of color and I couldn't possibly match it with a Mini Ink Blending Tool.  Both have their place in my arsenal, but I do love the super soft wash of color I get by doing it this way.  For more intense color (like in a night sky background) the Mini Ink Blending Tools are the way to go.  Next I put a drop of Berry Sorbet Reinker onto an acrylic block and mixed it with a bit of water then splattered drops onto my panel using a #4 Silver Black Velvet Round Brush.  By tapping my paintbrush against another brush handle, it makes splatter really easy and you can sort of predict the general area where it will fall.  After I let that dry for a couple of minutes, I put splatters of Finetec Arabic Gold Mica Watercolor onto the panel using a #8 Silver Black Velvet Round Brush.  Finally I went back in with my #4 brush and some Iridescent Gold Glimmer Mist mixed into a stronger concentration of Berry Sorbet for the more vibrant of the coral splatters.  I've started using another brush to tap against as my hand was really starting to take a beating whacking my paintbrush against it all the time. *Ü* This way is much less painful.  I never thought of doing it that way before Stamp-A-Faire. I set that aside to dry while I worked on the rest of my elements.

I'm thinking this will be a good place to mention that I keep the rinse water in a separate container when I'm using the Finetec Mica Gold Watercolors. My container has a lid that I can leave open slightly so the water can evaporate out of it.  There is so much paint left in the brush when you are using it so I started keeping it several months ago.  I can add a few drops of water to it to mix with a color or to make less concentrated splatter. Most of the rest of the time I am using a tiny drop of reinker with a mist of water on an acrylic block for this technique and I use it up.  Whatever is left, if anything, wipes right off.

Next I  stamped the bloom and the leaves in Versamark Ink on more watercolor paper and heat set it with a gold embossing powder that I made by mixing Simon's Rose Gold with Simon's regular Gold Embossing Powder.  I call this mix "18 Karat" because of it's distinctive Yellow Gold tone.  Next I lightly misted my watercolor paper then stamped one of the detail layers of the bloom and the solid layer of the leaves. With the water on the paper the ink immediately begins to soften and blend.  This technique gives me the look of watercolor without all the time invested.  I enjoy doing it both ways - traditional and this way, but I wanted to make sure I told you how I got this look today. You can lightly mist the inked up stamp also for an even softer blend of color.  I tend to get too liberal with water if I mist both, but everyone should just do whatever works for them.  I die cut the Impression Obsession Butterfly and the "Amazing" from Gold Poster Board. The "Amazing" word came from the Papertrey Ink "It's the Thought" Die Collection. Once my ink splattered background was completely dry, I heat embossed the rest of the sentiment directly on to that panel using the same "18 Karat" Embossing Powder while still leaving room to put the last die cut word on there.

Before I assembled my elements to an A2 Top Folding card made from Berry Sorbet Cardstock, I heat set the background panel and then lightly misted it with Iridescent Gold Glimmer Mist.  This is similar to Tsukineko Gold Shimmer Spritz.  The one I have is from Tattered Angels and isn't made anymore but I still have several bottles in my stash.  Basically, I sprayed it into the air and waved my panel under the falling mist a couple of times.  I wanted to be careful not to undo all my work on the background panel.  Once that was completely dry, I cut it with the largest Simon Says Stamp Stitched Rectangles Die and started putting the card together.  I used Thin 3D Foam Squares for the bloom, the upper part of the leaves and the body of the butterfly and Ranger Multi Medium Matte for the die cut word.  This way it has some dimension but is still easily mailable.

This is a really simple design that I've used before and is similar to a card I made when I was in a class at Altenew Academy with Marika, only there are more splatters here. I really miss seeing her out here in blog land, but she is on to very important work and doesn't have much time for crafting right now.  Thank goodness Yana isn't going anywhere!

Thank you so much for stopping by today and helping me to celebrate my first year as a blogger/cardmaker & sometimes artist.

Friday, July 1, 2016

Simon Says "Anything Goes" July 1 - 2016

I love the weeks on the Simon Says Stamp Wednesday Challenge where the theme is "Anything Goes" because it means I can create anything my heart desires and it qualifies for the challenge.  I have several things sitting on my desk right now that I've been trying to get to, so this weekend will be a great time to play and upload to their Challenge Blog.

I've been wanting to play with this stamp set, Background Basics - Sheet Music for a while. Dawn McVey created a card during the last Papertrey Release in June and I've been wanting to play with it since then. So yesterday I sat down and created a couple of backgrounds to use for some cards I was putting together.

I stamped the Sheet Music onto a piece of watercolor paper with Versamark and heat embossed it using Simon Says Stamp Antique Gold Embossing Powder. Next I did some ink blending using Lavender Moon Ink with a Mini Ink Blending Tool on that panel and set it aside to dry so that I would be able to stamp and heat emboss my greeting after it was dry.  While I waited for that, I created the blooms and leaves using the technique that I developed called Watercolor Detail Stamping where I emboss the outline layer then add a detail layer to "watercolor" those images. I'm actually stamping that 2nd layer into the outline image of Altenew's Beautiful Day Stamp Set by lightly misting my paper with water and then stamping that layer in.  I used Lavender Moon Ink for these and New Leaf for the leaves.  This simply moves the water a bit for that hand watercolored look.  I confess, I need to be a lot better about leaving more white space when I am watercolring.  This technique makes it easy to do.

Once the flowers had dried I die cut them with the Altenew Beautiful Day Coordinating Dies then returned to my background panel so that I coulds stamp the Sentiment from the Papertrey Inspired: Grace Stamp Set.  I stamped with Versamark and heat embossed with Simon Says Stamp Antique Gold Embossing Powder.  Beautiful Day is my 2nd most favorite stamp set and my very favorite of the sets I have from Altenew.  You can find this at Simon Says Stamp or Altenew.


My card base is made from Stamper's Select White and the Noted: A2 Dies. The largest Simon Says Stamp Stitched Regtangle Die is nearly the perfect size to fit on top of the stitched outline on the note card.  I just realign the paper back into the die (lining up the stitches too) and cut about 1/8th of an inch off from one end to make it fit perfectly.  I love it when I can mix several products across different manufacturers.  That makes it a win-win for everyon, but especially for me.

I love being able to make these horizontal note cards with this die but I am very much hoping for the release of a top folding vertical card die as a companion piece to this one.  I think my cardmaking world would be complete with that.

I have several other things on my desk this morning that I am planning to use this weekend so I hope you'll come back soon to check them out.  Meanwhile, I will be posting this over at the Simon Wednesday Challenge Blog.Thanks very much for stopping by today!

Monday, June 27, 2016

"Watercolor" Detail Stamping Technique

Today I am sharing a technique that I've decided to call "Watercolor Detail Stamping".  In many other English Speaking Countries, color is spelled colour and whenever I see it spelled that way it makes me smile.  Anytime I correspond with someone from one of those countries I try to remember to use that spelling although it isn't second nature to me. I used to have a friend who lived in Manitoba, Canada and we had some lovely conversations about colour and colour combinations back in the late 90's early 2000's when I was a very devoted scrapbooker and she was the owner of a message board for scrapbookers I used to be on.  Donna had a particular talent for enhancing die cuts using colored pencils. She lost a very short battle with pancreatic cancer in August of 2004 but I think of her often and smile when I remember our many talks. I even have Two-Page Layout (complete with a photo of Penguins) devoted to her in an album I did entitled "Rite of Passage - Journey to the Heart of Me".

I saw this sketch Challenge #179 over at the CAS Colours and Sketches Blog and thought it would be fun to combine it with the Simon Says Stamp Monday Challenge which has a Tic-Tac-Toe theme this week.  I chose the top row, with Stamping, Sequins and Gold. When I started working on my card for these challenges, seeing the spelling made me think of Donna so in part this card was inspired by her.  The other part of the inspiration came from one of my sisters-in-law who loves pink and black together as much as I do.  One of the options at the CAS (Clean & Simple) Colour Challenge Blog is to make a rectangle card into a square or vice-versa.  I don't do too many square cards since they require extra postage if you use a square envelope.  I get around this by using a 5 x 7 envelope but it bugs me a little that the card doesn't fit snugly so I don't do it too often.  I also really love the combination of Pink & Gold together and decided it would make for a super elegant card to combine it with the black.


I started by stamping the bloom and leaves from Altenew's Beautiful Day using Versamark and heat setting them with Ranger Gold Tinsel Embossing Power.  I colored them with Lovely Lady and New Leaf Inks from Papertrey Ink by lightly misting my watercolor paper with a bit of water and then stamping one of the detail layers into the outline while the paper is wet.  This moves the ink around nicely and it is a super fast way to get a hand water colored look with much less time spent.  I love to watercolor but if I'm doing any kind of mass production, this is a great way to get the look without all the time. I found this method by experimenting with my stamps to see what it would look like and then really liked the results in the softer colors in particular.  I'm planning to make cards for all of my Sisters-In-Law again this year at Christmas and some of them really like the watercolor look.  This technique gives me the ability to do that for them. Once the paper was completely dry, I die cut the leaves and bloom using the coordinating Beautiful Day Dies.


My card base is a 5.5 x 5.5 square note card made from Papertrey Ink True Black Cardstock.  I cut a 5.25 x 5.25 white insert for the inside of the card.  My pink square is cut from Lovely Lady Cardstock using the My Favorite Things Stitched Squares Stax Dies.  For the gold square I cut a Spellbinders Labels 42 Decorative Elements in two sizes and then cut the small one from corner to corner to make the little tabs with a little creative cutting to help.  The "thanks" die is a favorite from Mama Elephant and the 5 mm Gold Sequins are from Darice.

Thanks so much for stopping by today and I hope you'll come back soon!  You can subscribe to receive e-mail updates, and follow me on Facebook and Instagram.