Showing posts with label AECP. Show all posts

Tuesday, November 20, 2018

Altenew Educator - Masking Unleashed

THIS POST HAS BEEN EDITED TO ADD CONTENT!

Hello everyone!  I am here today with my last project for the Altenew Educator Certification Program Level II Classes.  Once this is submitted I will be assigned my class project for my "final" exam.

My project for today uses very simple masking to create the look of a flower with a lot of foliage behind it.  I used Versamark to stamp and heat emboss all of the outline images in this set and that can get super tricky as your mask will leave some sticky residue on your image, so you must use lots of powder between each stamping to make sure your image stays nice and clean.  I also did mine on Arches Hot Pressed Watercolor Paper because it is smoother for heat embossing and stamping.

Because I have RA, I have a difficult time cutting masks by hand, so I kept my card very clean and simple so I only had to cut one mask for the bloom.  I love the bloom and the leaves in this set, so I still stamped the additional layers but after that was done I took a plain water brush and blended all the color around.  The leaves first and then the bloom.  It just makes it so the lines are softened out a bit and the color blends a bit more.  For my leaves, I used Sweet Leaf and Just Green Inks and the bloom was done in Rose Quartz and Pinkalicious which are all from Altenew.  I wanted something very soft for the bloom which is why I chose to blend everything out with a water brush.  It gives it the look of watercolor without the work.  I'm not very good with watercolor and I haven't had much time to practice this year, but I have a couple of classes that I plan to go back and revisit with the colder temperatures setting in.


I did not get a very good picture of my card this time before the sun moved (with the shorter daylight hours) into my window, so I apologize for the image quality this time around.  For a touch of sparkle, I added some Ballerina Pink sequins with some gems in the center and also some Tonic Nuvo Shimmer Pen to the bloom and leaves.

Thank you so much for stopping by today and checking out my project.  I hope you'll come back soon.  Wishing all of my American friends a very Happy Thanksgiving weekend.  I'm both dreading and excited to see what the Black Friday or Cyber Monday Sales bring to us this year.

I have sent about 80 Christmas Cards today and still have a few more to make to finish up for the season plus I have the Keeping Christmas Blog Hop and the Papertrey Ink Blog hop on the 25th so I'll be back soon with more projects for you to see.


*Edited 11/22/2018:  So after sitting on my desk for a few days, I decided I really needed more color and contrast in my focal image.  Using my stamping as a guideline, I went back in with my Pink Zig Clean Color Real Brush Marker and added some additional color and details to my water-brushed image.  I like this much better.  I would encourage you to try adding some color if you aren't satisfied with the way an image turns out.  In my case, the greens seemed very vibrant while the bloom was too soft and pastel to compete with the leaves.  I'm much happier with the way the bloom looks now.

Wednesday, November 14, 2018

Altenew Educator - Magical Marker Techniques

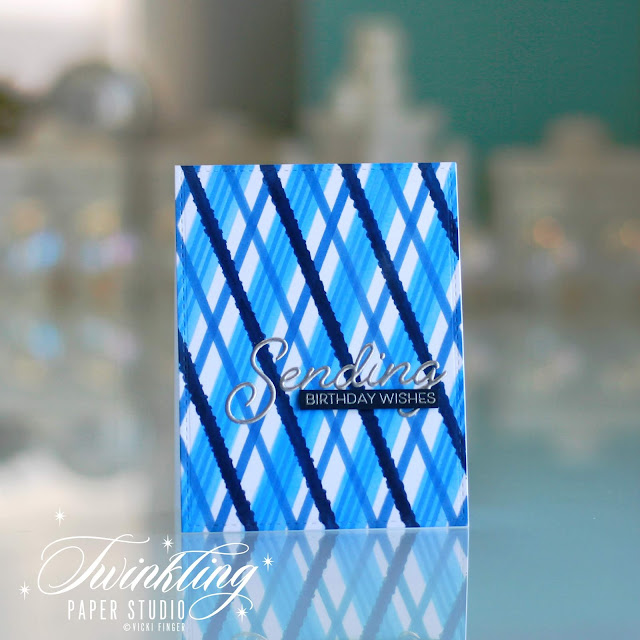
Hello everyone!  I am back today with another project for my Altenew Educator Level II Certification Classes.  This class was all about Magical Marker Techniques.  I always love it when I find a new way to use products that I already have and this class showed lots of ways to use Alcohol Based Markers.  My particular project was done using Alcohol Markers with Stencils to get a really bright and vivid background for my card.  As always, there are a few birthdays coming up soon and I needed a masculine card in particular for this occasion.  I need a feminine one as well, but I'll have to work on that another day. 

For today's project, I started by using a 4.25 x 5.5 panel of Cougar Digital White Cardstock which is a #100 weight.  It is super smooth and I love how bright the white is.  I also like Xpress-It Blending card, but it is much thinner and I wasn't sure how well it would die cut for a background panel, so I stuck with the Cougar Digital White Cardstock. 

I also pulled out my notebook that I keep all of my stencils in and had a look through to see what I could use with my markers to make a masculine background.  I just slip them down inside a page protector with a label stating the manufacturer and how many stencils are in the particular set.  In this case, I chose the Perfect Plaid Stencil Collection from Papertrey Ink.

I sat down with my drawer of blue markers and a scrap of cardstock to see which colors I would use and to make sure the tones all worked well together.  I used B32 - Pale Blue for the widest stripe, B23 - Phthalo Blue for the skinny three striped line, B24 - Sky for the single middle width stripe and finally B39 - Prussian Blue for the darkest stripe.  In some cases, I rotated the stencil 90 or 180 degrees to get the reverse look to create the plaid. I love how bold and bright this turned out and I think I will be getting more uses out of my stencils from now on.  I enjoy using them, but I don't often reach for them automatically.  I keep them in an easily accessible place so they are handy, but they aren't right at my fingertips like many of my other supplies are such as inks.   I love the look though, so I know you'll be seeing more of them in the future.


Once my background was colored in with my markers, I let it dry completely before heat embossing the "Sending" sentiment directly onto the panel.  I actually triple heat embossed this with silver embossing powder so that it would stand out more from the background.  Using a strip of Dark Indigo Cardstock, I stamped the "Birthday Wishes" sentiment onto that using the same silver embossing powder and adhered it with a skinny strip of foam tape.  This is a super clean and simple look (even with the busy background) and also very graphic which guys always seem to really love. 


Isn't this just a fun and graphic look for a card and imagine all the possibilities with all the various markers available for this look.  There are also multiple ways to rotate the stencils for a variety of different looks. 

I hope you all have a great day and come back soon to see my next project.  I'm getting adjusted to less daylight in the winter months and also the light in the sky is coming from different angles than it did over the summer so I have shorter windows for photographing my images.  But, I'm working it out.  I just really like to have as much natural light as possible and not use flash, so it's taking a little bit of adjustment.  Mid-morning continues to be my favorite time with the best light. 

Thanks so much for stopping by today!  I hope you'll come back soon. 

Wednesday, August 15, 2018

Altenew Educator - Seasonal Scene Building

Hello there!  I hope you are having a great week so far.  We are on our fourth day of rain in a row and I am needing some sunshine, so I decided to come into the studio and finish a project for my AECP Class - Seasonal Scene Building.  I wasn't sure where to head with this one, mostly because there are so many possibilities. In the end, I incorporated a few different techniques for my card.

Tulip Magnolia
I have a new die (PTI Shape Shifters Oval #2) that I had to wait a few months for it to even come back in stock, so I knew I wanted to use that for my card, as a frame for my scene.  I die cut one and set it aside.  Then I stamped and heat embossed three blooms from Altenew's Magnolias for Her Stamp Set onto Arches Hot Pressed Watercolor Paper.  This is actually one of my favorites and also one of my favorite spring trees because of the gorgeous blooms.  I like all types of magnolia trees but I am especially drawn to Magnolia Coral Lake and Tulip Magnolia trees. I was actually going for more of the Tulip Magnolia Color today.  Part of the reason that I am not all that great with Watercolor is that I am far too impatient to let it dry between layers in the normal way I make cards.  So I need to have a couple of projects going simultaneously in order to be patient enough for the layers.

It's not that I ever plan out a whole card and then assemble.  I totally fly by the seat of my pants pretty much all the time.  I usually have in mind what type of card I want to make and probably a particular stamp set selected, but that's about it.  The rest of it gets done on the fly all the way down to the cardstock I put it on.  I've developed a love for simple but elegant styling and that's mostly what I tend to stick to.  I also really love a crisp white card base most of the time, even if I'm completely covering the front of the card with something else.

A couple of weekends ago, one of my grandsons, who starts his Senior Year in High School tomorrow, was here and I was showing him about alcohol inks and we spend one entire afternoon just trying out different techniques in the studio.  We were just playing and you don't have much control over what happens anyhow with alcohol inks.  But because of that, I have several background pieces already done up.  Most of them were also foiled in my Minc.  It's hard to tell how much gold will transfer to an alcohol inked background so you just have to run it through and see.  This particular piece didn't pick up too much of the gold but there's a little of it there making it look a little like a piece of agate or granite with some gold veins.  This particular one I thought would also make a great "sky" colored background which is why I decided to use it for this card.  There's a tiny bit of lavender in the color mix as well, but I often see that in Texas skies, especially in the evening when the sun starts to set.  I really love how this worked out for this card and I think it made for the perfect background for my frame.  I sued the largest Oval from PTI Noted: Scalloped A2 Set to die cut this.  It did cover up the pierced line but left that beautiful edge on the white die cut.

In addition to the blooms, I like to put them on the branch from Altenew's Vintage Flowers Stamp and Die Bundle.  Once I had the card finished, I realized I had just about obscured the branch, but if you look for it you will see it coming from the top left to the bottom right of the oval.  Since I put a vellum banner under my Sentiment, it covered up even more than the blooms did, but once the Multi Medium Matte was dry, there was no going back.


At this angle, you can really see the gold foiled veining on the alcohol inked background and the gold foil cardstock as the shadow for the sentiment.


In this picture, you can see it, but you can't really tell it's gold so I wanted to give you both views.  I wanted to add some bling since the gold is pretty subtle on this background but I didn't have any sequins the right shade so I added some little gems.  Just a little touch of sparkle was the right touch here.

I hope you enjoyed this Spring Scene that I created here.  I've linked the supplies below for your convenience (Affiliate Links may be used).  The Magnolias for Her Stamp Set  is one of the 4 x 6 sets so it's a more affordable option than the larger sets.  The bundle is also really affordable.

Altenew Antique Gold Crisp Embossing Powder
Shop at:
ALT
Altenew Magnolia For Her Dies
Shop at:
ALT
Altenew Magnolias For Her Stamp & Die Bundle
Shop at:
ALT
Altenew Magnolias For Her Stamp Set
Shop at:
ALT
Altenew Rose Petals Reinker Set
Shop at:
ALT
Arches Hot Pressed Watercolor Paper 9 x 12 #140
Shop at:
SSS
Cuttlebug Die Cutting Machine
Shop at:
SSS
Decofoil Transfer Sheets Bulk Pack
Shop at:
SSS
Heidi Swap Minc Machine
Shop at:
SSS
Kokuyo Long Dot Runner Adhesive
Shop at:
SSS
Marvy Jewel Picker
Marvy Jewel Picker
Shop at:
SSS
MISTI Stamping Tool
MISTI Stamping Tool
Shop at:
SSS | ALT | GKD
PTI Stamper's Select Vellum (#44)
Shop at:
PTI
PTI Stamper's Select White Cardstock
Shop at:
PTI
Ranger Multi Medium Matte
Shop at:
SSS
Scotch 3M Foam Tape
Scotch 3M Foam Tape
Shop at:
SSS
Scrapbook Adhesives Thin 3D Foam Squares
Shop at:
SSS
Silver Black Velvet Size 2
Shop at:
SSS
Silver Black Velvet Size 4
Shop at:
SSS
SSS Big Thanks Die
SSS Big Thanks Die
Shop at:
SSS
Teflon Bone Folder
Teflon Bone Folder
Shop at:
SSS
Thermoweb Decofoil Transfer Gel
Shop at:
SSS
Versamark Ink
Versamark Ink
Shop at:
SSS
Wagner Heat Tool
Wagner Heat Tool
Shop at:
SSS