Showing posts with label Feminine Christmas. Show all posts

Tuesday, December 19, 2017

Make it Monday #307 - Faux Stained Glass

This week's Make it Monday Technique for Papertrey Ink is Faux Stained Glass presented by Laurie Schmidlin.  I've actually done this one other time but not in quite the same way as this time.

It's the week before Christmas and everyone is so busy, me included.  I wanted to participate but not take too much extra time this week since I have lots of other things going on.  So I wanted to use a few of those extra pieces that I tend to have on my desk along with the Papertrey Products I was using.

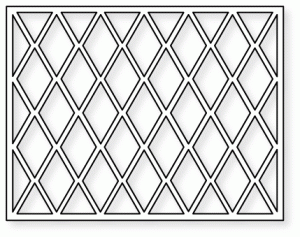
I started by die cutting the Cover Plate: Harlequin from Stamper's Select White Cardstock.  Next I cut a piece of Stamper's Select Vellum to go behind this for my "window" glass.  I cut this piece to just a smidgen smaller than 4.25 x 5.5 so that there would be no chance of it showing out the sides. I glued the front panel onto the vellum using a dot of liquid adhesive at each intersection of the lines.  Using Copic Markers in RV25, BG18 and G14, I colored in the diamonds totally at random.  I colored each one going the same direction and just in a single layer of color.  When those dried, I repeated that to get a deeper color.

In Laurie's video, she die cut two fun foam panels with her cover plate to use as the thickness for behind the main panel.  I did try this, but because the design of  the cover plate I chose has very thin lines, Fun Foam just didn't work out.  Therefore, I cut three additional panels of Stamper's Select White Cardstock to make the stack behind the front panel.  If you adhere it directly to the card base, it would not look like stained glass so I carefully glued the three frames, one on top of the other and then attached my front panel to that thick frame using tape runner.  Since the vellum was already glued in place, I didn't think it was necessary to use a liquid adhesive and just used my Kokuyo Dot Runner on top of the stacked frames.  That way, no adhesive showed once I laid the top piece down.  I then attached that panel to a Top Folding Horizontal Card Base. I die cut the Big Basics: Merry Christmas from Gold Foiled Cardstock and used some Holly leaves that I already had stamped and jeweled with Tonic Nuvo Drops in Gloss Carnation Pink.  These Holly Leaves are from the Gina K Designs Merry & Bright Stamp Set and are a bit larger than the Papertrey Ink Enclosed: Bell Holly Leaves which I thought fit better with the larger greeting.  These were stamped in Fresh Asparagus and Dusty Rose.


That finishes my card for today's post.  The supplies I've used are linked below for your convenience (affiliate links may be used at no cost to you).

Copic Marker Apple Green G14
Shop at:
SSS
Copic Marker Dog Rose R25
Shop at:
SSS
Copic Marker Teal Blue BG 18
Shop at:
SSS
Cuttlebug Die Cutting Machine
Shop at:
SSS
Gina K Designs Dusty Rose Ink
Shop at:
SSS | GKD
Gina K Designs Fresh Asparagus Ink
Shop at:
SSS | GKD
GKD Merry & Bright Stamp Set
Shop at:
GKD
Kokuyo Long Dot Runner Adhesive
Shop at:
SSS
Nuvo Crystal Drops - Gloss Carnation Pink
Shop at:
SSS
PTI - Big Basics: Merry Christmas
Shop at:
PTI
PTI - Cover Plate: Harlequin
Shop at:
PTI
PTI Stamper's Select Vellum (#44)
Shop at:
PTI
PTI Stamper's Select White Cardstock
Shop at:
PTI
Ranger Multi Medium Matte
Shop at:
SSS

Wednesday, September 13, 2017

Papertrey Ink September 2017 Create Along With Us Challenge


I don't think anyone will be too surprised or baffled when trying to figure out where the inspiration for my card came for the Papertrey Ink Create Along With Us Challenge this time around. It's release week which means we get to pick a project from the Design Team and create alongside them and share our projects with other customers via the monthly challenge.

On Day One of this release, Nichole's very first project (on the right) inspired me. Isn't it just gorgeous? Nichole used a combination of two new sets, Brilliant Baubles and Beautiful Berries: Winter. I can hardly stand the wait to see the full reveal of the stamps and dies on the 15th. I think I might even be most anxious for the Berries as I have been enjoying my Spring, Summer and Autumn sets. These are intended to be Juniper Berries but, like Nichole, I see lots of possibilities for these as well. I'm super excited to see both of these sets. Since they haven't been released yet, I had to try to recreate the feel of Nichole's card and I decided to do my favorite feminine combination of Pink and Gold for my card.  I will send this card to my best friend for her Christmas Card.

For my card, I started with a SU! set that I've had since way before I started making cards.  I was planning to use it in my scrapbooks, but that never happened.  I'm excited for the new Papertrey sets because I think they will be a better size for card making. Still, I have this SU! ornament stamp set and the coordinating dies, so I've hung on to it. These are cling mounted stamps so I removed the insert and popped some white cardstock into my Mini MISTI.  I wanted to control where the color got put onto the stamp and this was super easy to do with the Mini Ink Cubes. Since I have Rheumatoid Arthritis, the large ink pads don't work for me when I want to take ink to the stamp instead of the stamp to the ink. But the cubes work perfect with this technique. I tried a few different color combinations but this is the one I like best.  The center portion of the ornament is inked with Hibiscus Burst and the top and bottom is Lovely Lady. Since I was using the MISTI, it was easy to add more layers of color to get a saturated look. Once the stamping was done, I gave it a generous spritzing with shimmer spritz then popped some Swarovski Crystals in Aurora Borealis onto the center of the flowers. Normally I use the plain Crystal Color but the Aurora Borealis color works well with Pinks and Purples. This is my favorite way to add bling to my cards, especially to my bling loving girlfriends.

I created a top folding horizontal card base from Stamper's Select White Cardstock.  I die cut a panel of Pink Shimmer Cardstock for the background. One of my Papertrey Forum Friends, Cindy O, sent me samples of the shimmer cardstock and I used the pink one here. I used the Sparkle & Shine Holiday Additions Mini Stamp Set to heat emboss the word "Holiday" on the background panel. I die cut the "Sparkle" word with the coordinating dies for the Sparkle & Shine Stamp Set.


I used a strip of glitter paper to ground my ornament and some gold cord to tuck the strings behind the background panel.  So that it would stay nice, I did a Jennifer McGuire trick and also covered the back side of the card with plain white cardstock so those leftover strings would not show.  I think I will approach this in a different way next time and just glue the strings down in between the background panel and the card base but I had already done it this way when I had that light bulb moment.  The ornament is popped up on Thin 3D Foam Squares but everything else is adhered directly to the card front.  For the background panel I used Kokuyo Dot Liner but to adhere the crystals, Die Cuts and Glitter Paper strip I used Ranger Multi Medium Matte. I used the Sparkle and Shine Holiday Edition Mini Stamp Set to heat emboss the word "Holiday" on the background panel.

This finishes my card for today!  I hope to see your cards at the link up over on Nichole Heady's Blog.  And while you're there, look around to see all the beautiful holiday products that are being released this week on Friday at 10:00 Eastern Time.  Thanks so much for stopping by today!