Showing posts with label Make-It-Monday. Show all posts

Thursday, July 21, 2016

Make it Monday #258 Spritzed Stamps

This will be a super quick post today. I took a couple of days off this week and now I have several other projects on my agenda for this week still, so I'll try to keep it short and sweet.

This week on the Make It Monday over at Papertrey Ink, Melissa Phillips did a technique featuring spritzing stamps.  This technique really requires at least a two step stamp set and I used one that has been on my desk a lot lately, Friendly Flowers.  I've done this technique before so I knew a lot of what to expect as far as the behavior of my inks when spritzed.  My spray bottle happens to have a very fine mist sprayer which I think makes for smoother and more predictable results. I also used watercolor paper which helps the water move although in my case, it didn't move too much because my mist was superfine.  Mostly it only softens the hard lines of the stamps.  If you used more water, it would feel a lot looser and more like watercolor.  

I combined two of the stamps from Friendly Flowers for the blooms and only one layer of the leaves. The Blooms are stamped in Lovely Lady and Hibiscus Burst.  I tried a 2nd layer of the leaves (stamped in New Leaf) on another card but I didn't like the look. For this card, I stamped the base bloom then the dotted petals on top of that.  For my third layer, I stamped the dotty petals again with Versamark and heat embossed them with WOW! Neutral Ultra Shimmer Embossing Glitter.

For the greeting, I cut three of the "Hugs" and glued them one on top of the other for a thicker embellishment.  Using Hibiscus Burst Ink Cube direct to paper, I colored the sentiment.  When that was dry, I inked it up with Boss Gloss Liquid Embossing Ink from Stampendous and sprinkled it with the same WOW! Neutral Ultra Shimmer Embossing Glitter.

I cut the stamped panel down with a Simon Says Stamp Stitched Rectangle Die and adhered it to a Noted A2 Card Base cut from Hibiscus Burst Card Stock. If I hadn't done this technique before, the card would have taken me a lot longer just to learn and understand how the inks work when combined with water. It was a quick card to make although I must admit, it really isn't my usual style.

I'll be back soon with another project or two.  Thanks so much for stopping by!

Thursday, July 7, 2016

Make It Monday #255

Amy Sheffer's String Art Card
When I watched Papertrey Ink's 's Make it Monday #255 video this week, I fell in love with this card by Amy Sheffer who taught the technique. Somehow I had to find a way to make the technique my own. While looking for a certain color of sequins earlier, I passed up two spools of Silver and two spools of Gold DMC Metallic Thread... BINGO! I always love pink and gold and I knew this was what I was going to do for my challenge entry this week.

To start this card, I cut a Noted: A2 card base from Stamper's Select White Cardstock.  I masked off the scalloped edge then laid it in a shallow box and spattered Finetec Mica Gold Watercolor in Inca Gold on the front.  This card uses a #8 Silver Black Velvet Brush.  I set that aside to let it dry and went on to the String Art portion of the card.

I have 8 small medallion dies that I could swear came from Papertrey Ink, but I cannot find them on their website. I didn't realize at the time I received them that I would start a blog some months later and it would be important to know who made them.  I didn't used to keep track of that kind of thing.  If anyone recognizes these dies, please let me know what they are!  You have to use something that has holes in it or else make the holes for this technique that is also called Spirelli. It's really easy to do as Amy demonstrated for us and you can watch the video at Nichole Heady's Blog or at the Papertrey Ink YouTube Channel.  I had worked on something Spirelli years ago for a scrapbooking border set and used Iridescent Metallic Thread for that so I'm going to have to find that spool and put it with my others!


Once I had the medallions die cut, I used a Kabuki Brush to apply ink in Lovely Lady and Hibiscus Burst before doing the string art. I wanted some variation in the color of the blooms just as they would be in real life.  For the Spirelli art, my holes were big enough that a knot in the thread wouldn't have stopped it so I used a tiny piece of micro pore tape on the back side to hold the thread in place firmly so I could do the string art portion.  At the end of each flower, I tied it in a knot and taped it down with another tiny piece of micro pore tape. This held really well for me.

Using another Kabuki Brush (I have 5 - 1 each for the color families of Red, Orange, Yellow, Blue and Violet), I ink blended in Hawaiian Shores Ink ever so softly in the center of the front panel to give just a hint of a sky behind the flowers and then stamped the sentiment which is from Papertrey Ink's Friendly Flowers Stamp Set.  These Kabuki brushes give you a softness that is hard to achieve with an ink blending tool.

After that I cut 2 of the leafy stems from the Painted Petals Dies and another from a different set that I have.  Since I had gold spatter and gold metallic thread on my card, I wanted to cut the stems from gold cardstock as well to tie all of the elements together.  I adhered the flowers to the stems with a bit of Ranger Multi Medium Matte in one spot and then adhered the flower to the card front using Ranger Multi Medium Matte and Thin 3D Foam Squares.  A few sequins in Moonshine and Aquamarine finished this card.

This was such an easy card to create that I decided to make another one. This is a great one to send to my girlfriends to let them know I'm thinking of them and missing them since I don't live near any of them anymore.


For the flowers on the second card, I used Papertrey Ink's Tropical Teal and Amethyst Allure Inks with Simon Says Stamp Island Blue Ink for the flowers and a Hawaiian Shores Card Base.  The background panel was cut from Stamper's Select White with the Sunshine Layers Die Set for WPLUS9 Design Studios. I used Finetec Mica Gold Watercolor in Tibet Gold for the spatter and Hawaiian Shores for the soft area of "sky" behind the flowers.  Some Moonshine and Peacock Sequins finish it up.  The sentiment is one I often use from Altenew's Beautiful Day Stamp Set.

I've mentioned this before, but it probably bears repeating that I use Gold Metallic Poster Board from Hobby Lobby.  It's much less expensive and I can use all I want without worrying about the cost. I buy it when it's on sale 2/$1.00 and cut it into manageable pieces when I get it home.

Thanks for stopping by to share a quick card today.  I hope you'll stop over at the Papertrey Ink Blog and watch the video.

Wednesday, May 25, 2016

Creating a Masked Background

Today's card is for a couple of challenges; the Papertrey Ink Make it Monday for this week and the newest Color Q Challenge #343.

For the Make it Monday #250 technique this week, Laurie Willison masked off a half inch border all the way around her card front and then used ink blending to color the background. If you click the link it will take you to the website to watch the video. By now I have done quite a bit of successful ink blending so I wanted to do the technique with a slightly different twist for my project.

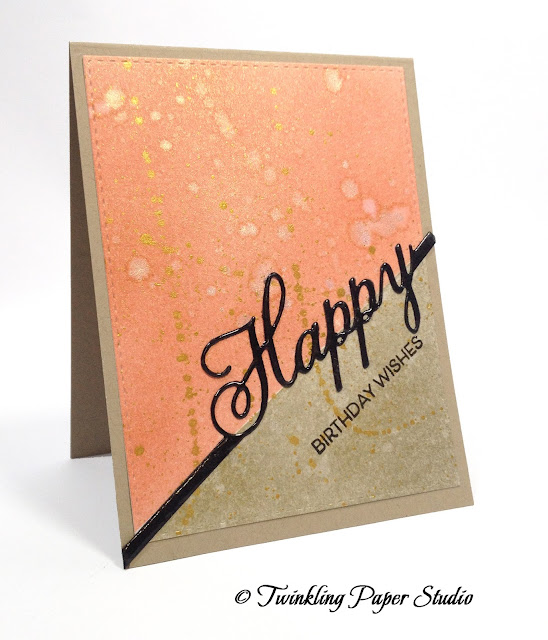
Using a 4.25 x 5.5 inch piece of watercolor card stock, I masked off a portion along the diagonal and then started ink blending the top of the panel using Melon Berry Ink from Papertrey Ink. Once I had that part inked up, I removed the tape and then masked off the opposite part. Using a clean pad for my Mini Ink Blending Tool, I blended Encore Metallic Gold Pigment Ink over that section. When I removed the masking tape I spritzed the entire panel with Iridescent Gold Glimmer Mist and then mimicked Laurie's technique of adding some droplets on my background. This gave the ink blending a nice shimmer and also gave it the distressed look from the water droplets.  To take it one step further, I splattered Finetec Mica Watercolor in Tibet Gold with a #4 Round Silver Black Velvet Brush which created the brighter gold spots.  The size of the brush determines the size of your spatter.  Smaller brushes make smaller splatter.

Next I die cut the "Happy" from a scrap of black cardstock.  Laying it on top of my Ranger Craft Mat, I smooshed Versamark Ink over the entire die cut, poured clear embossing powder on it and heat set it.  I used something from my barely used items - Ranger Large Particle Embossing Powder.  My mom had sent me a message this morning asking me if I had used this product and I told her only once and that I had not liked it.  Since it was on my mind and I had been meaning to try it for this technique, I got it down off my shelf and used it today. Normally, I would have to ink up my die cut with Versamark and pour clear embossing powder on it a minimum of three times to get the same look that I got in one shot here.  So I am pretty stoked about it!  It was a lot easier than squeezing glossy accents over the whole word but gave it the same look. Thanks, Mom! Be sure not to touch it until it's completely cooled down which only takes a few extra seconds. Otherwise, it will have your fingerprints on it (the voice of experience here *Ü*).


Using the "Birthday Wishes" sentiment from the Papertrey Ink 2016 Painted Petals Anniversary Set, I stamped it with Onyx Black Versafine, poured Simon Says Stamp Fine Detail Clear Embossing Powder over that and heat set it again. I die cut the ink blended panel with the largest Simon Says Stamp Stitched Rectangle and adhered it to a Kraft Card Base then assembled the rest of the card.


This is another clean and simple card that will be great to mail and is also a great for a masculine look. If you used a color other than orange, you could also go with a black card base but in this case it seemed a little too much like a Halloween look.

I have to say, after so carefully blending my inks it seemed sort of a waste to mess it all up by adding the water drops to distress it but I guess it's okay for a once in a while kind of grungy look and feel.  I couldn't stand it though so I had to make a second card...  I know, I know!

My second card uses Pure Poppy with the Gold Metallic Ink and an A2 Black Card base.  I did use some Tsukineko Shimmer Spritz but I did not use any splatters.  I really love the Red and Gold with the pop of the black and I'm thinking this will make a great choice for my father-in-law's birthday coming up in a few weeks.  He always buys a red pick-up so I'm thinking this is good color choice to send him.


Thank you so much for stopping by to see my card and I hope you'll be back soon to check out my next project.

Tuesday, March 29, 2016

Watercolored Peonies

For many years I have claimed that Pink is my favorite of all the colors.  And that is still true but I have many colors that I love; Teal, Purple, Turquoise and many others but lately I have been on a Coral kick.

I had been hoping to receive a stamp set I had ordered last week in time for a challenge I was participating in but it never arrived until Monday afternoon. Turns out, I love it even more than I thought I would.  My regular one-stop shop for card making supplies doesn't carry this particular manufacturer.  In fact, so far, it's only available for purchase through their own company called "The Ton" which is a historical reference to "Couture Style" in the British Aristocracy.  It's Effie's desire to bring couture style to the stamps she designs.  I think it is interesting to note that Effie also happens to be a lawyer.


One of the things I most like about The Ton Stamps is their size.  My primary complaint with most of the stamp sets I have is that the images in them are so small.  I love these big bold and beautiful images in The Ton's Peony Series that I can watercolor. This particular one is called Large Peony 2.

I colored this last night using Abandoned Carol Distress Marker with Forest Moss and Mowed Lawn for the leaves.  I know y'all might get tired of seeing Watercolor, but I never get tired of doing it. Even when I do two of the same image in the same colors, they are never the same.

My favorite medium for watercolor is Ranger/Tim Holtz Distress Markers which come in a whole slew of colors - 60 in all I think.  But I recently worked on a project where I was trying to stay with one brand of coloring medium and couldn't because I didn't have an orange color in a Distress Marker. I actually have more yellows than oranges and if you you know me very well at all, that is somewhat amusing, *wink*. Anyhow, I added a new color to my Distress Markers in what appeared to be a nice shade of orange called Ripe Persimmon. I'm not really a "pumpkin orange" kind of girl although now I need one that color. Thank goodness for Simon Says Stamp who sells the colors individually so I can add one or two at a time and not have to buy a whole set in one shot. This also allows me to buy only the colors that I personally will use.

So, I got this Ripe Persimmon Distress Marker a few weeks ago but I like to take time to know how each color reacts with water before actually starting a project with it. Distress Markers are ideal for watercoloring as the formulation is designed to react with water each and every time. But I learned early on that they aren't that predictable for watercolor if you haven't used a particular shade before.  I have to know what it does and how it behaves with the water.  And with any watercolor medium, you have to let it dry before you can see the end result. I always talk about how Seedless Preserves is a favorite Distress Ink color and I like to call it "My Little Extrovert" because what goes down as purple becomes pinky purple or a color I would call Thistle.  Well, as I was finishing up some work last night in my studio, I grabbed the Ripe Persimmon really quick with a strip of watercolor paper that had been cut off of a big sheet. I made a mark on the scrap of watercolor paper and then added water to it with a brush.  Oh my goodness - this wasn't the color I was expecting AT ALL!   I'm adding a little swatch here for you to see. There's that orange, then that hint of peachy pink and the golden edges all dependent on how much water you use with the color.  This color needs it's own little nickname too although I can't think of one at this moment.  

When I was a little girl, I used to go and spend the night with my great-grandmother sometimes and there was a persimmon tree in her yard.  That was the sole basis for my color selection of this particular "orange". It was a happy memory and I thought it would remind me of her every time I use it.  And so it will.  *Ü*

The finishing touch on each of these cards is the sentiment from the Papertrey Ink Stamp Set called "Scripted".  The first card also used a technique I learned in a previous class and is one that Laurie Willison taught for this week's Make it Monday at Papertrey Ink.

 The Simon Says Stamp Wednesday Challenge is Anything Goes featuring Ranger Products.  I'll be entering the top card for the Papertrey Ink Challenge and the second card for the Simon Says Stamp Wednesday Challenge as well as the Challenge over at Inspired By All the Little Things #8. I was also invited to participate in a Challenge that is new to me called Word Art Wednesday. Thanks for the invite!

Thank you so much for stopping by today and I appreciate all of the kind comments you leave.