If you’ve been following along, you’ve just arrived from Nenette S. Madero's blog. If you find a broken link, you'll find a master list of the hop links at the Altenew Card Blog.

I had this stack of background papers sitting on my desk that I had pulled out so I would remember to use them, so I wanted to very closely match the colors in that paper to my stamping. Today's project was created using the gorgeous Beautiful Day Stamps and Coordinating Dies with a technique that I developed, called Watercolor Detail Stamping. For those of us who might not be as good at watercolor painting, this is an easy way to get the look of watercolor without the actual time and intensity involved.
I start by stamping the images with Versamark and then heat embossing them with Antique Gold Embossing Powder onto Cougar Super Smooth Digital White #110 Cardstock. You can use watercolor paper, but I wanted to prevent the continual spreading that using watercolor papers allows. Basically, I wanted to contain the spread of color so I used cardstock which restricts the flow of water somewhat. The heat embossed edges also help to contain the color.

For the colors, I use my MISTI to stamp in each layer of color. Starting with the most solid image in my lightest shade, Rose Quartz, I stamp that in without any water misting since it's the base layer and the other colors will go on top of that. For the leaves, I used Frayed Leaf on a couple and Sweet Leaf on the others as my base layer color.
For the second layer, I used the little water bottle that I keep on my desk. It's an empty bottle from a previous product, but it has a very fine mist, so it works perfectly for this. I can also use it to put a bit of water on my pan watercolors if I want to add spatters or do occasional watercolor. The secret is finding a bottle that has a very fine mist. For the second layer of the blooms, I inked up with Baby Pink Ink. Holding my water bottle about 2 feet above the inked up stamp, I spray a light mist onto the stamps, then stamp it onto the paper. If you do it too close, it will be too wet, so start light and go with additional layers of color if you want deeper tones. This lets the first and second ink blend seamlessly. I stamped the second layer of color for the leaves using Forest Glades Ink. Again, I held my water bottle about 2 feet above and gave it a very light mist, then stamped the images.
For the next color on the blooms, I chose Pinkalicious and did it the same way. The final layer on the blooms was inked up with Puffy Heart. I usually let each layer sit for a couple of minutes before stamping the next layer. Once the stamping is done, I set it aside to let it dry. You can easily see that there are no harsh lines between the color changes. This technique works perfectly with Altenew's layered floral stamp sets and Crisp Inks.
While I waited for those to dry, I did a bit of work on my background paper. I spritzed it with some gold shimmer mist and then some clear sparkle shimmer mist I let that dry and then, used my Finetech Gold Watercolors to create some spatter on the background piece. Setting that aside, I went back to my stamped images that were now dry, and gave them all a liberal spraying of shimmer mist and let that dry before die cutting the images with the coordinating dies.

I also die cut the background panel using a basic stitched rectangle die. Because I didn't want to cover up the design, I tried my arrangement several ways to see which was going to work best and then die cut it accordingly. I mounted that to a top folding horizontal card base and worked with my elements until I had a pleasing arrangement.
It was very important to me to have a nice balance and blend of color between the stamped elements and the beautiful watercolor look background paper. I didn't want to take anything away from either of them.
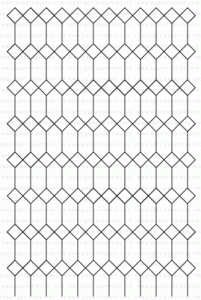
My second card features some of the stems and blooms from my initial Watercolor Detail Stamping but I used Corals instead of Pinks. I started by stamping Pattern Play - Diamond Stamp Set onto a piece of Bristol Smooth Cardstock with Versamark and heat set it using Antique Gold Embossing Powder.

Once the background panel was completely dry, I die cut it with a stitched rectangle die. Then I added Nuvo Dream Drops to each of the center points across the design in the color Cloud Nine. This color picks up the colors underneath and so it looks like I have little bits of iridescent pink or orange pearls at each of those points. I absolutely love the Nuvo Dream Drops and I am hoping they come out with additional colors this year.
Once the Nuvo Dream Drops were dry, I figured out my arrangement and then starting placing all of my elements. I again used Little things From Lucy's Glossy Porcelain Pearls for the center of the blooms. I love how vibrant this card turned out!

My last card for today's Certified Altenew Educators Blog Hop was created with Gilded Ombre Washi Tape, a sentiment from Beautiful Day and the Fantasy Floral 3D Die Set. I applied Washi Tape on a 5.5 x 8.5 panel of white cardstock, then rotated it and did it again, so that the purple met in the center. I am a huge fan of the Altenew Washi Tapes and this is a favorite. I have all of the gilded ones and as always, they are my favorites! I die cut half of it for a background panel, and then die cut the leaves randomly from the piece of leftovers. I already had the two bottom layers of the bloom in two shades of purple, so to tie everything together, I cut the top layer from some gold foiled cardstock. One of the really neat things about this die set is that while you can stack them exactly where all of the layers line up, you don't have to. This helps to vary the look from bloom to bloom if you want more than one.
The Altenew Educator Certification Program really helped me to stretch and explore beyond what I thought my style was. I can easily do elegant designs, but I continue to explore the more artistic styles and techniques learned in the classes. Beginning now through 7/21/2019, you can get class bundles at a discounted price of 20% off. I always find Altenew Academy Classes to be well worth the money spent and very reasonably priced at around $10.00 or less. They are self-paced, with lifetime access, so you can review a lesson at any time.
https://altenew.com/products/aecp-level-2-class-bundle
https://altenew.com/products/aecp-level-1-class-bundle

Prizes/Giveaway
Altenew is giving away a $30 gift certificate to 3 lucky winners! Please leave a comment on the Altenew Blog by 7/26/2019 for a chance to win. Altenew will also draw a winner to receive a $15 gift certificate from the comments left on each designer’s blog on the blog hop list below. All winners will be announced on the Altenew blogs on 7/30/2019.
Hop Order:
Vicki Finger (You are here)
Your next stop along the hop is the talented Nandini Karmarkar! There are many stops along the hop to enjoy, so don't forget to check them all out and be sure to comment for a chance to win one of the giveaways!
If you'd like to see all the projects on Instagram, here's that list for you.
@altenewllc
If you'd like to see all the projects on Instagram, here's that list for you.
@altenewllc
@yesvirginialu
@altenew_planner_girl
@_michelleomurray
@maryam_crafter
@irenemcbeatle
@notableink
@terismailbox
@fd92354
@treasuresinletters
@mylittleatticstudio
@vicki.finger
@crownfocus
@sevenscrafts
@penningtoncreates
@glitternswirls
Compensated Affiliate Links used whenever possible at no additional cost to you!
@altenew_planner_girl
@_michelleomurray
@maryam_crafter
@irenemcbeatle
@notableink
@terismailbox
@fd92354
@treasuresinletters
@mylittleatticstudio
@vicki.finger
@crownfocus
@sevenscrafts
@penningtoncreates
@glitternswirls
Compensated Affiliate Links used whenever possible at no additional cost to you!
 Altenew Antique Gold Crisp Embossing Powder Shop at: ALT |
 Altenew Beautiful Day Die Set Shop at: ALT |
 Altenew Beautiful Day Inspiration Guide Shop at: ALT |
 Altenew Beautiful Day Stamp & Die Bundle Shop at: ALT |
 Altenew Beautiful Day Stamp Set Shop at: ALT |
 Altenew Cherry Blossom Mini Cube Set Shop at: ALT |
 Altenew Cherry Blossom Oval Set Shop at: ALT |
 Altenew Gilded Ombre Washi Tape Shop at: ALT |
 Altenew Gold Foiled Cardstock Shop at: ALT |
 Altenew Green Fields Mini Cube Set Shop at: ALT |
 Altenew Green Fields Oval Set Shop at: ALT |
 Altenew Green Fields Reinkers Shop at: ALT |
 Altenew Pattern Play - Diamonds Shop at: ALT |
 Altenew Pocketful of Sunshine Mini Cube Set Shop at: ALT |
 Altenew Pocketful of Sunshine Oval Set Shop at: ALT |
 Altenew Rose Petal Mini Cube Set Shop at: ALT |
 Altenew Rose Petals Oval Set Shop at: ALT |
 Altenew Rose Petals Reinker Set Shop at: ALT |
 Altenew Spring Bouquet 6 Mini Cube Set Shop at: ALT |
 Altenew Spring Bouquet 6 Oval Set Shop at: ALT |