

 |
| "Goldie" |
 |
| "Seashell Background" |

For this little lady, I wanted to stick with the sea blues, even on the tail. Because I don't have all of the colors in Copics, I just grabbed a few B colors and a couple of BG colors and then some of the E colors for the skin and hair. Even the little snail's shell is done in sea blues. I added Tonic Nuvo Shimmer Pen to all of the mermaid and also to the bubbles. You can really see it at this camera angle.

For the second background panel, I heat embossed again using a piece of Arches Cold Pressed #140 Watercolor Paper. Then I wet the whole panel with clean clear water and did a wet on wet watercolor technique to get the variegated colors that you can see. I used a wide range of Daniel Smith Extra Fine Watercolors colors from Pink to Rose to Purple to Coral to Blue. It's always a hot mess until you set it aside to dry. I knew I wanted to keep as much of the background as I could in this case and so I die cut it with a 5.5 square die that I got when I bought my Gemini Die Cutting Machine.
I had recently purchased some Neenah Marble White #130 12 x 12-inch Cardstock, so I made my card base for that card from that cardstock by cutting a sheet 6 x 12 inches then scoring at the 6-inch mark and folding it in half. Since this is such a heavyweight cardstock, it works perfectly for the card base and doesn't do the splits as I call it. You can also use a regular #110 cardstock and make a cardbase that is top folding by using the method I did on a post here. The instructions for that are in the first paragraph.
My daughter and her best friend used to have a beauty blog together called "A Pair of Mermaids" and they both love mermaids so I made these cards with them in mind.
Next, I stamped my focal image, "Goldie" in Gina K Designs Black Amalgam Ink three times - two to use and a third just in case I messed up. That didn't happen, so I have another here to color. I'm not very experienced with Copic Markers, but I've had mine for a long time and I love the images that I found on the Whimsy Stamps Website. I hadn't heard of them before they contacted me but I've already placed an additional order with them and have a pretty big wishlist added as well. *Ü*
 Next, I set about coloring the images. I have quite a few colors, but when I got my first set of Copic Markers, there were a total of 78 colors available. Now there's 358 or some such. As you can see by the image of my Hex Chart, I only have maybe 150 colors or so. I definitely don't think you need to have all 358 colors. So in the past year or so, I've been adding a few more colors here and there. I was really missing quite a few colors in the Earth Tones which is what you use for hair and skin, so I felt that I had added enough of those to have enough to work with. In all honesty, after I colored these, I did add a few more colors as I had no markers to make blonde or light brown hair. Like me, my daughter has dark hair but her friend is a blonde, and I didn't have the colors I needed at that time to make blonde hair. She won't care at all and will just enjoy having the mermaid card.


I know this post is getting long, but I have a couple more projects to share with you. I really enjoyed the coloring of these, so I got a few more stamps after my initial order for this post. But I have a couple more projects for you here. I used these two stamps: Sweetie and Mistletoe Fairy.

 I love the Wee Stamps Line over at Whimsy Stamps and made a few more cards to share with you. This little girl is called "Sweetie". Then I found out that my Epson 3750 Printer will print digital images without the ink smearing. I am very careful to let the ink dry completely before coloring. In fact, usually, I plan ahead and print one day and then color the next. This is really cool for me in case I want to make the image larger for a 5 x 7 card. In my case, I am using
Express it Blending Card which is bright white. You can also use Neenah Solar White #80. I am definitely going to have to get some more since I've been using it, but I want to see which I prefer before purchasing. I got my Copic Ciao Markers in 2007 or 2008 and at that time, there was only something like 72 colors. I couldn't quite get the hang of them and especially the skin tones, so they sat for years unused. One of my New Years' resolutions this year was to actually use more of my supplies, including Copics. I bought a few from a friend who was selling hers off, and I have purchased several additions. I can buy 10-20 at a time and I like to replace the brush tips on the older ones as I see that is needed. I still have about 80 colors on my wish list, but I can't spend that much in one shot! As my Copic Ciao markers dry up, I am replacing them with Copic Sketch markers.

I made this cute card for one of my daughters that sent me a gorgeous Early Blue Hydrangea forStepmother's Day which is the Sunday after Mother's Day. It was quite a surprise when it got delivered this week and we potted it on Friday. This card is for her. While my style is usually ultra-elegant, I love these super cute images.
In fact, I love them so much, that over Memorial Day Weekend, I purchased all of the ones on my wishlist in Digital Format. Space is at a premium in my studio but I have an enormous hard drive and a 4 TB Server, so Digital is way cool now that I know and see myself buying many more digital images. You can make the image larger or small, rotate the image, etc.

Just because I loved the image so much, I also decided to color in the "Mistletoe Fairy" Image. This is where I realized I was seriously missing most Greens in my copies so I ordered about 15 of those plus some additional Super-Brush Nibs for some of the older markers I have that were very dried out - My original 72 Ciao Markers that sat for so long are in really bad shape. Even though I store them horizontally after this many years, they aren't in great shape. I tried something to give them kind of a last-life while I wait on the replacements that I ordered. If you add a bit of colorless blender to them. Don't fill them completely, just put enough colorless blender solution inside to get them moist again. Give it 5 or 10 minutes to get the ink flowing just a bit, and it will most likely get you through while you wait on replacements.
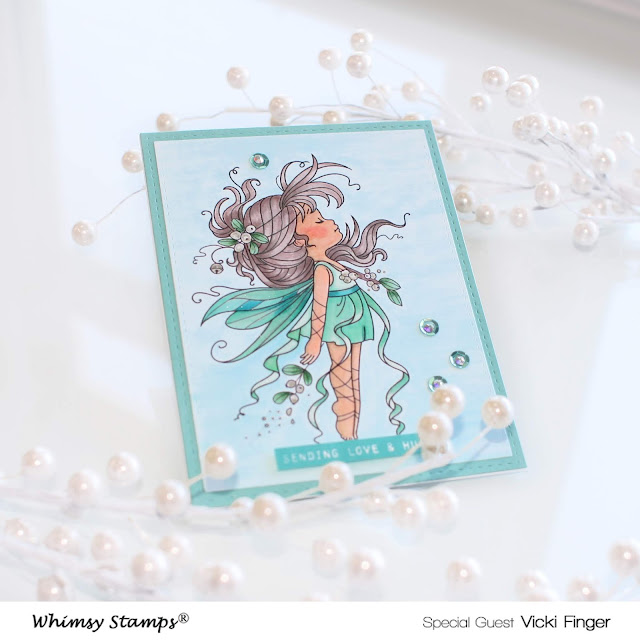
My daughter and I both love little fairies and I also love butterflies, so anything with wings is okay in my book! For the berries on the mistletoe, I used Floral White, E0000. I made a very light shadow using Toner 1 and then everything except her skin gets a layer of Tonic Nuvo Shimmer Pen. I have several different brands of shimmer pens including Spectrum Noir and Wink of Stella. It usually comes down to what I have on my desk at the time. I seem to reach for the Tonic most often.
I don't tend to track numbers as I color unless I am doing a different technique. Especially since I have some Ciao Markers and some Sketch Markers. Ciao Markers don't have the number on the caps, only on the barrel. I'm not yet experienced enough to know automatically which colors I want so I keep a scrap of white cardstock next to me so I can see how colors work together before I use them on my actual project. I hope you enjoyed my cards today!
Thanks so very much for visiting. The products I used are linked below to make shopping easy for you. Whimsy has a really nice line of Red Rubber Cling, some Photopolymer, and a ton of Digital Stamps. I have some of each!


Lovely cards with those cute mermaids and fairies. TFS
ReplyDeleteI enjoyed seeing your post today! You've created some very sweet cards with your new Whimsy images.
ReplyDelete