

I saw the wreath on this black door and I wanted to play along. I think part of the attraction (other than how pretty this door looks) is because we are having a dark colored door on the house we're building. It's not black, but it's a very dark Navy called "Dress Blues" from Sherwin Williams. We're headed back to Texas this weekend to see how everything is coming along so I wanted to play along while I have time. When I saw the wreath on this door, it made me think of some paper that I have in my stash.
If you know me, then you know I love to have papers that have Gold Foil accents. On Cyber Monday, I had made a trip to Michaels to check out one of their deals from Black Friday - $5.99 Hot Buy Cardstock Paper Pads. There were plenty to choose from and I couldn't get them all but I was most interested in any that had quite a bit of Gold in them. I came home with a few of them. My most impressive find that day was one from Die Cuts With a View that was all Black and Gold. This is always a great combination for Guys in particular or if you want something very luxurious looking. This particular pad is 24 sheets of this gorgeous black "kraft" and gold with many Art Deco Inspired patterns. You know me -- I do love my Art Deco inspired finds so this was a no-brainer for me and I happily picked it up.
I love all the patterns in this pad so much, but it seems like every paper pad lately has a couple of sheets in it that are pre-printed with foiled sayings that I probably wouldn't use and that don't really work for the size format that I mostly use for card making which is A2. So I was pretty tickled yesterday when I tried to use one of those for this card and it worked out. The card started out as a 4 x 6 panel that has an oval in the center of it. The trick was getting it lined up correctly to be able to die cut it and use it on my card. Thankfully, I didn't mess it up and was able to get it die cut perfectly. I used the largest of the Simon Says Stamp Stitched Rectangle Dies which cuts at exactly 4 inches wide, so it was critical to get my paper lined up correctly in the die and secure it with a bit of low tack tape so it wouldn't move. Not only did I have to center it from side to side, but also top to bottom. If I messed up, it was no big deal, but I really wanted to find a way to use this panel since it didn't have a saying on it. Once I had that part done the rest was fairly easy. I also wanted to use some of my many Prima Flowers and so I grabbed a few of the pink and purple hydrangeas. Like many of my projects, I wanted this to have some shimmer and shine, so I spritzed them with my shimmer mist and set the aside to dry while I did the rest of my die cutting.
 While I was trying to figure out how I would give it the same feeling as all those springtime tendrils. I didn't have anything that would work for that, so I decided to use a lot of leaves on my project. The leafy branch from the Papertrey Songbirds Dies would be just the ticket and they would also be easy to snip apart and use each part individually. So my wreath then became more of a swag. I cut three of the branches from Gold Foiled Cardstock and then snipped each one into pieces to use as needed for my swag. I love this branch with the stitched leaves and in fact, I still don't own the stamp set - only the dies. It's on my wish list, but so far, I have always had something else I wanted more and so it stays on my wish list.

For the sentiment, I die cut the "hello" 3 times from True Black Cardstock and glued them one on top of the other and then cut the top layer from the same gold foiled cardstock. I put these together with Ranger Multi Medium Matte to have a thicker embellishment for my sentiment. The dies is from the Hello Stamp and Cut by Hero Arts and is a favorite for its style and size. Not to mention the Stamp and Cuts are around $15.00 for the stamps and the die. It's a smaller stamp set, but that's okay with me.
I matted the black and gold panel to a gold foiled panel cut with the WPLUS9 Gift Card Layers Die which cuts a full 4.25 x 5.5 inch stitched rectangle panel. I love the very finished edge of my panels when I use dies and no matter how good my paper trimmer is, I never feel like it cuts as nicely as my dies.
This card came together pretty quickly since I was able to use the gold foiled paper. Prima flowers can be difficult to layer so I used some Alene's Jewel it because for whatever reason it dries faster. Glue dots don't work and Ranger Multi Medium matte isn't very satisfactory either. It seems as though the Multi Medium stays wetter longer on the Mulberry Paper. There are probably other adhesives that would work well but I have the Alene's already in one of the containers on my desk.
There's no special techniques her unless you count no stamping as a technique. Lately, I've had a few challenge to make a card with so stamping on it. In fact, there's one of those over at AAA Cards Challenge this week but they want CAS (Clean & Simple) Style cards and this one definitely does not qualify. I challenge you to use something pre-printed and make a card out of it. It should be easy but it's harder than you think sometimes.
The supplies I've used are linked below for your convenience (Affiliate Links may be used).
 Hero Arts Hello Stamp & Cut Shop at: SSS |
 Kokuyo Long Dot Runner Adhesive Shop at: SSS |
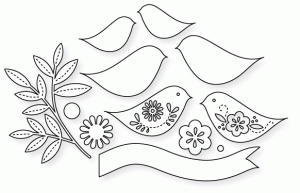 PTI Songbirds Dies Shop at: PTI |
 PTI Stamper's Select White Cardstock Shop at: PTI |
 PTI True Black Cardstock Shop at: PTI |
 Teflon Bone Folder Shop at: SSS |
 Tsukineko Sheer Sparkle Shimmer Spritz Shop at: SSS |
 WPLUS9 Gift Card Layers Designer Dies Shop at: SSS |


