Tuesday, May 31, 2016

Our Rustic Cuff Story

I noticed a couple of months ago that whenever I tell a little story about the card I am making, a lot more people seem to comment.  This particular post is one I've had on my mind for a little while.  I really loved the last card I created and I wanted to create a special one like it to send to someone in particular.  This post is in honor of her.

We are married to twin brothers and have been sisters-in-law for more than 30 years.  We are both named Vicki (& Vickie).  Trust me when I tell you we have had some good clean fun over the years because of that.  But in the past year or so, we've gotten to know each other better and have gotten to be pretty close because of it. She is a fun loving person who knows how to see the bright side in pretty much any situation.  I really admire that about her.

Wayne and Vickie were here about a month ago for the Tulsa Chill Car Show (where BTW they won "Best of Show") and on that Friday, Vickie and I went out to shop locally for a couple of things.  You know, my local is different than her local and she was right here in an area where the population is over 1 million people and shopping for that compared to her entire county back home with a population of less than 10,000.  This is how we came to be at Kirkland's.  

She was looking for a gift for an upcoming occasion and I had mentioned in passing that Rustic Cuff was kind of cool and a somewhat local thing.  Without having one to show her, it probably didn't even register. But as we were walking around Kirkland's I noticed the associate was wearing two of these bracelets so I grabbed her wrist and said "Look! This is Rustic Cuff" and went on to tell her how this was an Oklahoma thing and how much I'd been wanting one.  Poor girl probably didn't know what to make of someone grabbing her wrist.  She asked me which color I liked and when I said the pewter one, she took it off her wrist and handed it to me saying that was part of the Rustic Cuff Tradition too.  I was floored.  I hadn't heard that part of the Rustic Cuff Story before.  As we were checking out and signing up for Kirkland Rewards, the associate learned that we were sisters-in-law, married to twin brothers, and that we have the same first and last name. She took her other bracelet off and gave it to Vickie.  It was a pretty special thing to receive the RAK but also seeing Vickie receive one as well. There is no one I would rather have shared that experience with.

The White Emerson
Of course, then I had to take Vickie over to the little boutique nearby that carries lots of different Rustic Cuff Bracelets and we both felt we needed another bracelet to go with the one we had been RAK'd. . .  *Ü*  The ones we have are all this style called The Emerson.

I've been wanting to make a card to send her to commemorate that occasion although I don't think either of us will ever forget it.  I used the colors of our bracelets for this card; Pewter, Rose, White and Plum. When you buy one of these bracelets you can get them with a gold Rustic Cuff logo charm or a silver one. We both have gold.  This is not the most colorful card, but I know Vickie will realize the time and thought I put into making it.  She has been one of my biggest supporters since I started making cards and writing my blog and she loves to receive them. You can read the full Rustic Cuff Story here if you are interested.  Suffice it to say that even Oprah has one (or possibly more).

This card was made in pretty much the same way as my previous post, just with different colors.  I chose to use the heat embossed gold leaves without adding color to the vellum to represent the white bracelets.  The rose colored flowers were colored with Hibiscus Burst, and the purple ones with Amethyst Allure. The background panel was inked up with Smoky Slate to represent the pewter bracelets.  Because of the logo charms on our bracelets, I went with gold accents where normally I think I would have used silver.  I used Altenew Beautiful Day and Altenew Peony Bouquet with their coordinating dies for the flowers and the Papertrey Ink Scripted Stamp Set and Scripted Dies for the sentiment. The banner is from the Tag Sale - Quilted die.


Thanks so much for stopping by today.  I hope you enjoyed my story of getting to share in some pretty magical moments with my Sister-In-Law/Friend.  I treasure her and she does mean the world to me.  The Word Art Wednesay Challenge Blog is all about being a blessing to someone.  I think it's also important to notice when someone is being a blessing to us and Vickie is definitely a blessing to me!

Simon Says "Monochrome"

It's been a while since I worked on a card specifically for the Simon Says Stamp Monday Challenge.  Believe it or not, I can't always come up with a card for every challenge and some just don't fit my style. I'm learning that if it isn't my style, I need to just move on to the next project because I probably won't be happy with the end results. My style tends to lean toward Classic and Elegant and my love of using gold lends itself well to my projects.

This week's challenge over at the Simon Says Stamp Monday Challenge is Monochromatic and I chose "Yellow/Gold" for my color.  I started with a piece of Fabriano Water Color Paper in the 140# weight. This paper is more cream than white and has a heavy texture to it but since I was planning to do ink blending over the top, it didn't matter.  I ran that through my die cutting machine using the Taylored Expressions Leafy Vine Embossing Folder and then ink blending it with Papertrey Ink's Lemon Tart.  This is Papertrey's softest yellow ink. Because the design is so close together on this paper, the ink just stays on the surface of the panel.  Once I had that done, I misted the panel with Iridescent Gold Glimmer Mist which blends the color so softly and gives a light golden shimmer to the paper.  I set that aside to dry and worked on my other elements.

Using a 4.25 x 5.5 inch piece of Papertrey Ink 44# Vellum, I did ink blending on that using Summer Sunrise Ink and a Mini Ink Blending Tool.  While it was still damp from the ink, I sprinkled Gold Perfect Pearls on it and blended it out as if it was ink all over.  I used my heat tool to make sure the vellum was dry before I stamped two of the outline images from Altenew's Beautiful Day Stamp Set in Versamark and heat set them using Simon Says Stamp Antique Gold Embossing Powder which is my favorite gold to use. For the leaves, I first inked up another piece of vellum using the Summer Sunrise and then went over the top with New Leaf which is a yellow-green (olive) color tone.  I wanted the yellow undertone so I could stay monochromatic.  After that, I stamped the leaf outlines from Beautiful Day on that piece of vellum and then die cut all of the flowers and leaves with the Beautiful Day Coordinating Dies.


I also cut a frame from the Spellbinders Label 42 & Label 42 Decorative Elements from a gold cardstock scrap.  I buy big 24 x 36 inch sheets of Metallic Gold Poster Board at my Hobby Lobby when it's on sale 2/$1.00 and cut it down to manageable sizes when I get it home.  Because I am paying so little for it I don't feel the need to skimp and you'll notice I use it on a large percentage of my cards.


I used the "Scripted" Stamps and Coordinating Dies from Papertrey Ink for my sentiment and the banner is part of the Tag Sale - Quilted Die.  To finish, I assembled everything on the panel and attached that to an A2 Top Folding Card Base made from Rustic White Cardstock.  I used Thin 3D Foam Squares for the Banner and hid the Ranger Multi Medium Matte adhesive behind the vellum layers so it wouldn't show.  

I'll also be entering this project into a couple of other Challenges, Addicted to Clean and Simple and Word Art Wednesday.  I really appreciate it when you stop by to see my project and your comments are such a kindness.  I read and treasure every one.  

Monday, May 30, 2016

CAS On Sunday #84 - Sparkle

I found a new challenge to participate in this week so I thought I'd give it a shot. It is called CAS (Clean & Simple) on Sunday.  To be considered CAS, it must be minimal layers, one focal image, and fast and easy to recreate.  While I enjoy the challenge of more technique driven cards, at other times I just want something that is fast and easily mailable.  I actually make a lot of cards that would fit into this category although not all of them.  Today's card definitely fits into this category.  The style for this challenge is CAS with Sparkle.  Y'all know how I love my sparkle.

I started by stamping the largest image from the SU! Flowering Flourishes Stamp Set with Versamark onto a piece of Creative Memories Sea Glass Card Stock.  I don't know if that set is a current product or not.  Once I had it stamped, I heat set it with WOW! Metallic Platinum Sparkle Embossing Powder.  That completed my main focal image. I used the "You've been on my mind" greeting from the Papertrey Ink Friendly Flowers Stamp Set and die cut the butterfly from some Papertrey Ink #44 Vellum.  The butterfly is from Impression Obsession.


I spritzed the Sea Glass panel and the butterfly with Tsukineko Sparkle Sheer Shimmer Spritz and set it aside to dry for a few minutes.  Once it was dry, I cut the panel with the largest Simon Says Stamp Stitched Rectangle  After that I attached the Sea Glass Panel to a top folding A2 Card Base made from Stamper's Select White Cardstock using my ATG.  The butterfly was attached using Ranger Multi Medium Matte.  Three small pearls were attached to the three little flowers on the stamped image and this card was complete.  It's a super fast card that still looks great!  You can't really see the sparkle of the paper in the photograph, but it is there. The sparkle of the embossing powder also helps to bring that out.  

I hope you enjoyed today's card and that you'll come back soon.  There will be lots more projects this week.  I'll also be entering this into the Simon Says Stamp Wednesday Challenge for their Anything Goes theme. Have a great rest of the Memorial Day weekend! 

Sunday, May 29, 2016

Cup Full of Love


This week's challenge at The Card Concept (#56) gave us this sweet image as our inspiration. I gave up coffee several years ago and drink hot tea in the mornings.  I love pretty little cups and I've used tea cup images before as my inspiration.  In fact, another challenge that I participate in, Inspired by All The Little Things (#17) also has a tea cup for inspiration this week.  It's always nice when I can combine one card for 2 challenges.

I wanted to include some of the elements into both images; the teacup first and foremost.  I happen to have this little tea cup die from Papertrey Ink called "Fancy Teacup" so that was where I started.  The first image feels totally vintage inspired so I channeled my inner Melissa Phillips and that was the look I chose for my card today.  Melissa usually combines Shabby Chic with Vintage.  I don't know that I was particularly effective at getting the look of both, but I gave it my best shot.

I started by die cutting all the elements I wanted to use - the Fancy Cup (cut from a scrap of Audrey Blue), a metallic gold oval frame, Bookmark #3 (also from Papertrey Ink), and lots of little hearts using the Mini Hearts Set Craft Die from Simon Says Stamp for the "Cup Full of Love".  I used the soft teal color from the first image for my cup.  It is a two part die so I used metallic gold cardstock for the bottom solid layer and also inked up the edges of the assembled cup with a Gold Cat's Eye Pigment Ink Pad. I could have used my bigger ink pad but the smaller one made it easier to get into the small places and also control where I actually put the ink.

I wanted to use an oval frame like in the first inspiration image so I cut a Spellbinders Oval Floral Frame in the middle size from Metallic Gold Cardstock. I could have left the bookmark off, but I felt like it also helped to ground the image of the tea cup.  I used Rustic White Cardstock rather than the stark white of Stamper's Select White Cardstock for the bookmark, the banner and the card base because I felt it was more in line for the feel of the card. Using my Audrey Blue Ink from Simon Says Stamp with a Ranger Mini Ink Blending Tool, I softly blended the ink around the outside area onto the bookmark, the banner and the card front then inked up the edges of those things with the Gold Cat's Eye.  The blue behind the frame is Surf Blue Cardstock from Simon Says Stamp and the "You" (stamped in Tropical Teal Ink) is from the Scripted Stamp Set from Papertrey Ink as is the sentiment on the banner.  To continue to tie in the gold, I stamped the sentiment line in Versamark and heat set it with Simon Says Stamp Antique Gold Embossing Powder.  Finally I began to assemble my card using a variety of mediums - Multi Medium MatteATG, and Foam Squares.

The overall color tone of this card is very soft in much the same way that Melissa achieves on her Shabby Chic cards and projects.  I'll also be entering this in the Simon Says Stamp Wednesday Challenge "Anything Goes".  I hope you enjoyed this card and that you are having a great Memorial Day Weekend.  Thank you so much for stopping by today.  It means a lot to me when you take time to comment, so please feel free to do so.

Saturday, May 28, 2016

Image Inspired Cards

Stamping Royalty May 26, 2016 - Challenge #331
Hello everyone!  As you know if you read my blog regularly I have been on a magnolia kick lately. They are definitely one of my springtime favorites.  In my quest for life like colors, I usually do a search on Pinterest for whatever I am painting so I can study the colors a bit. What I wasn't expecting was to see how many colors there are of Magnolias.  I had no idea. Before then I had only ever seen the regular creamy white and the Pink Tulip Magnolias but there are other colors. Magnolia Coral Lake has coral blooms with lots of pink in them. The Black Tulip Magnolia has deep purple blooms and there's even a yellow one called Magnolia Butterflies.
Magnolia Coral Lake
So when I saw the inspiration image over at Stamping Royalty I wanted to create a Magnolia Coral Lake colored Magnolia branch. It didn't hurt any that I happened to have some orange and gold striped paper like the sleeves in that one image. I also really love how the color in the cake is a deeper coral at the bottom layer going to a mid-orange on the top layer, just like petals.  All in all I think the cake decor is very Hindi inspired and just beautiful.

I stamped a handful of the magnolias from Altenew Magnolias for Her Stamp Set on watercolor paper with Versamark and heat set them using Simon Says Stamp Antique Gold Embossing Powder.  Using a water brush and Ranger Ripe Persimmon Distress Ink smooshed onto an acrylic block, I initially went in with a very light wash of color.  The thing about Ripe Persimmon Ink is that when activated with water it's not a very predictable color which is one of the reasons I love it.  It's always nice to get a little unexpected surprise and Ranger's Seedless Preserves and Ripe Persimmon are my favorites to use for this.  When used as a watercolor, it has all these other tones in it and the most surprising of all to me was the pink undertones.  There's also some golden edges and just a whole range of shades from the palest peach to some bright vivid oranges. Just put your color on in layers and be sure to let it dry in between so you can see what the actual color looks like and where you might want to add in more.  I did less color on this first card to keep the images in the peachy orange family.


I cut the branch from the Altenew Vintage Flowers Die Set in gold to coordinate with the other elements on my card.  I cut the blooms with the Magnolias for her Die Set.  I assembled everything using a combination of ATG, Ranger Multi Medium Matte and Foam Squares. The sentiment label is a die I've had for a while and I don't know what the brand is. I got it at Hobby Lobby but I've not seen it there again.


Since I had stamped extra magnolias, I created a second card.  This time I wanted the more pinky tones so I added additional color in with a little bit of Berry Sorbet Ink from Papertrey Ink smooshed onto an acrylic block.

I wanted to use a Kraft card base this time which always looks so good with the Berry Sorbet Cardstock that you see as the background panel.  Both background panels are cut using the largest Simon Says Stamp Stitched Rectangle Dies.  I love pink, but this Coral is my absolute favorite this spring!  It is just the best color.  I used the Magnolias For Her Die Set, the same branch from Altenew Vintage Flowers Die Set and the same label.  It came together really fast since I already had the watercolor done.  I attached the elements the same as the previous card with ATG, Foam Squares and Multi Medium Matte.

I'll be entering this card into the Simon Says Stamp Wednesday Challenge for "Anything Goes" in addition to the Stamping Royalty Challenge #331. Thank you so much for stopping by.  I really treasure and appreciate your kind comments.

Wednesday, May 25, 2016

Creating a Masked Background

Today's card is for a couple of challenges; the Papertrey Ink Make it Monday for this week and the newest Color Q Challenge #343.

For the Make it Monday #250 technique this week, Laurie Willison masked off a half inch border all the way around her card front and then used ink blending to color the background. If you click the link it will take you to the website to watch the video. By now I have done quite a bit of successful ink blending so I wanted to do the technique with a slightly different twist for my project.

Using a 4.25 x 5.5 inch piece of watercolor card stock, I masked off a portion along the diagonal and then started ink blending the top of the panel using Melon Berry Ink from Papertrey Ink. Once I had that part inked up, I removed the tape and then masked off the opposite part. Using a clean pad for my Mini Ink Blending Tool, I blended Encore Metallic Gold Pigment Ink over that section. When I removed the masking tape I spritzed the entire panel with Iridescent Gold Glimmer Mist and then mimicked Laurie's technique of adding some droplets on my background. This gave the ink blending a nice shimmer and also gave it the distressed look from the water droplets.  To take it one step further, I splattered Finetec Mica Watercolor in Tibet Gold with a #4 Round Silver Black Velvet Brush which created the brighter gold spots.  The size of the brush determines the size of your spatter.  Smaller brushes make smaller splatter.

Next I die cut the "Happy" from a scrap of black cardstock.  Laying it on top of my Ranger Craft Mat, I smooshed Versamark Ink over the entire die cut, poured clear embossing powder on it and heat set it.  I used something from my barely used items - Ranger Large Particle Embossing Powder.  My mom had sent me a message this morning asking me if I had used this product and I told her only once and that I had not liked it.  Since it was on my mind and I had been meaning to try it for this technique, I got it down off my shelf and used it today. Normally, I would have to ink up my die cut with Versamark and pour clear embossing powder on it a minimum of three times to get the same look that I got in one shot here.  So I am pretty stoked about it!  It was a lot easier than squeezing glossy accents over the whole word but gave it the same look. Thanks, Mom! Be sure not to touch it until it's completely cooled down which only takes a few extra seconds. Otherwise, it will have your fingerprints on it (the voice of experience here *Ü*).


Using the "Birthday Wishes" sentiment from the Papertrey Ink 2016 Painted Petals Anniversary Set, I stamped it with Onyx Black Versafine, poured Simon Says Stamp Fine Detail Clear Embossing Powder over that and heat set it again. I die cut the ink blended panel with the largest Simon Says Stamp Stitched Rectangle and adhered it to a Kraft Card Base then assembled the rest of the card.


This is another clean and simple card that will be great to mail and is also a great for a masculine look. If you used a color other than orange, you could also go with a black card base but in this case it seemed a little too much like a Halloween look.

I have to say, after so carefully blending my inks it seemed sort of a waste to mess it all up by adding the water drops to distress it but I guess it's okay for a once in a while kind of grungy look and feel.  I couldn't stand it though so I had to make a second card...  I know, I know!

My second card uses Pure Poppy with the Gold Metallic Ink and an A2 Black Card base.  I did use some Tsukineko Shimmer Spritz but I did not use any splatters.  I really love the Red and Gold with the pop of the black and I'm thinking this will make a great choice for my father-in-law's birthday coming up in a few weeks.  He always buys a red pick-up so I'm thinking this is good color choice to send him.


Thank you so much for stopping by to see my card and I hope you'll be back soon to check out my next project.

May 2016 Papertrey Ink Blog Hop

Hello everyone!  It's time for the Monthly Blog Hop over at Papertrey Ink. Nichole provided us with this as our inspiration image and it has been interesting trying to figure out what I was going to do for this challenge.  These colors are just delicious and make me think of ice cream and popsicles and all the other Ice Cream Truck treats of my childhood.

Remember how when you were little (if you lived in town) you could follow the ice cream truck on foot or on your bike to get an instant cool down from a Popsicle?  My husband didn't know that feeling as he grew up on a farm 12 miles outside of town.

To begin, I stamped the image onto watercolor paper with Encore Silver Ink then sprinkled it with Simon Says Stamp Clear Embossing Powder and heat set it.

Part of participating in the Papertrey Ink Blog Hop is using at least one of their products for the challenge.  I'll admit I am stretching that a little bit today because I didn't use one of their stamp sets but most everything else is from Papertrey Ink.

From the moment I saw the inspiration image, I could only think of this particular stamp set, Ice Cream Dream, that I got a year or two ago from Close To My Heart. So I decided to watercolor it using Papertrey Ink Cubes; Raspberry Fizz, Vintage Jadeite, Melon Berry, Spring Rain, Hawaiian Shores, Berry Sorbet, and Pure Poppy for the Cherry.  A little distress ink in Gathered Twigs was used for the syrup on the top of the sundae. I wanted to use Kraft Ink from Papertrey but mine hasn't been delivered yet. Some of the colors I used aren't exactly what you might find in real life, but it's okay.  I just smooshed a bit of ink from the corner of the ink cube onto a 3.5 inch round acrylic block and then used a water brush to pick it up and "paint". Since the block was large I could just rotate it to have access to the color I wanted much like a paint palette.


The watercolor panel was spritzed with Tsukineko Sheer Shimmer Mist and the ice cream treats were given a coat of Clear Wink of Stella.  When that dried, I die cut it using the largest Simon Says Stamp Stitched Rectangle and adhered it to my top folding A2 card base made from Papertrey Ink's Hawaiian Shores Cardstock.  For the very last step, I put Glossy Accents on the ice cream for the added dimension and to give it the wet look.

Be sure to check out all of the projects over at the Papertrey Ink Blog Hop today! Thanks so much for stopping by and be sure to leave a comment if you like!

Tuesday, May 24, 2016

Happy Birthday Wishes

This week over on the Simon Says Stamp Monday Challenge the theme is "Make a Wish" while at AAA Cards there is also a birthday theme in honor of their 2nd birthday.


I recently discovered a small, pretty new company, Power Poppy, that has incredibly detailed floral images including a Magnolia which to me is the most beautiful and regal of all the flowering trees although Crabapple and Cherry Blossom Trees would be a close 2nd.  I talked quite a bit about this company a few days ago on this post.  I wanted to create the Magnolia Coral Lake color in the card for today.  There is even a Black Tulip Magnolia which has deep purple blooms. I didn't even know these existed a week ago.

I started with a 4.25 x 5.5 inch piece of watercolor paper.  I stamped the Planning For Magnolias branch using Versamark Ink and heat embossed it using Simon Says Stamp Antique Gold Embossing Powder.  I stamped a second time coming in from the opposite corner using just a portion of the stamp. I always use a powder "tool" of some kind these days which in this case was a small container of baby powder and an Oval Mop dry paint brush.  I have an EK Success Powder Tool but I don't like it as well and the bristles break off way too easily.  I keep one method on my desk and one on my table so I'm covered either way.  For heat embossing I normally work on my table because it is right next to where my heat tool is plugged in.  I walk over there and turn on my heat tool to start warming up while I do the actual stamping and sprinkling of embossing powder.  It works perfect to get my heat tool warmed up.  

For my flower colors, I used Abandoned Coral Distress Marker with a Zig Clean Color Real Brush Pen in Sugared Almond Pink.  I started with a light wash of the coral and then added pink and coral in layers until it suited me.  I'm not sure my photograph can accurately capture the color, but trust me when I tell you it is there.  I used Gathered Twigs and Forest Moss for the branch and leaves and I was able to finish this in about 30 minutes.  

I'm not really a cutesy critter or punny sayings kind of girl, so florals are always a fantastic choice for nearly any kind of card I want to make. My favorite sentiment stamp set, "Graceful Greetings" from Papertrey Ink, was used for the "Happy Birthday".

Once all the painting was completed and dry, I gave the whole panel a spritz of Tsukineko Sparkle Sheer Shimmer Spritz and set it aside to dry while I made a card base from Stamper's Select White and cut a background panel from Berry Sorbet, also a Papertrey Ink Cardstock. I really love all of their cardstock.  It is 110 lb. and so smooth.  I've beeen scrapbooking or making cards for 18 years by now so I have used a lot of cardstock in my day and I think theirs is absolutely the best quality out there.  I also find their prices to be very reasonable.  


Everything was assembled to the card base using my ATG gun.  My mother-in-law has a birthday coming up on June 2nd and I know she will enjoy the beautiful colors in this card so I am planning to send this to her.  

That's the project for today but thank you so much for stoppng by.  I'd love to have you subscribe to my blog via e-mail if you like.  I post on average 4 times a week or more.  I'll be back with another project soon.   

Monday, May 23, 2016

Sunday Stamps Challenge


I am popping on here today with a super short and quick blog post.

I came across a new challenge this weekend called the Sunday Stamps Challenge.  I loved the colors in their inspiration photo so I decided to play along which was somewhat of a challenge for me because I wouldn't normally use these colors.  It was good to know I could and I love how the colors just pop on the black panel.

For this card I used the Altenew Henna Elements Stamp Set with the Henna Elements Coordinating Dies using the simplest form of Copic Coloring there is. I didn't do any shading or highlights at all.   The challenge is to use at least three of the five colors and you can add in a neutral if you like. For my neutral I chose the metallic gold of the sentiment and embossing.

I stamped the images in Versamark and heat embossed them using Simon Says Stamp Antique Gold Embossing Powder then die cut each one of them with the coordinating dies.  I wanted the bright vivid colors to pop so I did plain old ordinary coloring; there's nothing fancy here.  I chose to use black cardstock for my background panel.  I tried a few other colors like mint, turquoise, and olive but in the end it was the black that made it pop.  That's probably not a very predictable color choice for me, but I love how striking it is.  I'm pretty sure I'm going to send this one to my best friend in Texas.

The sentiment is from the Papertrey Ink "Scripted" Dies.  There is also a coordinating stamp set, but I didn't use it here.

We have a stormy and rainy day today and even the dogs don't want to get out of bed. I hope you are all having a great day.  Thank you so much for stopping by.

Saturday, May 21, 2016

Planning for Magnolias

I've been thinking for a few days about The Challenge #73 over at Always Playing with Paper. The Challenges change each week and this week's image is actually one that I've played along with at another challenge back in March.  I wanted to really be inspired in a different way than what I previously did. Thankfully, I had happy mail today!  

I was looking through Pinterest the other night, trying to gather some inspiration as I sometimes do.  I have several boards there, but ones I frequently pin to are Color Combinations or Flora & Fauna.  I think you will always have a winning combination if you go with colors that already exists in nature.  For example, Pink and Green is a frequent floral combination seen everywhere in the spring.  I think there must be more pink flowers in the world than any other color although I try to enjoy them all.  But I came across an image that immediately grabbed my attention. I followed it (as I am inclined to do) and found a website called Power Poppy by Marcella Hawley.  OH. MY. WORD!  I stumbled upon some incredible digital images and clear stamp sets. The bad news is that not all the digital images are available in clear stamp sets because they are a new, young company, but the good news is that there are several stamp sets to choose from and one can hope that as they release new stamps that some of the digital favorites will make it into the collection.  

Marcella has enjoyed incredible success including Martha Stewart Living and Mary Engelbreit's Home Companion.  You can read about it HERE.  The images you see here are all her gorgeous photography influenced no doubt by her mother, whom she lost recently.  Her mother was a painter and illustrator for Hallmark Cards in Kansas City.

This beauty is one I have never seen or even heard existed before and is called Magnolia Coral Lake. Isn't the color just breathtaking? These images were the inspiration for the Planning for Magnolias Stamp Set by Power Poppy. The stamps are clear photopolymer and are a few dollars more than most on the market, but they are incredibly detailed while still giving you the outline image to paint or color as you wish.  They are by far, the most detailed and nicest floral images I have.  I felt that was worth the couple of dollars and I was so happy when they arrived in today's mail and solidified this opinion.  I checked this morning and saw that they were "out for delivery" by my mail carrier so I started checking and rechecking the status (a.k.a. STALKING) until it showed up as "Delivered" to my mailbox.  Then I knew I could go out and get the mail.  I wish you could have seen the smile on my face....

I am just not that in to Copic Coloring.  It doesn't soothe my soul the watercolor does.  I totally appreciate other people who can do it and I love seeing their creations but it is a last choice for me rather than a first choice.  I took some Copic Classes several years ago but I don't feel like I get most of my images to look the way I want them to so it's just not relaxing to me.  I know part of it is practice so I am doing that a bit, but watercolor is my first love.  Trust me when I tell you that I will be attempting to duplicate this gorgeous shading on a card soon. Today, I was after instant gratification so went with the color of the Tulip Magnolia at one of my daughters' homes in Missouri.  And as you know, Pink is a favorite. Actually, I feel like Coral is right up there with Pink these days, even more than purple.  It has to be the right shade and not too orange-y, but I do love it too.  


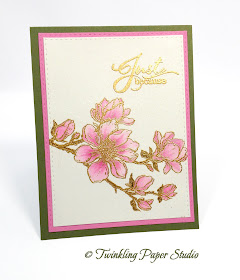
This card was super simple.  I used the largest bouquet from the Planning for Magnolias Stamp Set, stamped it with Versamark then heat embossed it with Simon Says Stamp Antique Gold Embossing Powder.  I used a Zig Clean Color Real Brush Pen in Sugared Almond Pink to paint it, layering color where I needed to.  A tiny amount of Gathered Twigs and Forest Moss Distress Marker was all I needed to finish coloring this image.  All of the pink is done with just that one color. 


After that I die cut the panel using the largest Simon Says Stamp Stitched Rectangle Die.  I re-aligned that into the die to cut a little off of two sides so I could mat it with the pink panel.  Then it was adhered to a top folding card base made from Olive Cardstock. When I use darker colored card bases I cut an extra stitched rectangle to go on the inside of the card. 

In case you are wondering, I find that watercolored images are "the show" on a card of this style.  They don't need a lot of other distractions such as patterned paper going on so I prefer to keep the look of my cards clean and classic. I really admire those who can incorporate a lot of pattern and color in their cards but it's not for me.  
I'll be entering this over at the CAS Mix Up Challenge using Stamping, Heat Embossing and my choice which is Watercolor for this card.  

Thank you for stopping by to see my creation and read my blog post.  I hope you'll look around over at Power Poppy.com.  It means the world to me when you take time to comment.  Have a great weekend everyone! 

Color Throwdown #393

This week over at the Color Throwdown Challenge #393 there is a very soft, subtle and muted color palette.  The photo on the left was our inspiration image for the colors we were to use; blush, rose and grey and white.  I chose to watercolor some of the images from the Altenew Magnolias for Her Stamp Set and use the coordinating dies.

I've been working with these magnolia images in an attempt to imitate an artist whose work I greatly admire, Marika Rahtu. For this card, she used Copic Markers with Faber Castell Polychromo Pencils to get the phenomenal results you see here.  I still need more practice, but my 2 attempts so far have resulted in great learning for my third attempt which will hopefully happen soon.  My results were not terrible but not good enough for me to share yet.


I do love Magnolias and the smell from the blooms is incredible! The image on the left is from my Magnolia tree in our yard. We purchased and planted it 2 1/2 years ago and it was such a beautiful tree. That first winter, it got hit by an ice storm causing it to lose several branches and some height.  It was so heavy with ice, it just broke the top completely off.  I feel lucky that it survived at all.  Last year, we had so much rain that the blooms would get knocked off by the rain the same day they bloomed so we didn't get to enjoy them at all.  I took this picture last weekend of the year's first bloom on this tree.  It is loaded with buds this year.  We are still getting quite a lot of rain at this point, but I'm hopeful.  A second bloom came out yesterday.  If this flower seems large to you, it's because it is.  I haven't actually measured, but it is approximately 10 inches in diameter. I'll have more Magnolia beauty coming to the blog in the coming days and I can't wait to share!

I've mentioned before that I detest "fussy cutting" and that one of the things that had happened over the 5 years between scrapbooking and making cards is that now most stamp sets have coordinating dies. That is what I used to wish for, but I kind of got away from even traditional scrapbooking and had been doing digital scrapbooking for the last several years. Once I started making a few cards last year and found out this wish had been granted. . . well to me, it's paper crafting heaven! I've gone from scrapbooker to card maker in nearly one fell swoop.

I stamped the magnolias with Versamark and heat embossed them using Simon Says Stamp Antique Gold Embossing Powder on a piece of Canson Bristol Watercolor Paper. I have other gold embossing powders, but this is my current favorite Gold Embossing Powder.  It's a warm rich color, melts fast and is a reasonable price. Using my Zig Clean Color Real Brush Pens, I painted the blooms using Sugared Almond Pink and Pale Rose so that I could keep with the designated throwdown colors. Originally, I tried to do a grey branch, but it just didn't look right so I opted for the grey card base.  The branch is cut with the Altenew Vintage Flower Dies.


I laid in my first layer of watercolor using the Sugared Almond Pink and went over the entire image on all three blooms.  I let that dry and went in with subsequent layers of Pale Rose with more color at the base of the petals where the shadows would be deepest.  I use a #2 and #4 Round Silver Black Brush that I got at Simon Says Stamp. You can buy each separately or the three in a bundle. Once I had the blooms painted and they were dry, I went over them with a coat of Wink of Stella Clear Shimmer and let that dry before die cutting them with the coordinating dies.  Then it was only a matter of arranging the elements on my card background and adhering them with Ranger Multi Medium Matte.  The biggest bloom is attached with foam squares under the petals except for the very center of the flower is glued down to give it that extra bit of dimension. I added a few Moonshine Sequins in 6mm and 10mm to finish it off.  Simon's has a few sizes and also a multi-pack with 3mm, 5mm, and 10mm in it.

The greeting is from Papertrey Ink's Friendly Flowers and heat embossed with the same Antique Gold Embossing Powder.  This is my favorite font and  also my current favorite sentiment set.

The Color Throwdown Challenge #393 will end Monday at noon so I'd better skeedaddle and get this post up!  Thanks so much for stopping by today and if you'd like to leave a comment, I really enjoy reading them.

Wednesday, May 18, 2016

Birdhouses with an Ink Blended Sky

Over at the Curtain Call Challenge this week, they have given us this bright, colorful inspiration image with these birdhouses.  I don't have occasion to use my birdhouse die very often, but I was excited when I saw the picture. As is usually true, I have almost no patterned paper in my supplies and definitely nothing that could work on this small of an item, but I could make the colors pretty and vibrant.

I do not know the brand of the die that cuts the card front.  I bought it at my LSS last year and they have since gone out of business.  I've never seen another one like it but this one was cut from SU! Tempting Taupe Cardstock.

Taking a 4.25 x 5.5 inch piece of Stamper's Select White, I ink blended it using a Mini Ink Blending Tool and some Tumbled Glass Distress Ink.  I made the sky slightly darker at the top than at the bottom and spritzed the whole panel with Iridescent Gold Shimmer Mist which helps the ink to blend and smooth out while giving it a slight golden glow from the "sun".  There is a lot to assume here, ha ha!  I cut 4 layers of the Paper Smooches Bird Houses in white and one in the color I was using for the very front piece (Vintage Jadeite and Audrey Blue) and adhered them together with Ranger Multi Medium Matte.  I was trying to mimic the look of a silver chain by using Silver Metallic Thread from DMC to hang my birdhouses from the tree.


There's nothing difficult about this card.  It was a lot of pieces to keep track of but you could make everything just 1 layer thick if you didn't want to go to this much trouble.  I also keep a little dish or container on my desk that I can put all of the pieces into during the "construction" process to keep track of them.  I love how the thickness of the birdhouses adds to the dimension of the whole card.

I am yearning to watercolor so that is on my agenda for today if I can get moving.  I have a feeling that you are going to see a whole lot of watercolor in the next few weeks. Thanks for stopping by today and I'll be back soon!

Tuesday, May 17, 2016

Bold Graphics

This week, Kara Vrabel is the Guest Designer at Inspired By All The Little Things.  The challenge has a more graphic look this time. I didn't know it when I started making cards last year, but I like really bold graphics and they are perfect for masculine cards.

The inspiration image has a very neutral and subtle background with bright pops of color that I wanted to mimic in my design. But I'm going rogue as no one else has changed up the colors yet!  I started with a piece of SU! Smoky Slate Cardstock for my background panel and a black top folding note card made from SU! Basic Black Cardstock.  I don't have a triangle die, so I opted for Diamonds (an old QK die set).

I die cut the Smoky Slate panel using the largest of the Simon Says Stamp Stitched Rectangles then I began to die cut a few of each color of diamonds for my pops of color; one large and 2 small in each color.  I wanted the most vibrant turquoise in my color selection so I chose this paper which is an old Creative Memories Cardstock in the color Teal.  The white is Stamper's Select White from Papertrey Ink.  I just arranged them by eyeballing where they should be and attaching them using Ranger Multi Medium Matte.


The banner is from a SU! Bitty Banners set of thinlits I have and the die cut "wishes" is from Impression Obsession.  I cut three of them and stacked them one on top of the other to get the thicker element. The "Birthday" stamp is one that says "Birthday Wishes" from the Papertrey Ink 2016 Anniversary Set.  It comes with both words on the stamp so I masked off the Wishes part of the sentiment, inked up the "Birthday" in Black Versafine, pulled the masking tape off the "wishes" part of the stamp and put clear embossing powder over the top, heat setting it.  This is by far the way to go vs. black embossing powder.  In fact, I'm not sure I will ever use my black again.  I did use my powder tool to treat my paper before embossing.

I hope you enjoy my card for the challenge and thank you so much for stopping by.  I appreciate each and every comment that is made!

Monday, May 16, 2016

Gifts of Stationery

I worked on a project this afternoon with the new Papertrey Ink Make-It Market Kit called, Don't Forget to Write.  There's only a few hours left to pre-order one so if you want it don't wait.

I confess -- I had to go to Dictionary.com to check and see which spelling was correct for this word since there is also Stationary.  For the note card or writing paper variety, Stationery is correct.  This kit was intended to make beautiful stationery for yourself or as a gift. My sweet friend, Lorie, has a birthday in just a few days and I wanted to make my first set of note cards as a gift for her. She is very thoughtful and always sends thank you notes for the smallest little kindness so I know she will use these.

I made all vertical cards except for this first one. All of the cards bases except the 2nd one are made from Papertrey Ink's Stamper's Select White Cardstock.  I buy Invitation Envelopes from a variety of sources as I need them, in packs of 100. If a need a special size, I make my own in a coordinating paper, something I often do for Wedding Cards.

I started this project yesterday afternoon by cutting several of the flower bouquet outlines from white cardstock so that I could kind of mass produce in a variety of colors; all of the leaves and stems first then each layer of color in order of the instructions.  This did take a little bit of practice getting everything lined up but I was super happy with how many of these I could complete and how well.  As usual, I used a negative of one of the die cuts to be my placeholder for my stamping. Because I always sacrifice one die cut to be my visual guide, I was able to stamp the rest of them cleanly.

I think the colors may be difficult to determine in the photographs so I'll tell you what colors I used for each of the cards.  For this first one, on the bouquets I used Lovely Lady, Hibiscus Burst, Sweet Blush, Sahara Sand and Tempting Taupe, the latter two being from Stampin' Up!  I don't have any Kraft inks from Papertrey as of yet and I liked that I could use a darker color and then a lighter one for the second layer of the leaves.  The cardstock I used here is Tempting Taupe with Regal Rose.


This next card uses Berry Sorbet, Sahara Sand, Tempting Taupe, Sweet Blush, Lovely Lady and Hibiscus Burst.  The background panel is cut from Calypso Coral. This card base was made from Tempting Taupe Cardstock.


For this card, I used Tempting Taupe for my background panel and also as one of the leaf colors. In addition to that, I used Sahara Sand, Lovely Lady, Sweet Blush, and Hibiscus Burst.


The final card features New Leaf, Mint Julep, Winter Wisteria, Amethyst Allure, Tropical Teal, Hawaiian Shores, and Autumn Rose.  The background panel is cut from Tropical Teal Cardstock.


So there you have it.  I will be entering one of these cards over on the Word Art Wednesday Challenge Blog as well as the Simon Says Stamp Wednesday Challenge Blog which is Flowers this week.  I have discovered that I can actually put my Papertrey White Cardstock in my printer and print on it so I am excited that in the future, I will be able to use some of the word art they provide with each challenge.

Thanks so much for stopping by today!  I'm off to figure out what my next project will be.  One of the Challenges uses an inspiration photo from a challnge I've participated in before, so I'll be trying to figure out how to make something new and different from the previous project.